Zenith

Installation guide

How to configure your subscription

Zenith TV
Zenith TV installation wizard
Optimized - auto recommendations

Select your device: we're displaying the app the most suitable with clear steps.

Step 1 - Choose your device
SMART TV(Samsung, LG)
ANDROID(Phone/Tablet)
APPLE(iPhone / iPad)
APPLE TV
CHROMECAST& Google TV
ANDROID TV(Sony, Philips, Sharp TVs...)
ANDROID BOXES(Nvidia Shield, T95, Onn, Buzz TV...)
ROKU / HISENSE(TV with integrated Roku OS)
FIRESTICK& Fire TV
FORMULER(Z8 / Z10 / Z11...)
COMPUTER(Windows)
COMPUTER(macOS)
MAG BOX(all models)
Recommended

Smarters Pro - Smart TV (Samsung, LG)

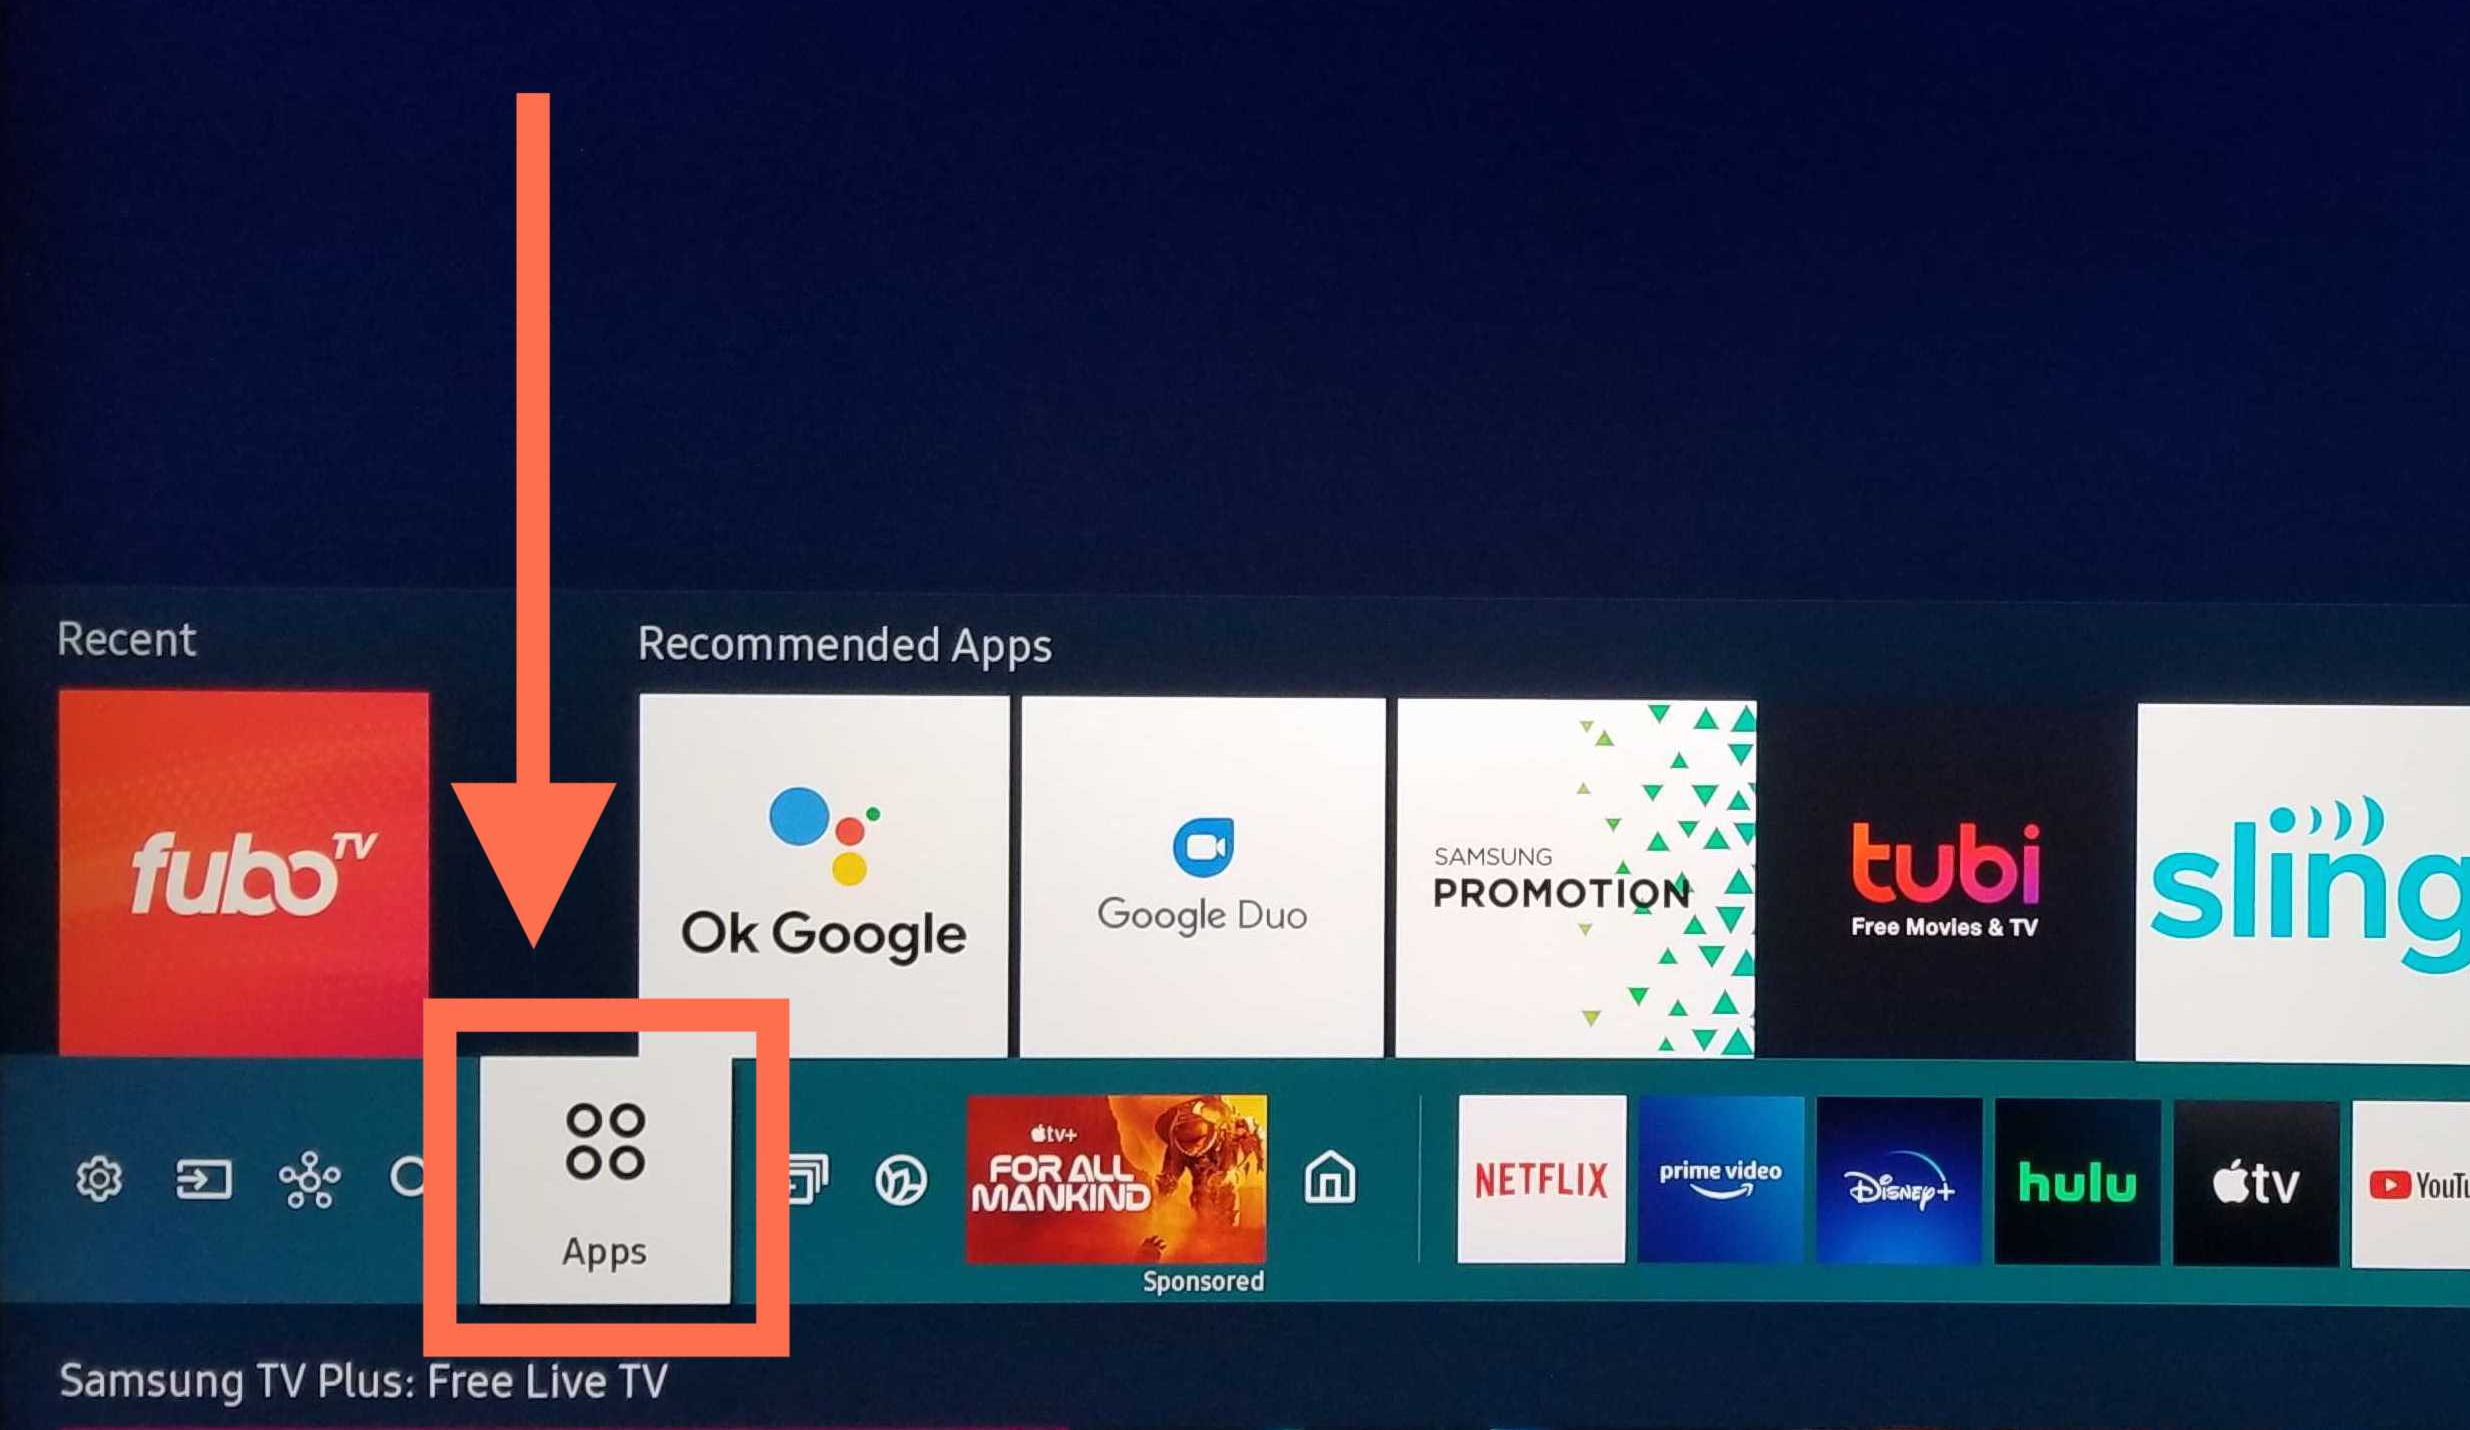
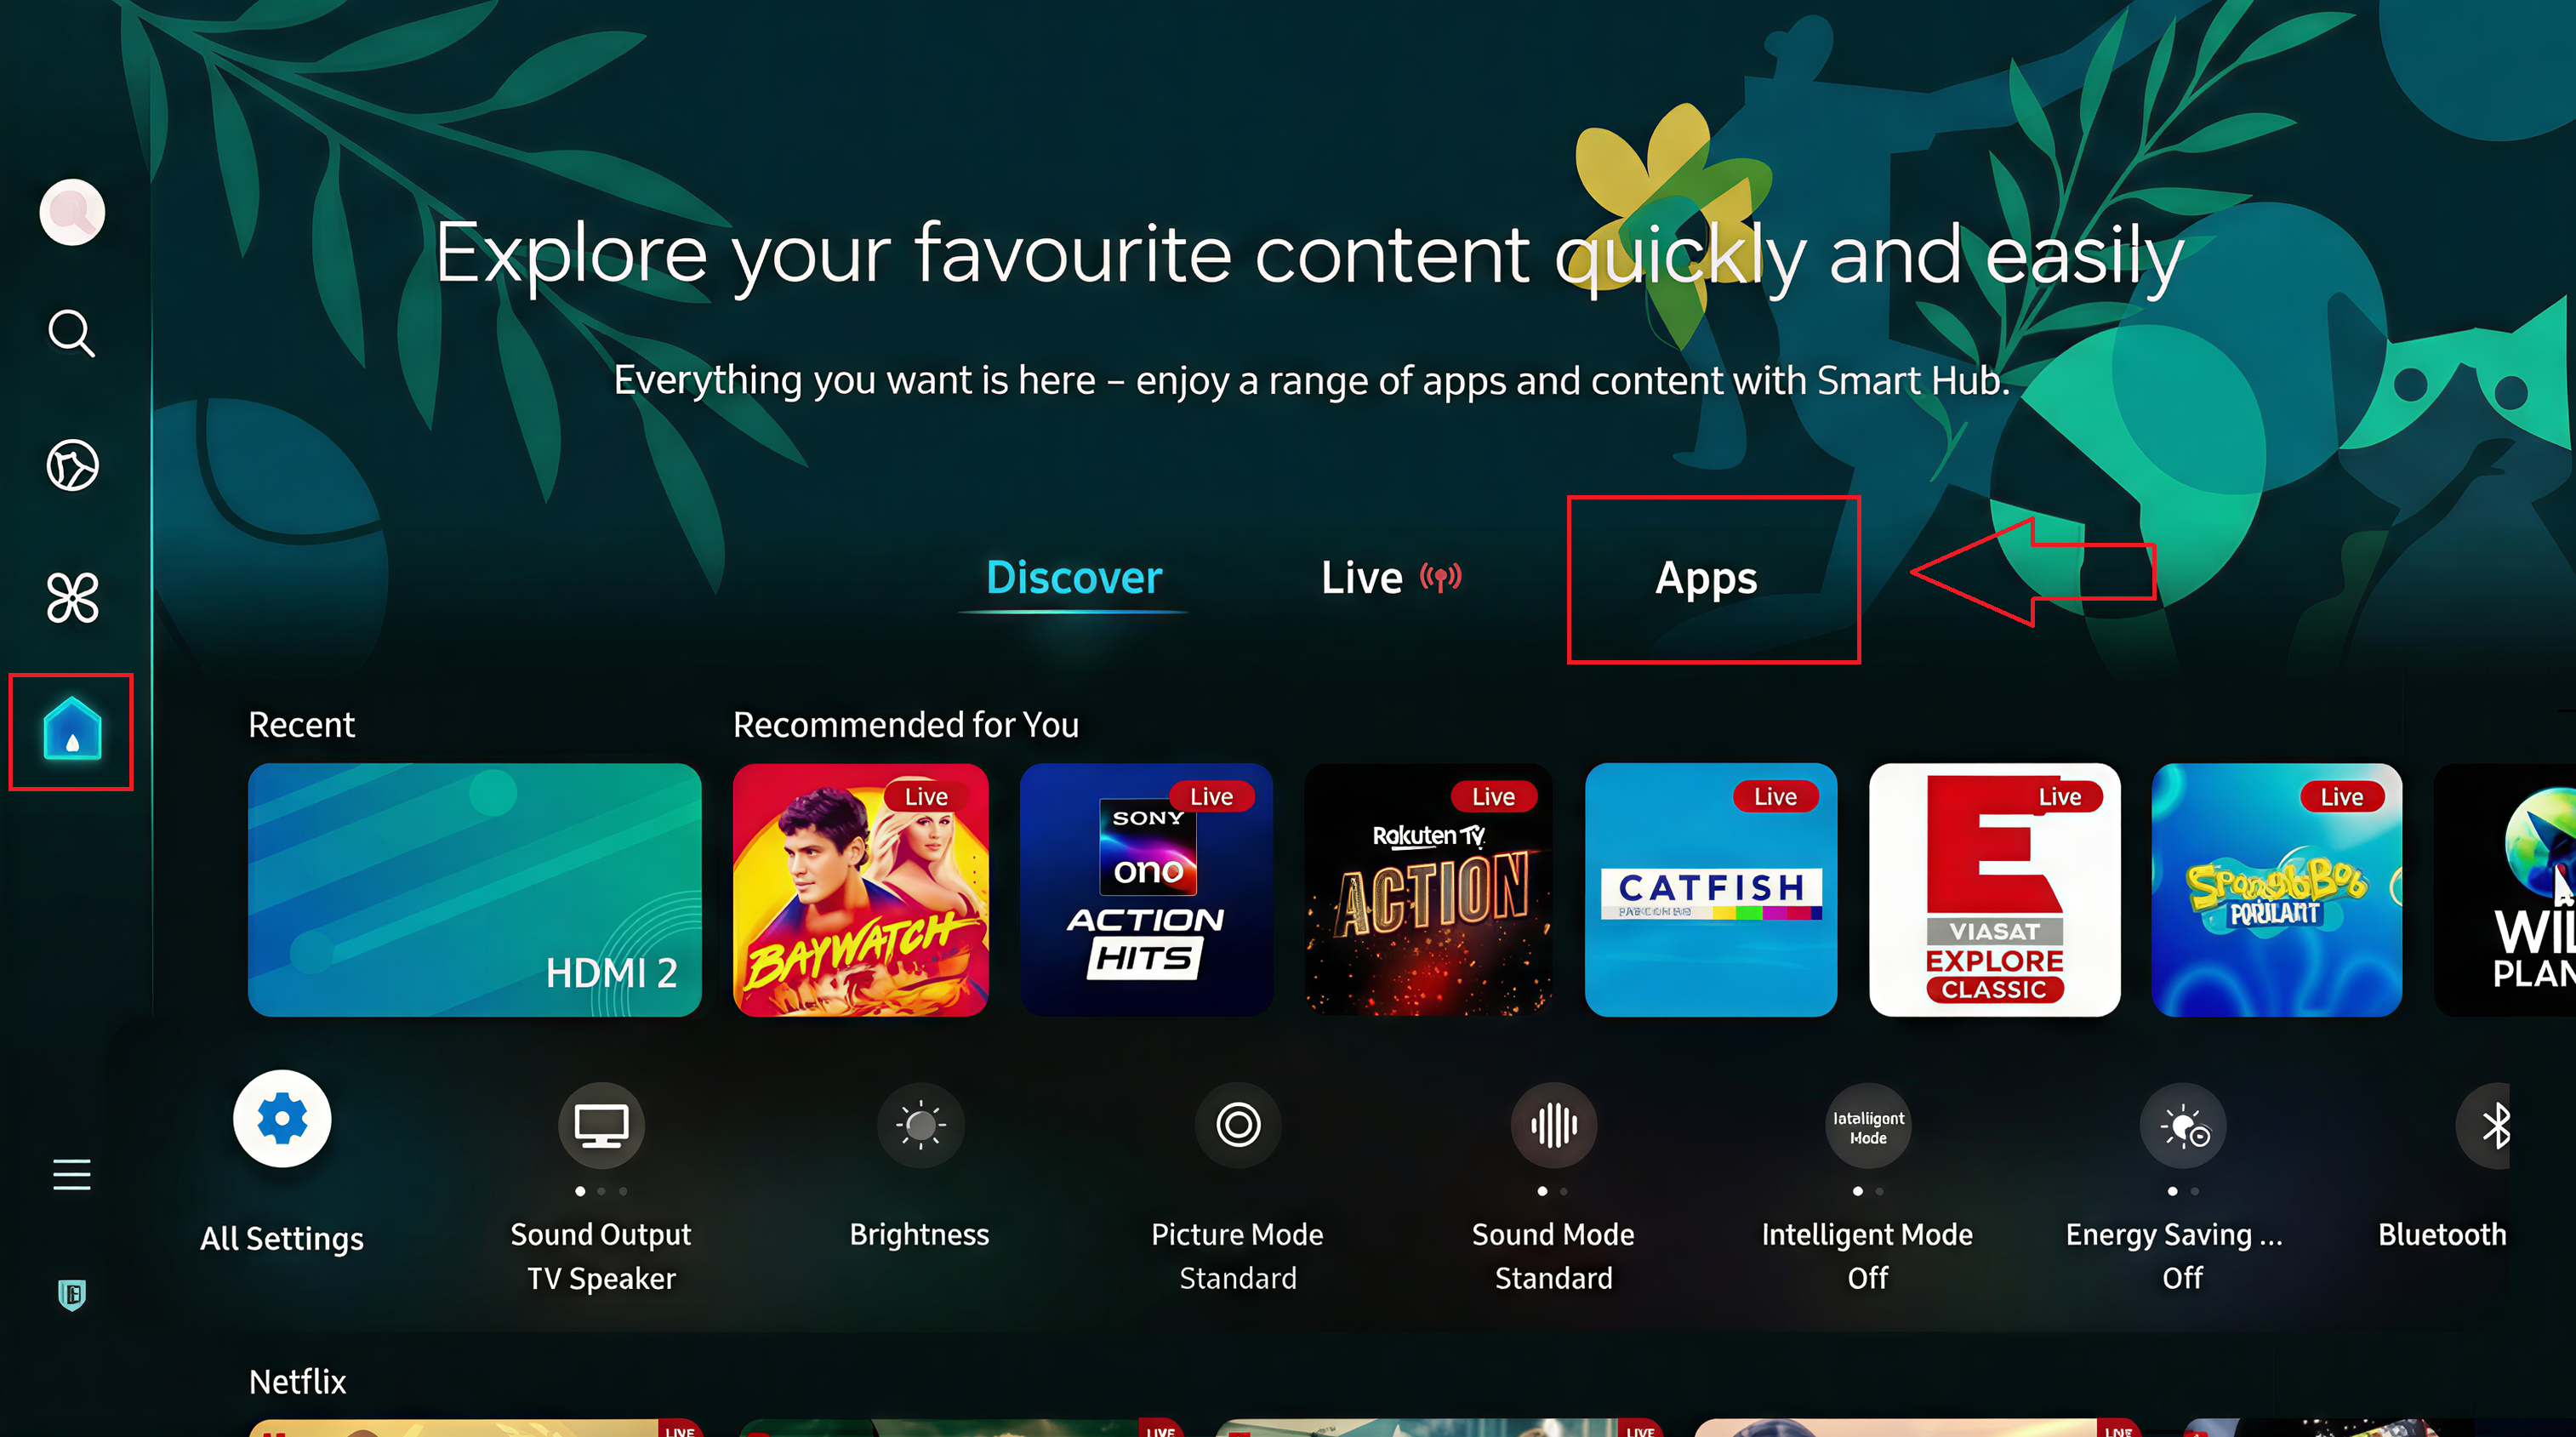
Step 1: Access the Smart Hub / Applications menu

On your Samsung or LG TV, use your remote control to access the Smart Hub or application menu. This is the platform where you can find and install applications on your TV.

Smart TV - Access the Apps menu

Smart TV - Applications menu

Step 2: Application search

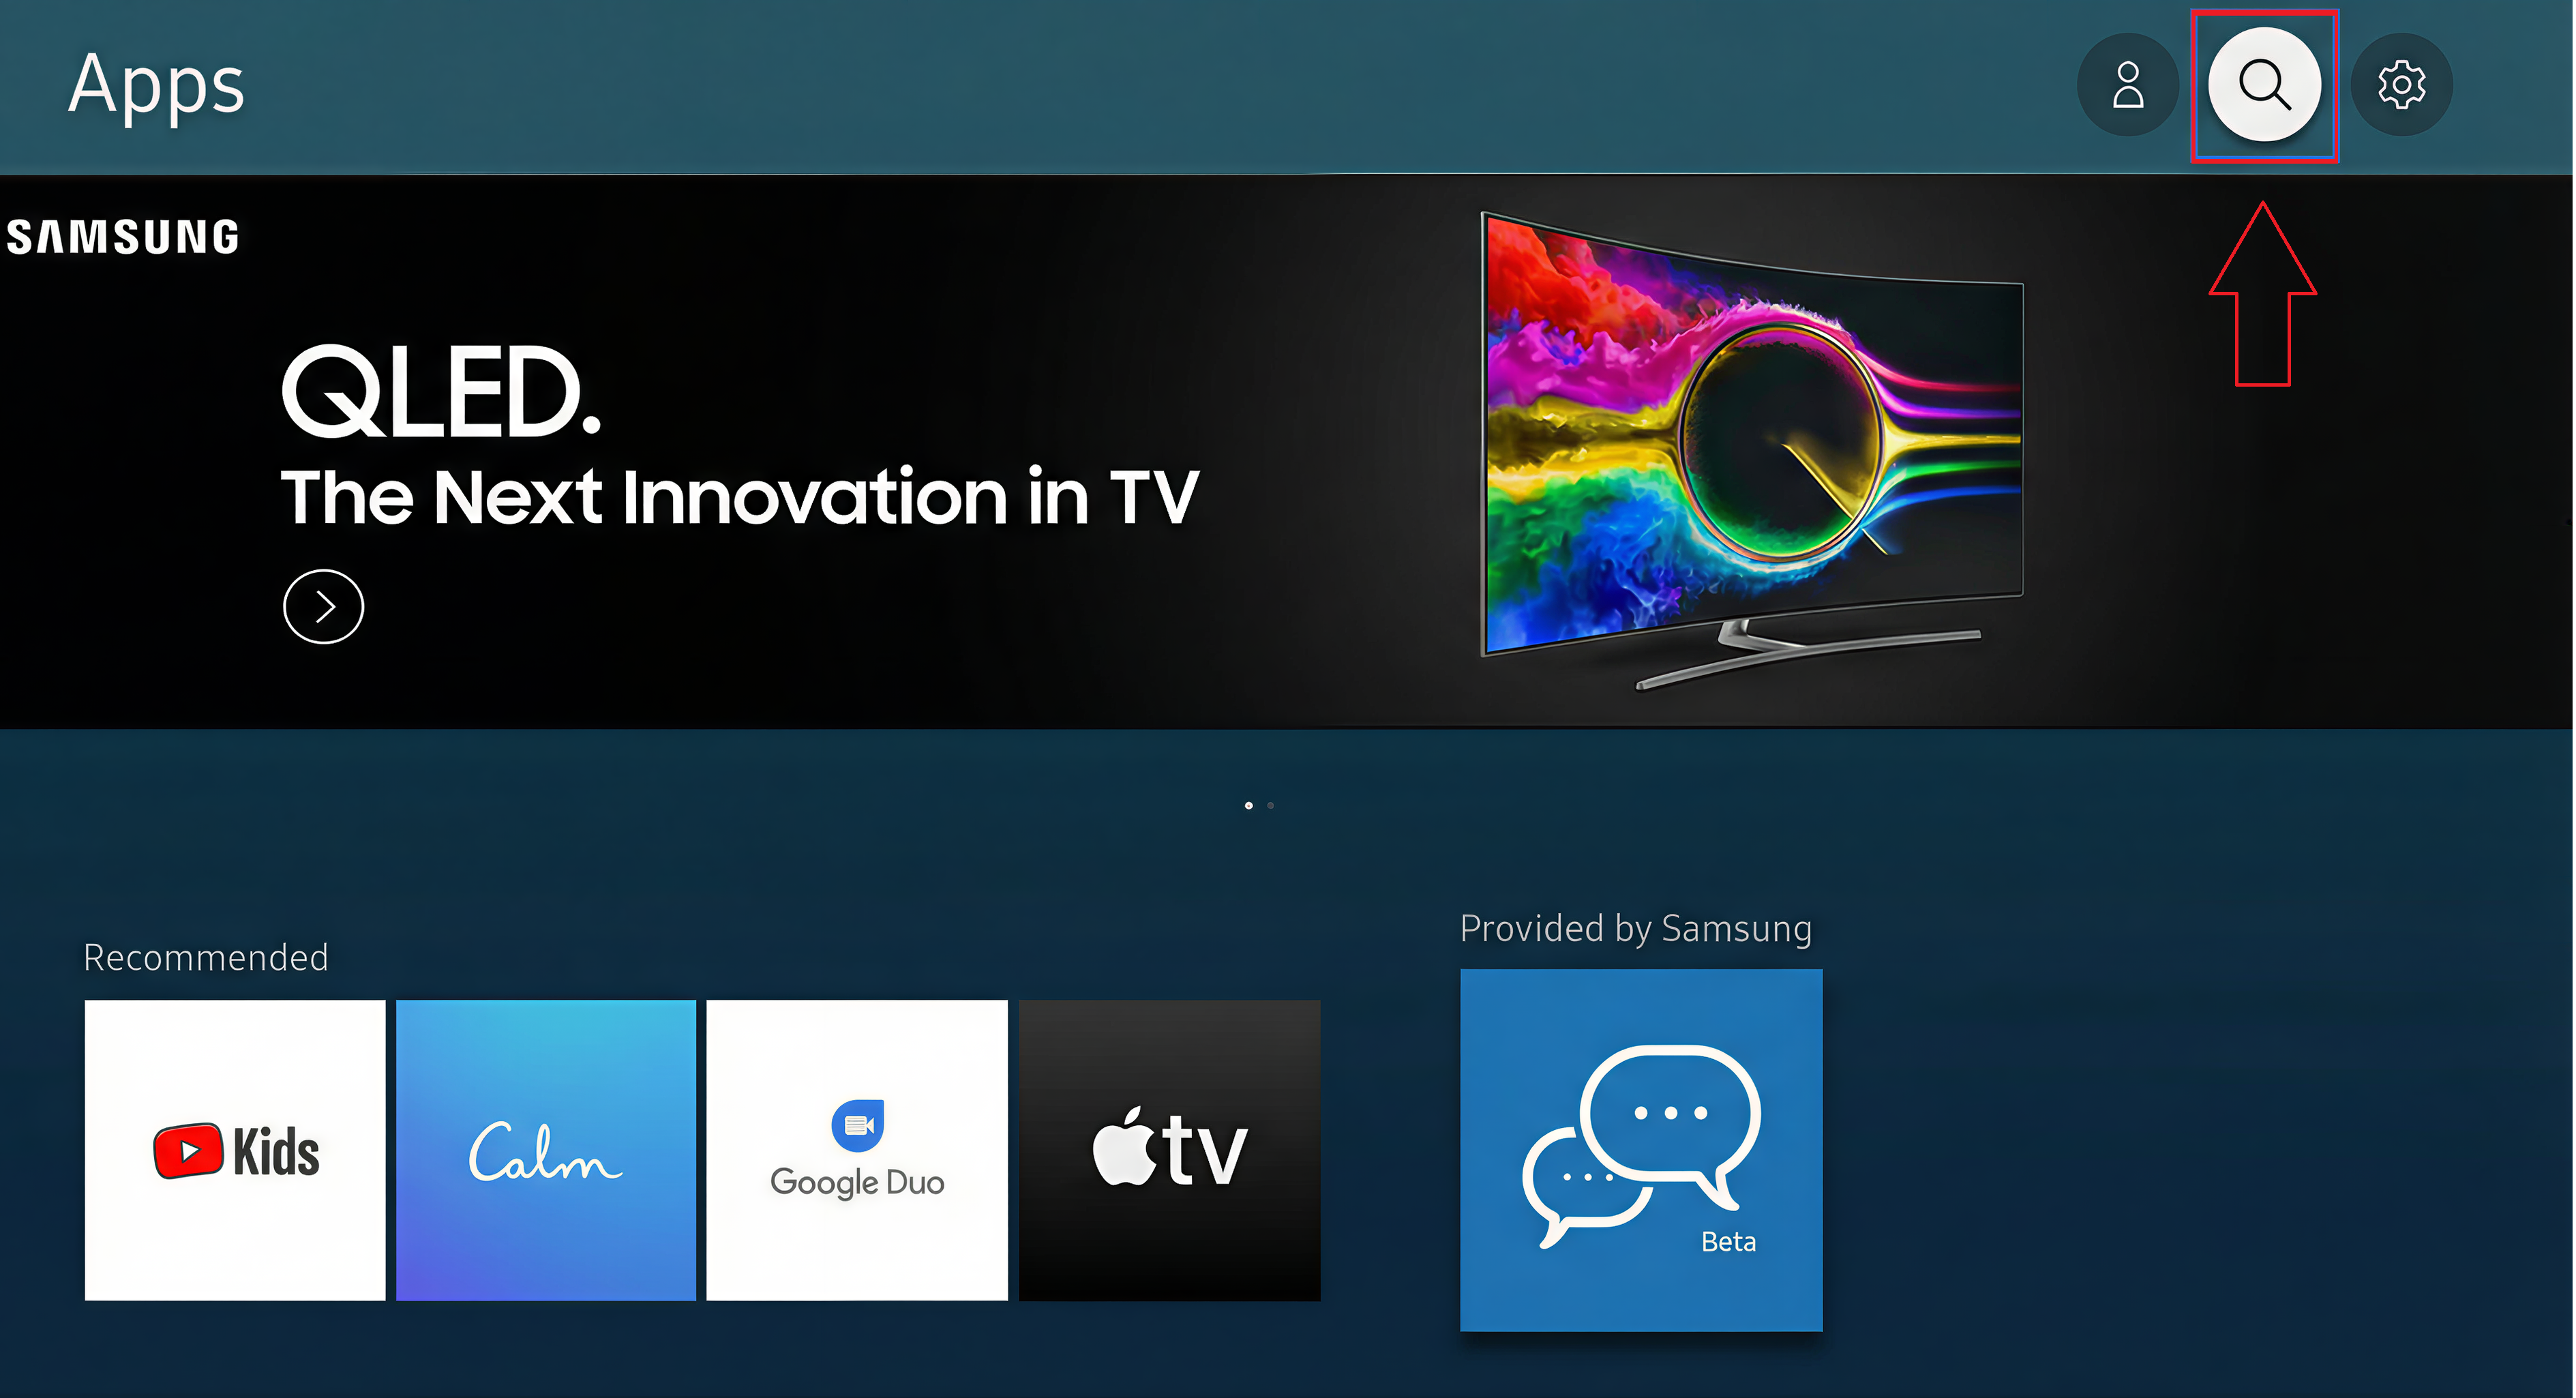
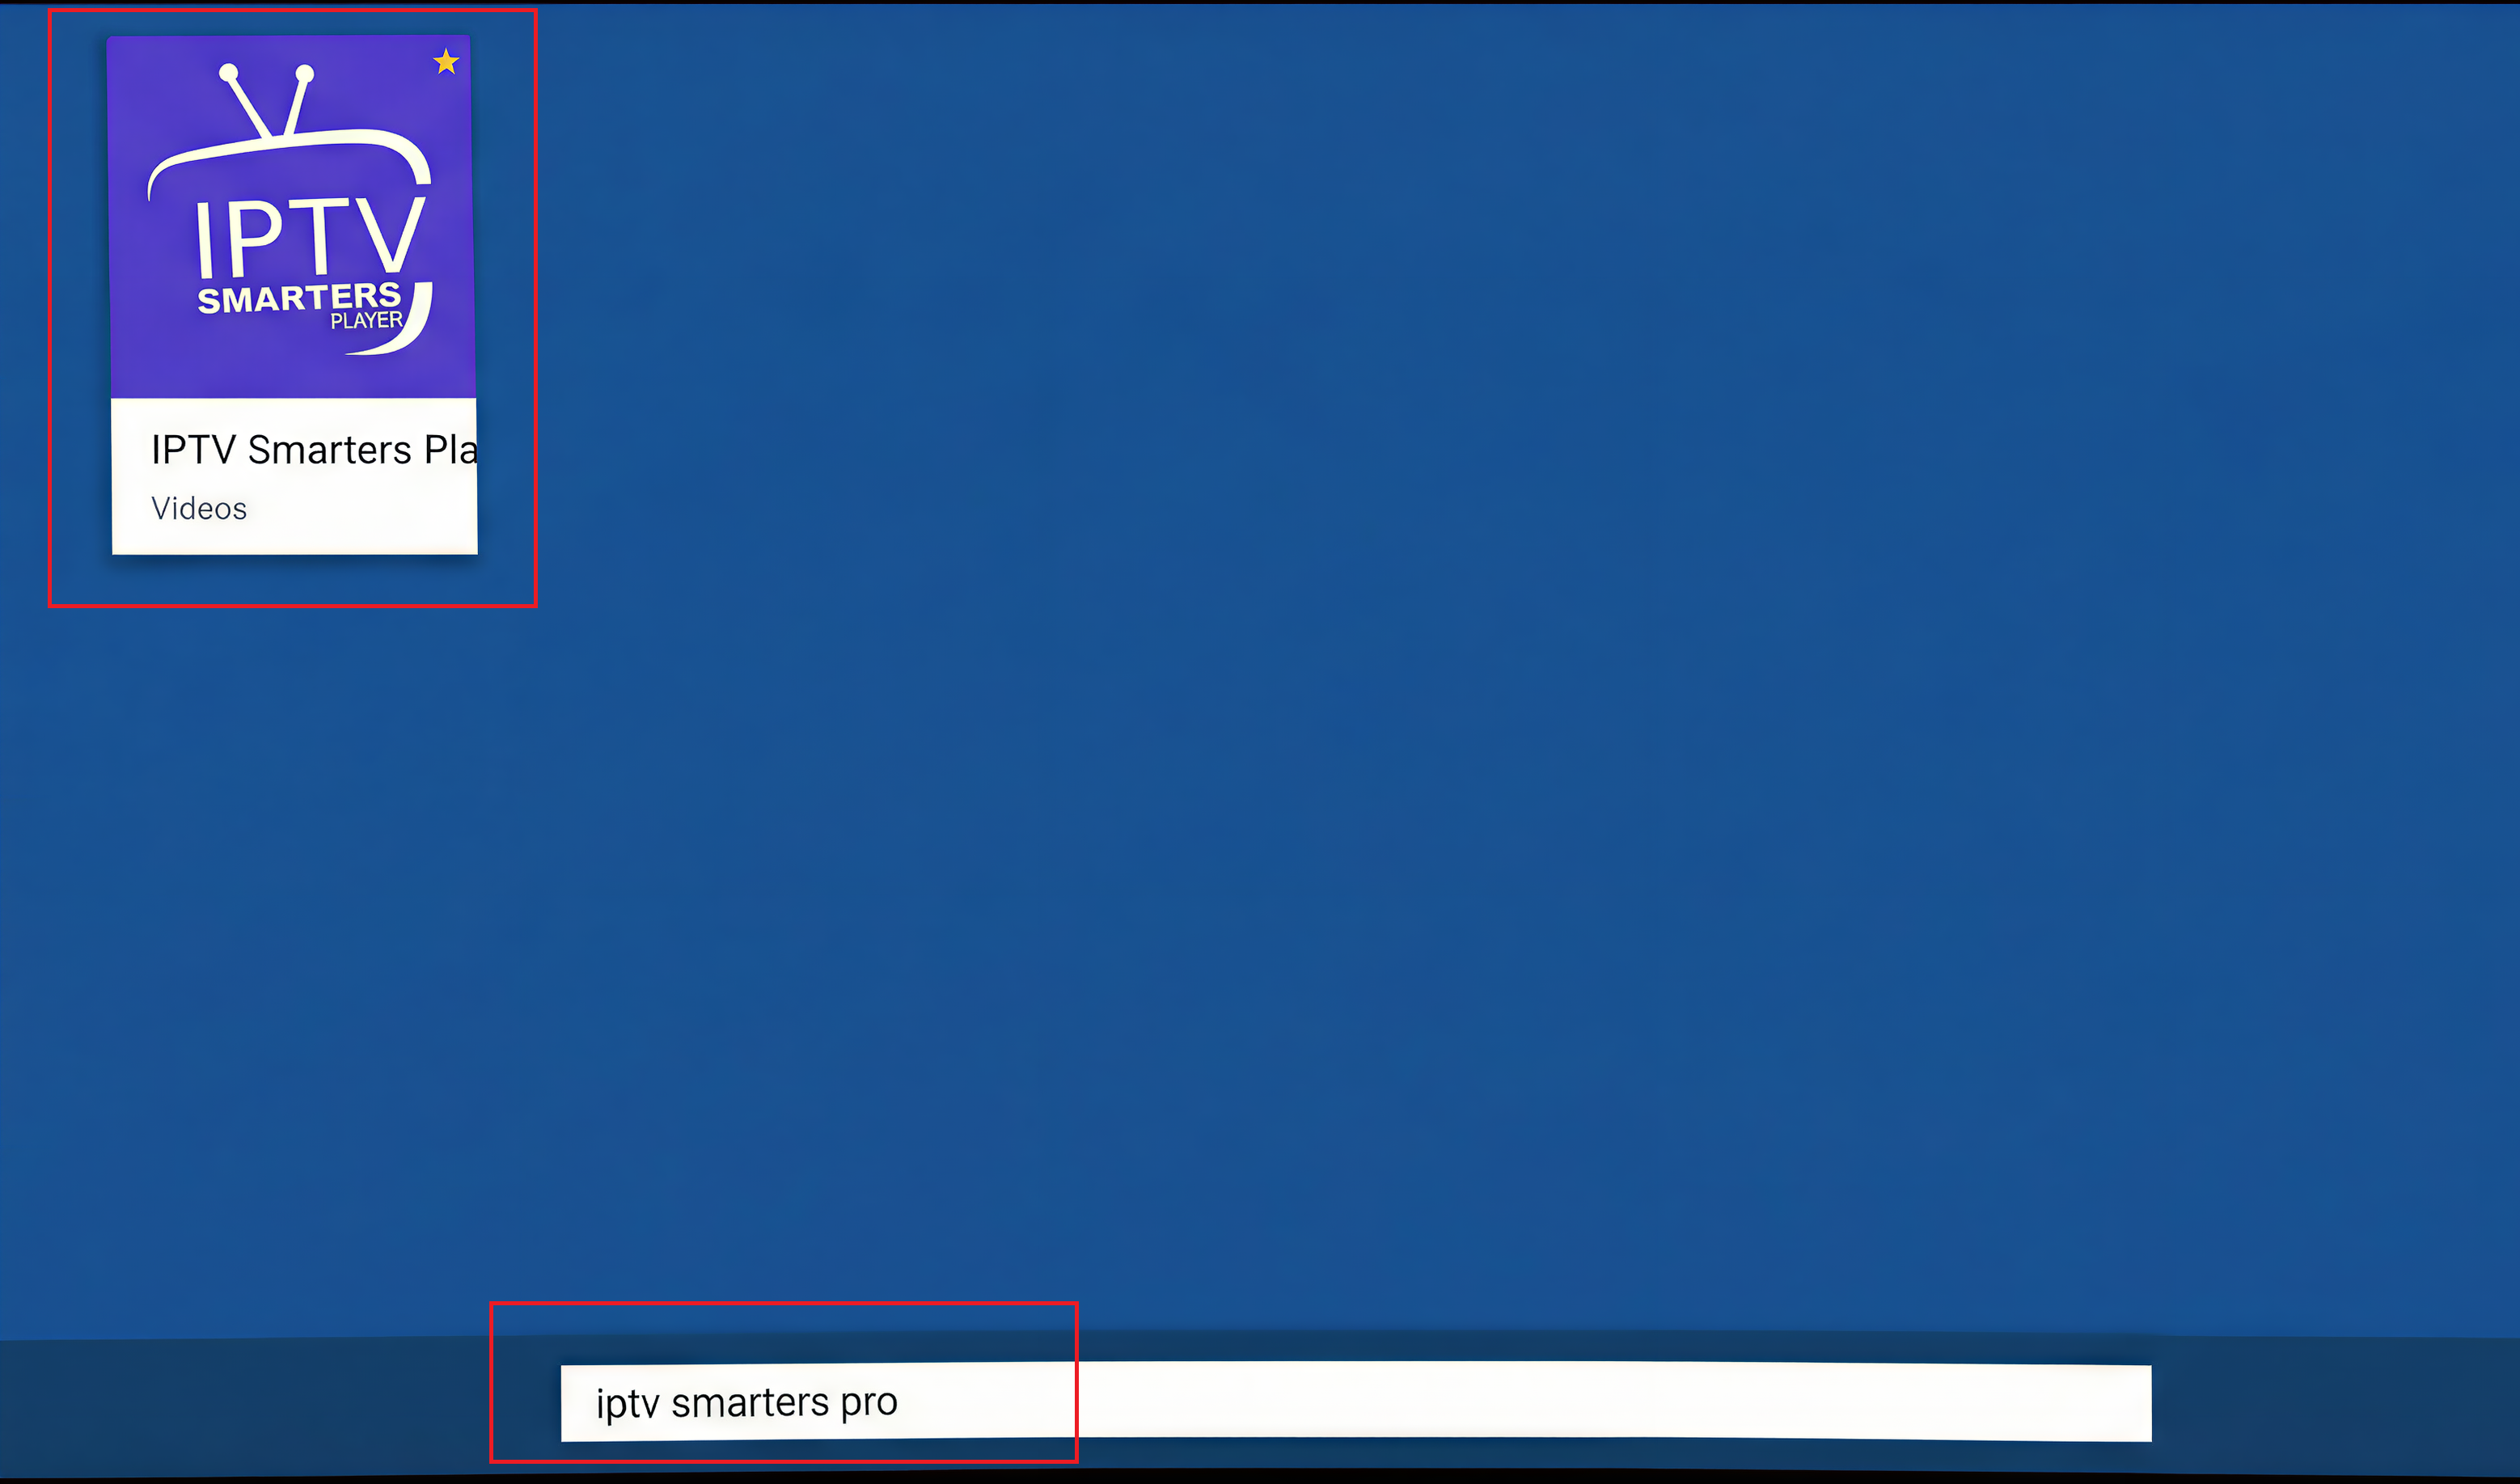
Once in the Smart Hub, use the search function to find the Smarters Pro app. You can type "smarters pro" into the search bar and press Enter.

Smart TV - Search icon

Smart TV - Search Smarters Pro

Step 3: Download and Installation

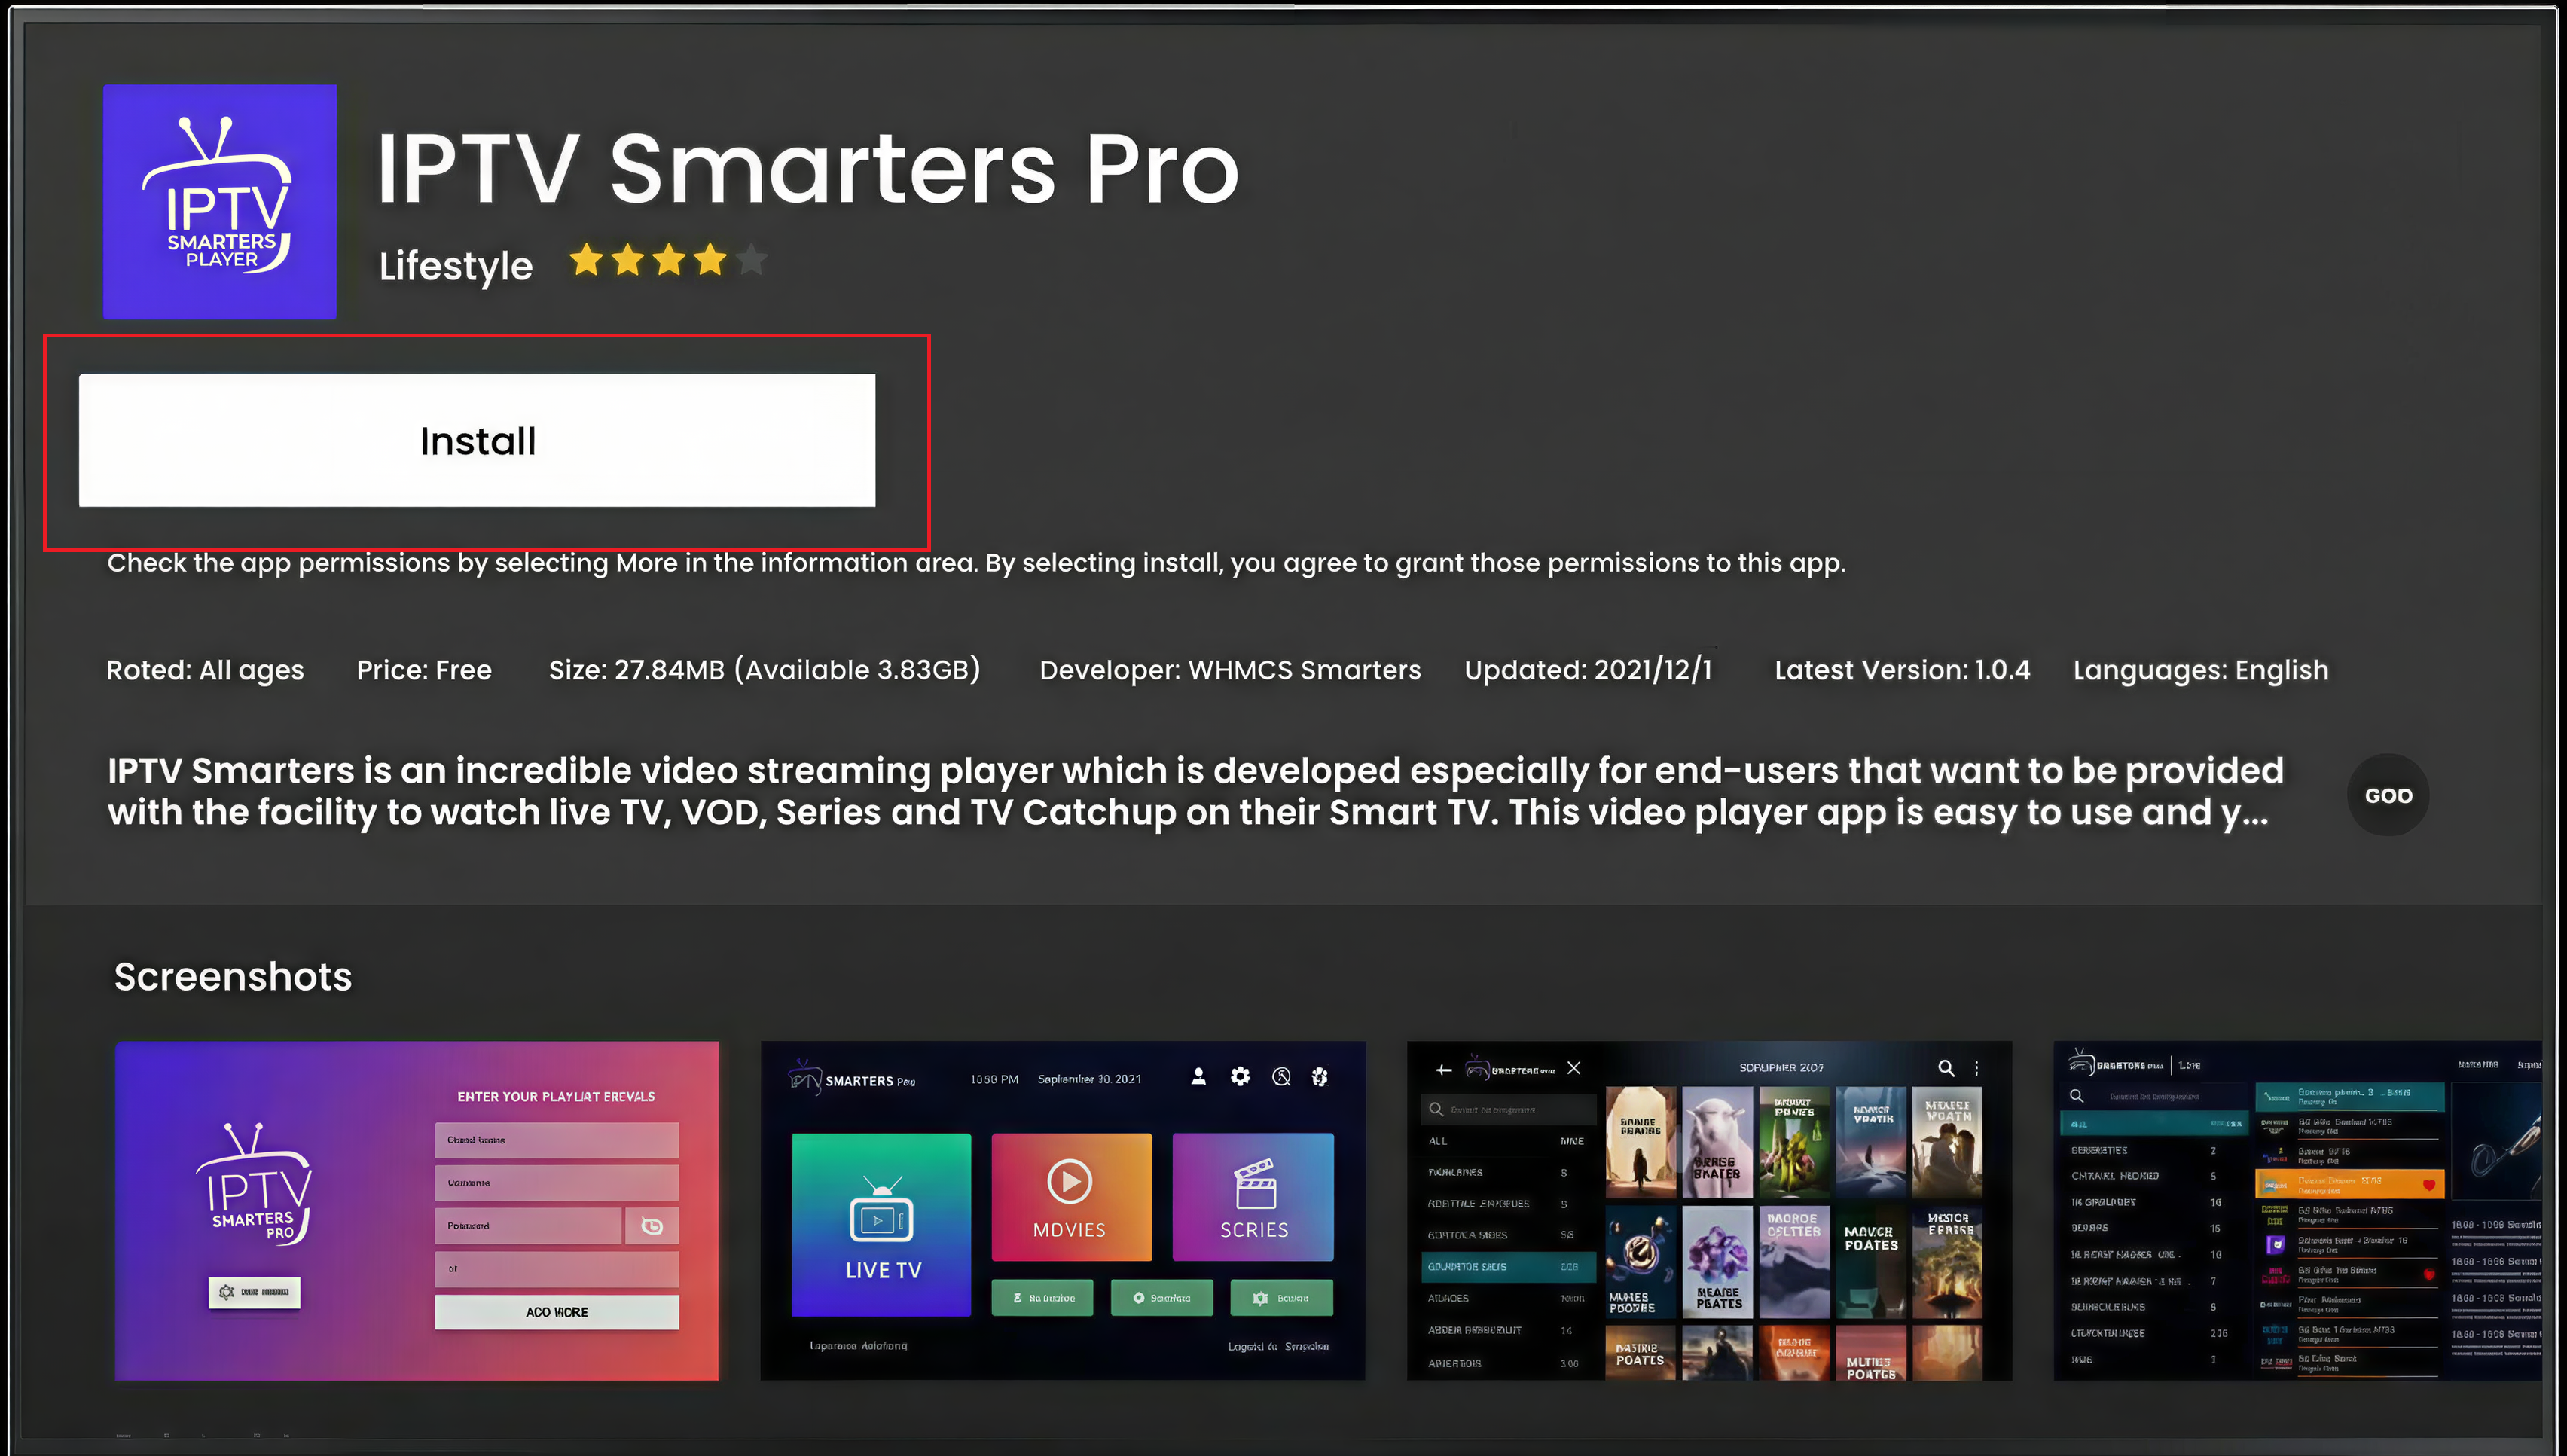
Once you've found the Smarters Pro application, select it to display the details. Then click on the install button and wait for the process to complete. Once the download is complete, the application will be automatically installed on your TV.

Smart TV - Install button

Step 4: Login to Your Account

Once installation is complete, open the Smarters Pro application on your TV. The application will sometimes ask you which connection mode to use, so please always choose "XStream Codes API". All that's left to do is enter the connection details you've been sent.

Smarters Pro - Connection / XStream Codes API

Step 5: Take advantage of our service

Congratulations on your purchase! You're now ready to enjoy our service on your Samsung or LG TV. Browse our catalog of channels, movies and series to find your favorite content and start watching with ease.

If you have any questions or encounter any problems during installation, please do not hesitate to contact our customer service. We are here to help you.

Recommended

Zenith TV App - Android (Phones / Tablets)

Step 1: Download the APK file

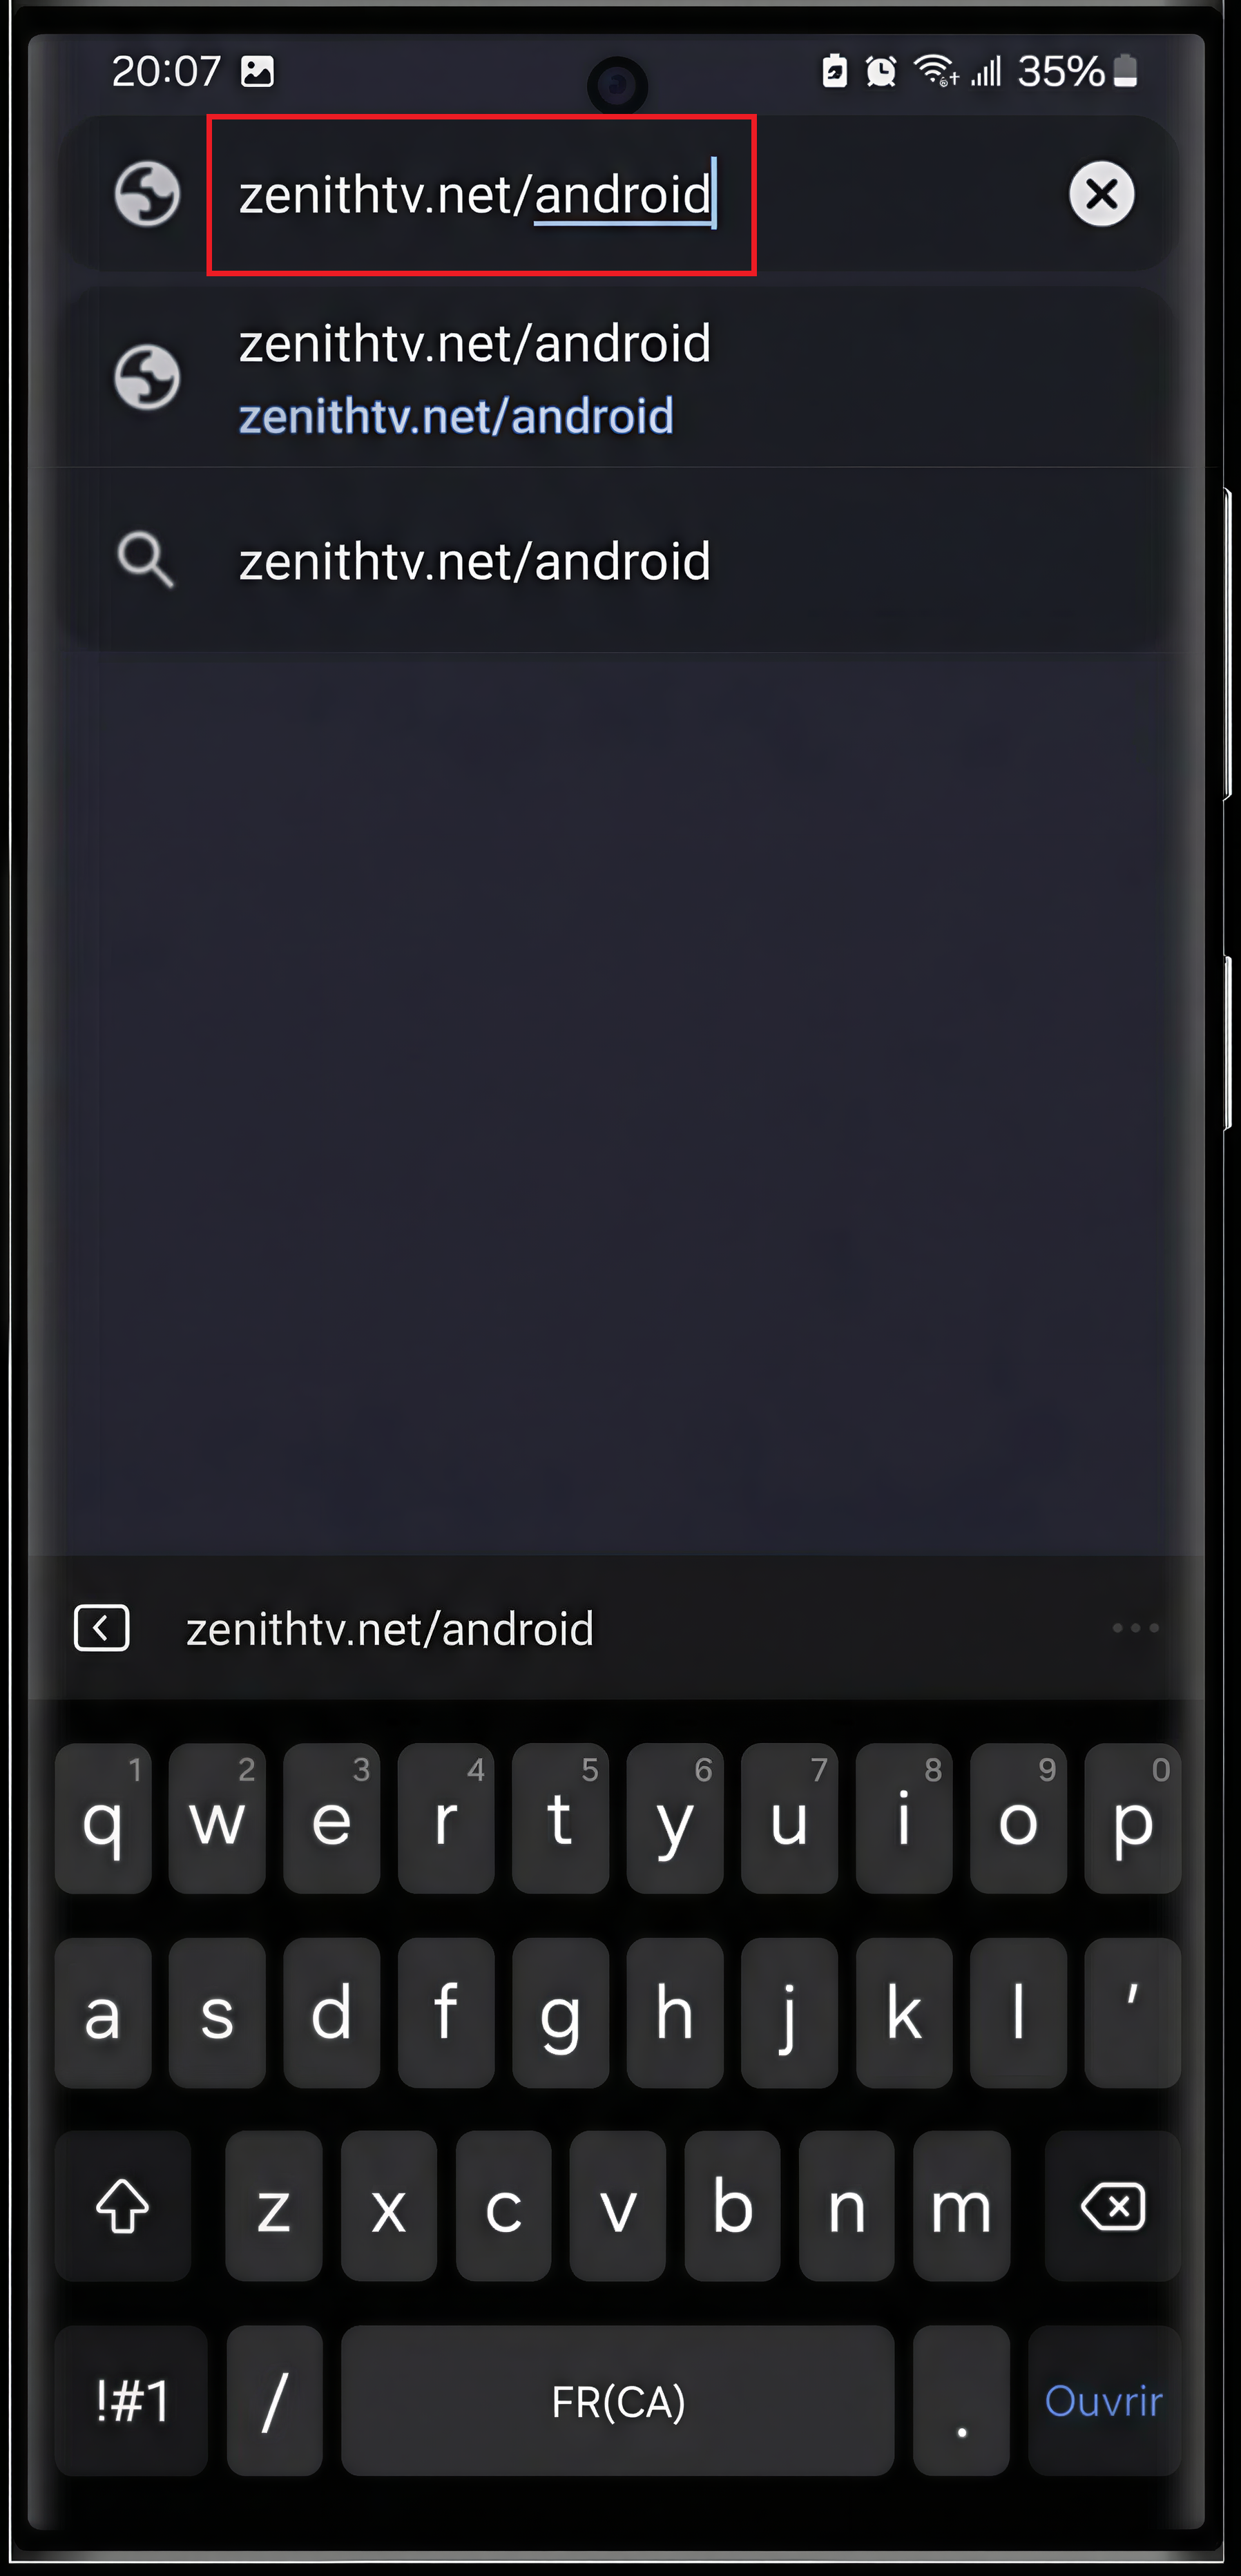
On your Android device, open Chrome (or your browser) and go to : https://zenithtv.net/android

Android - open zenithtv.net/android

Step 2: Confirm download (if Chrome displays a warning)

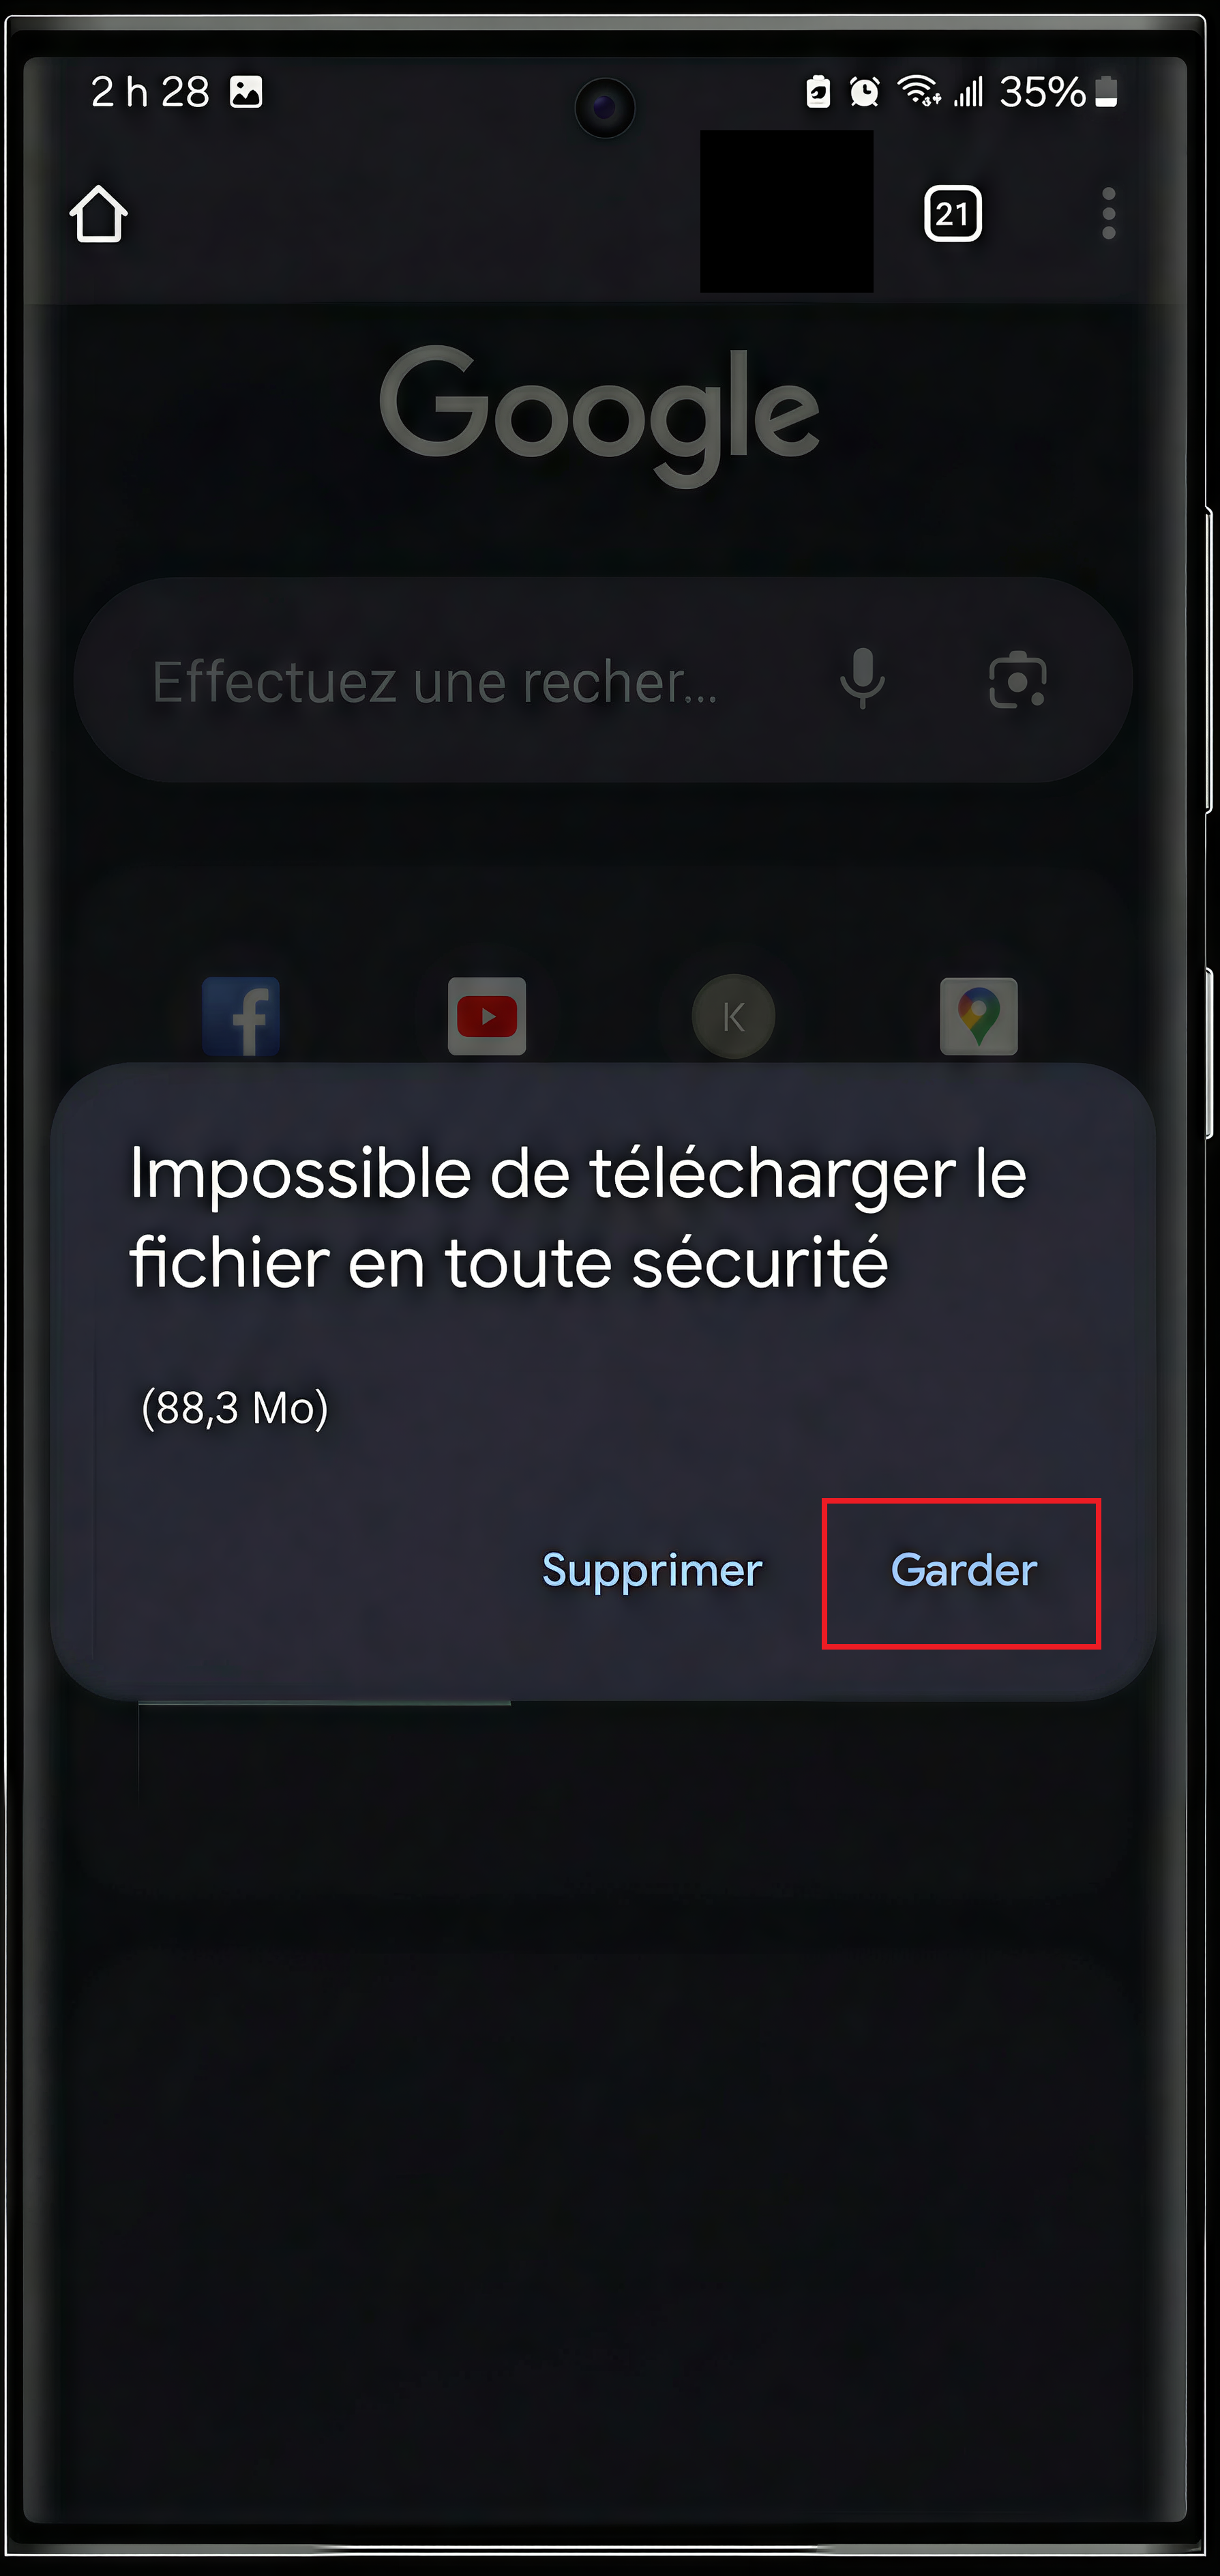
If a security message appears, press Keep to save the file.

Android - confirm download (Keep)

Step 3: Open the downloaded file

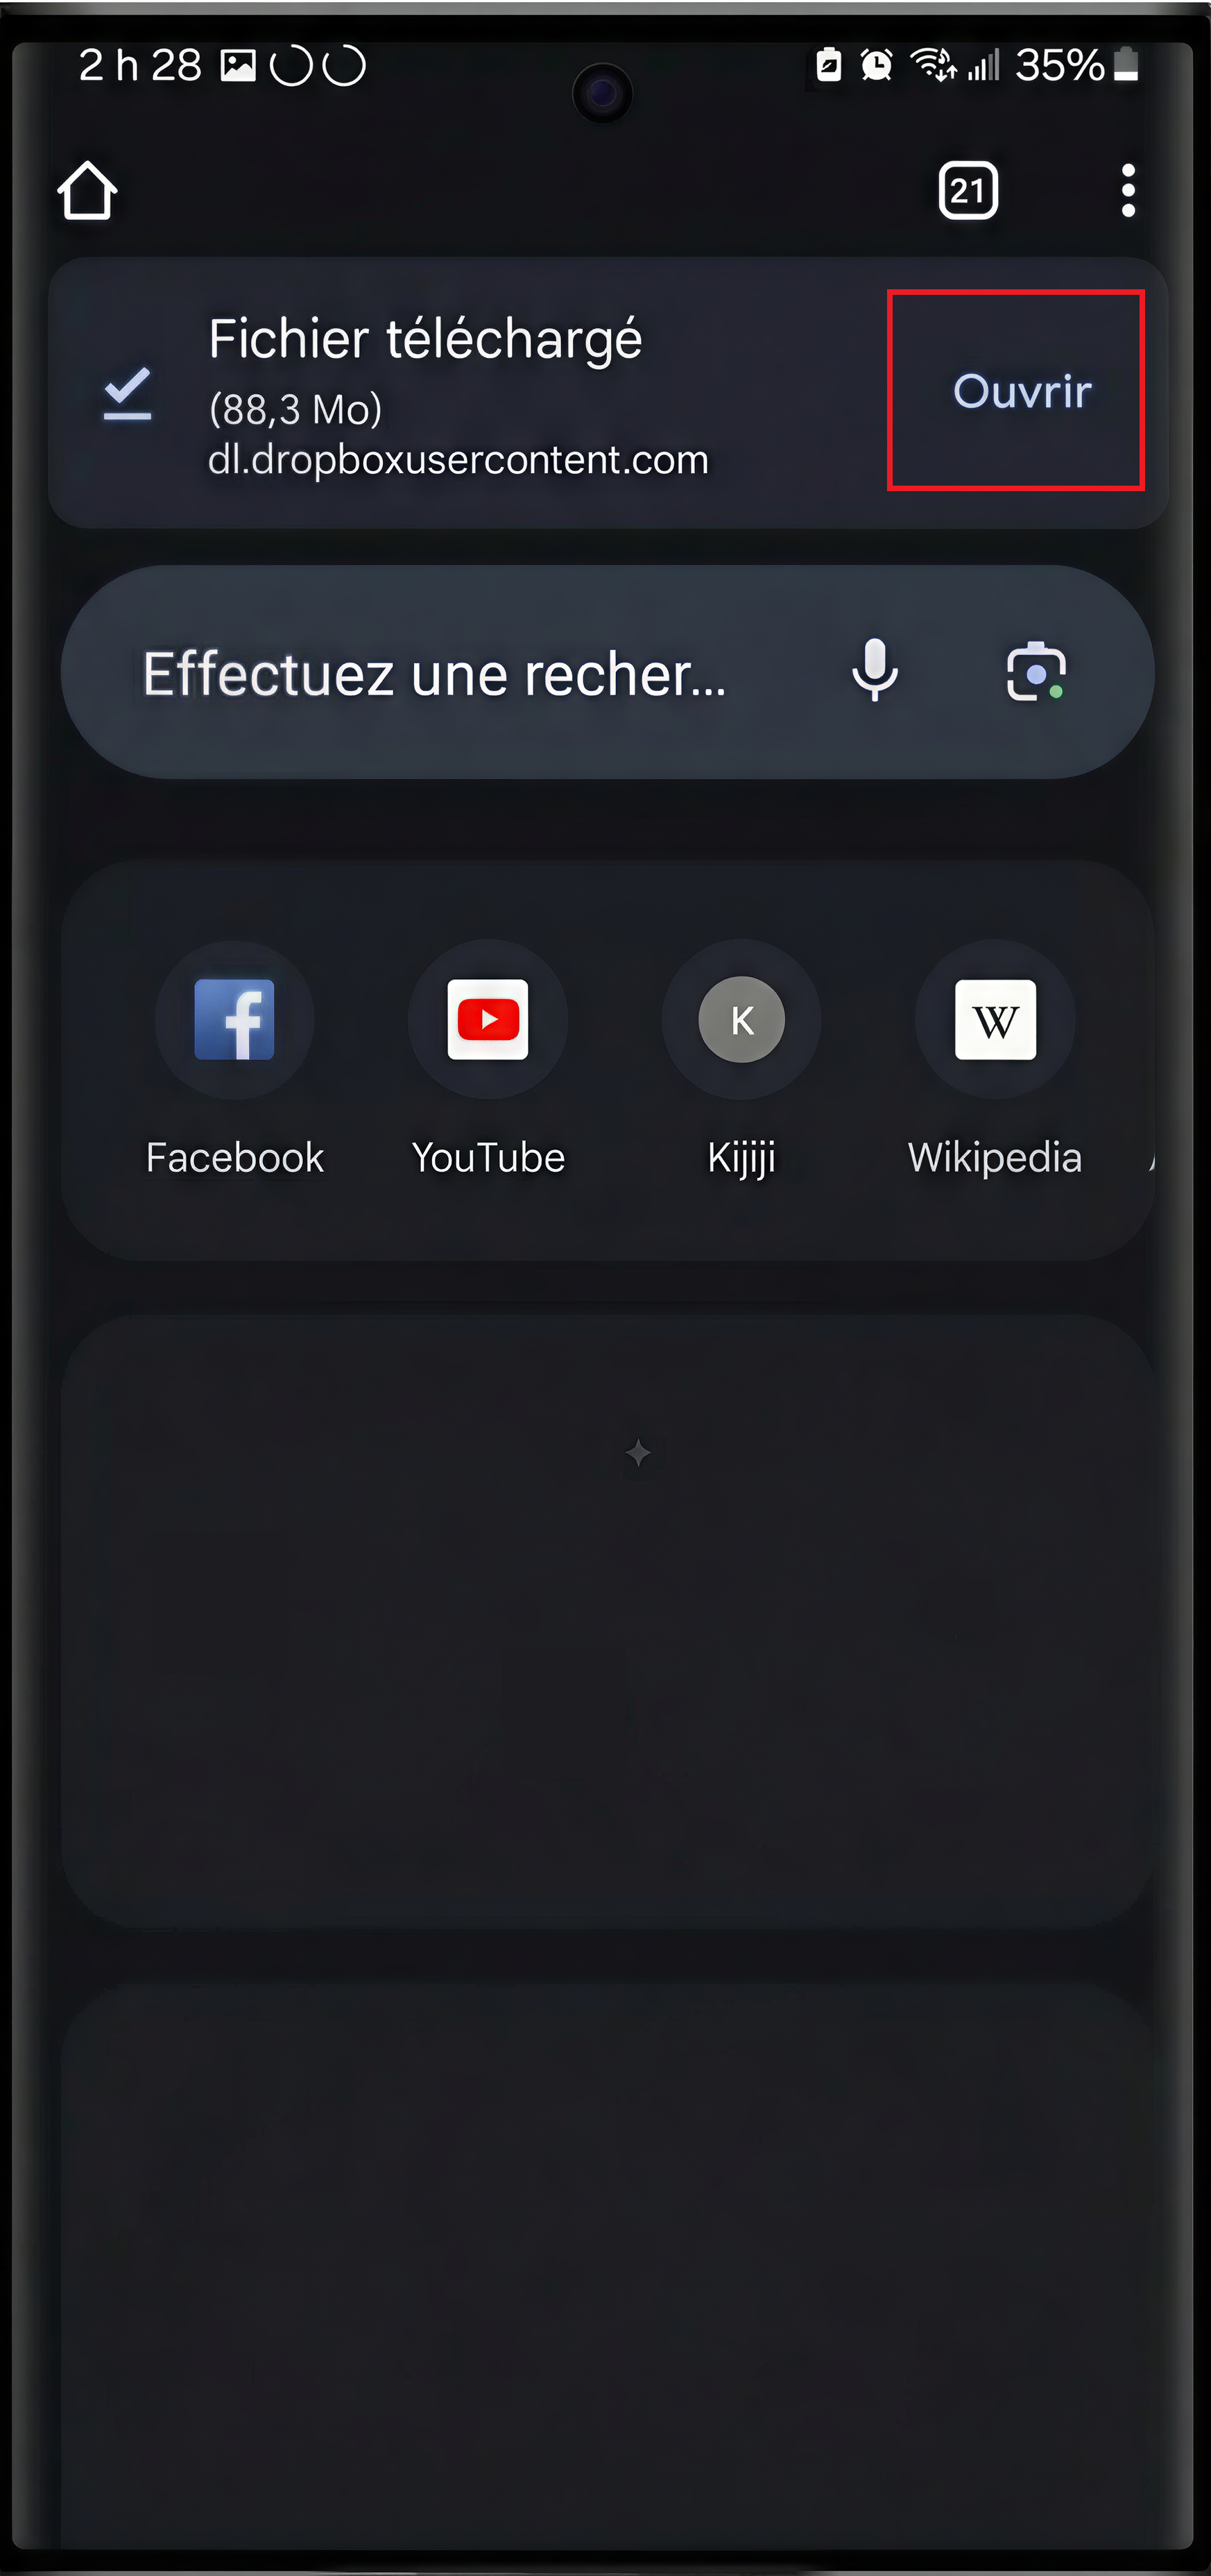
Once the file has been downloaded, press Open.

Android - downloaded file (Open)

Step 4: Authorize installation (if Android blocks the source)

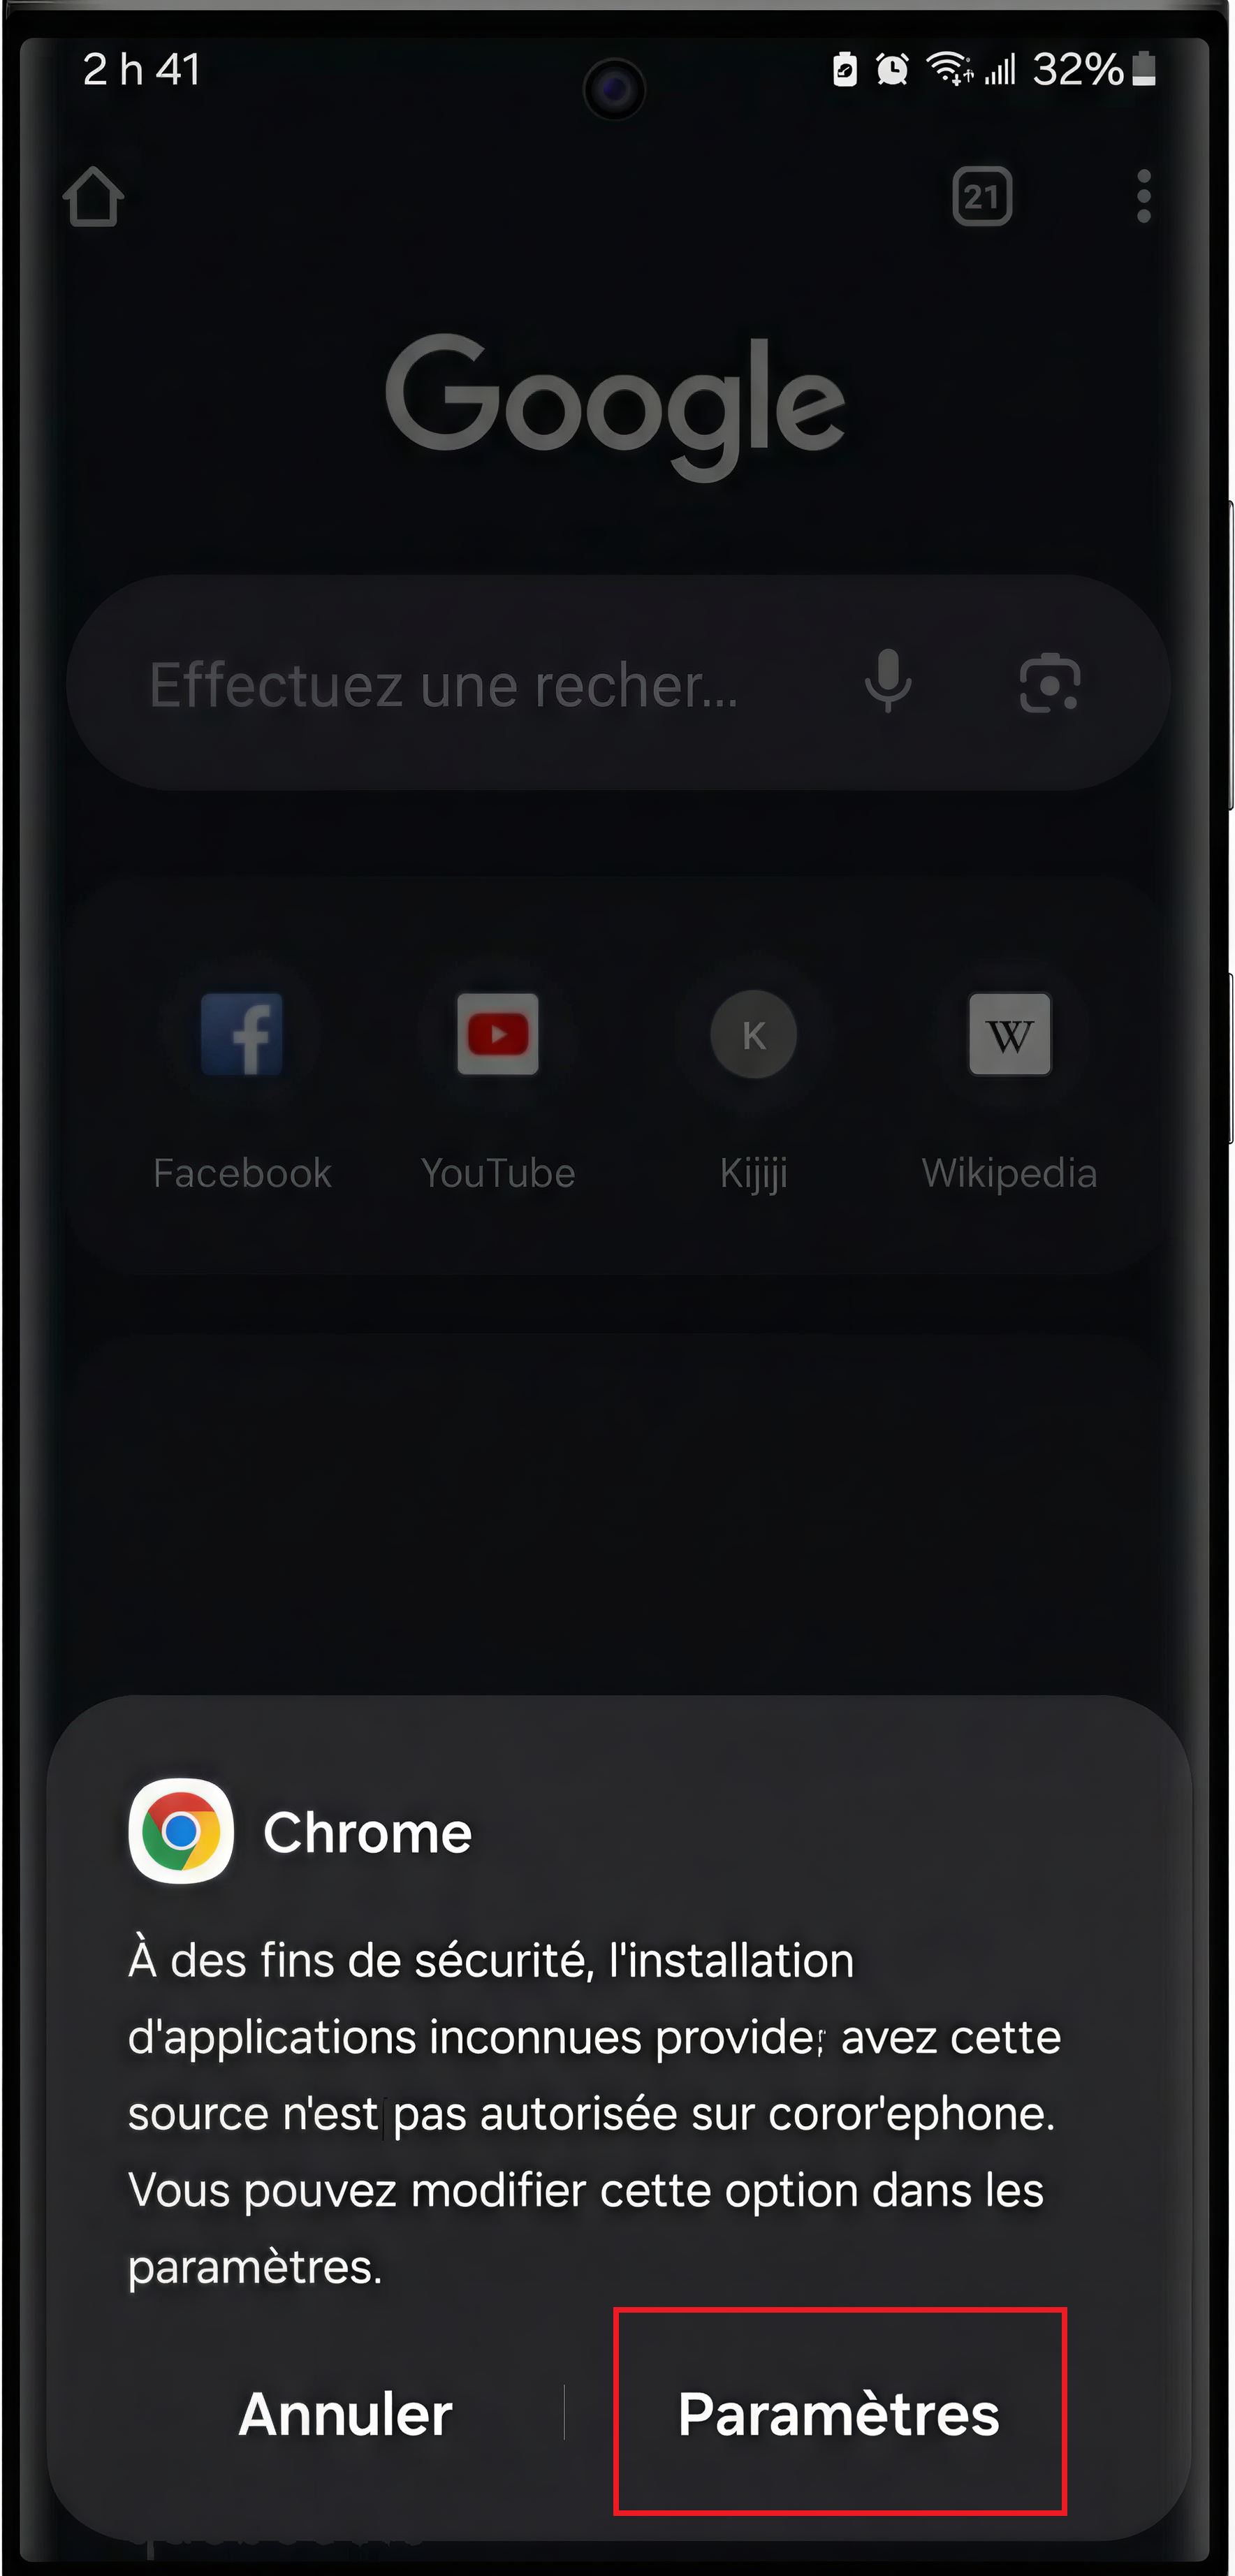
If Android indicates that installation from this source is not authorized, press Parameters.

Android - installation blocked (Settings)

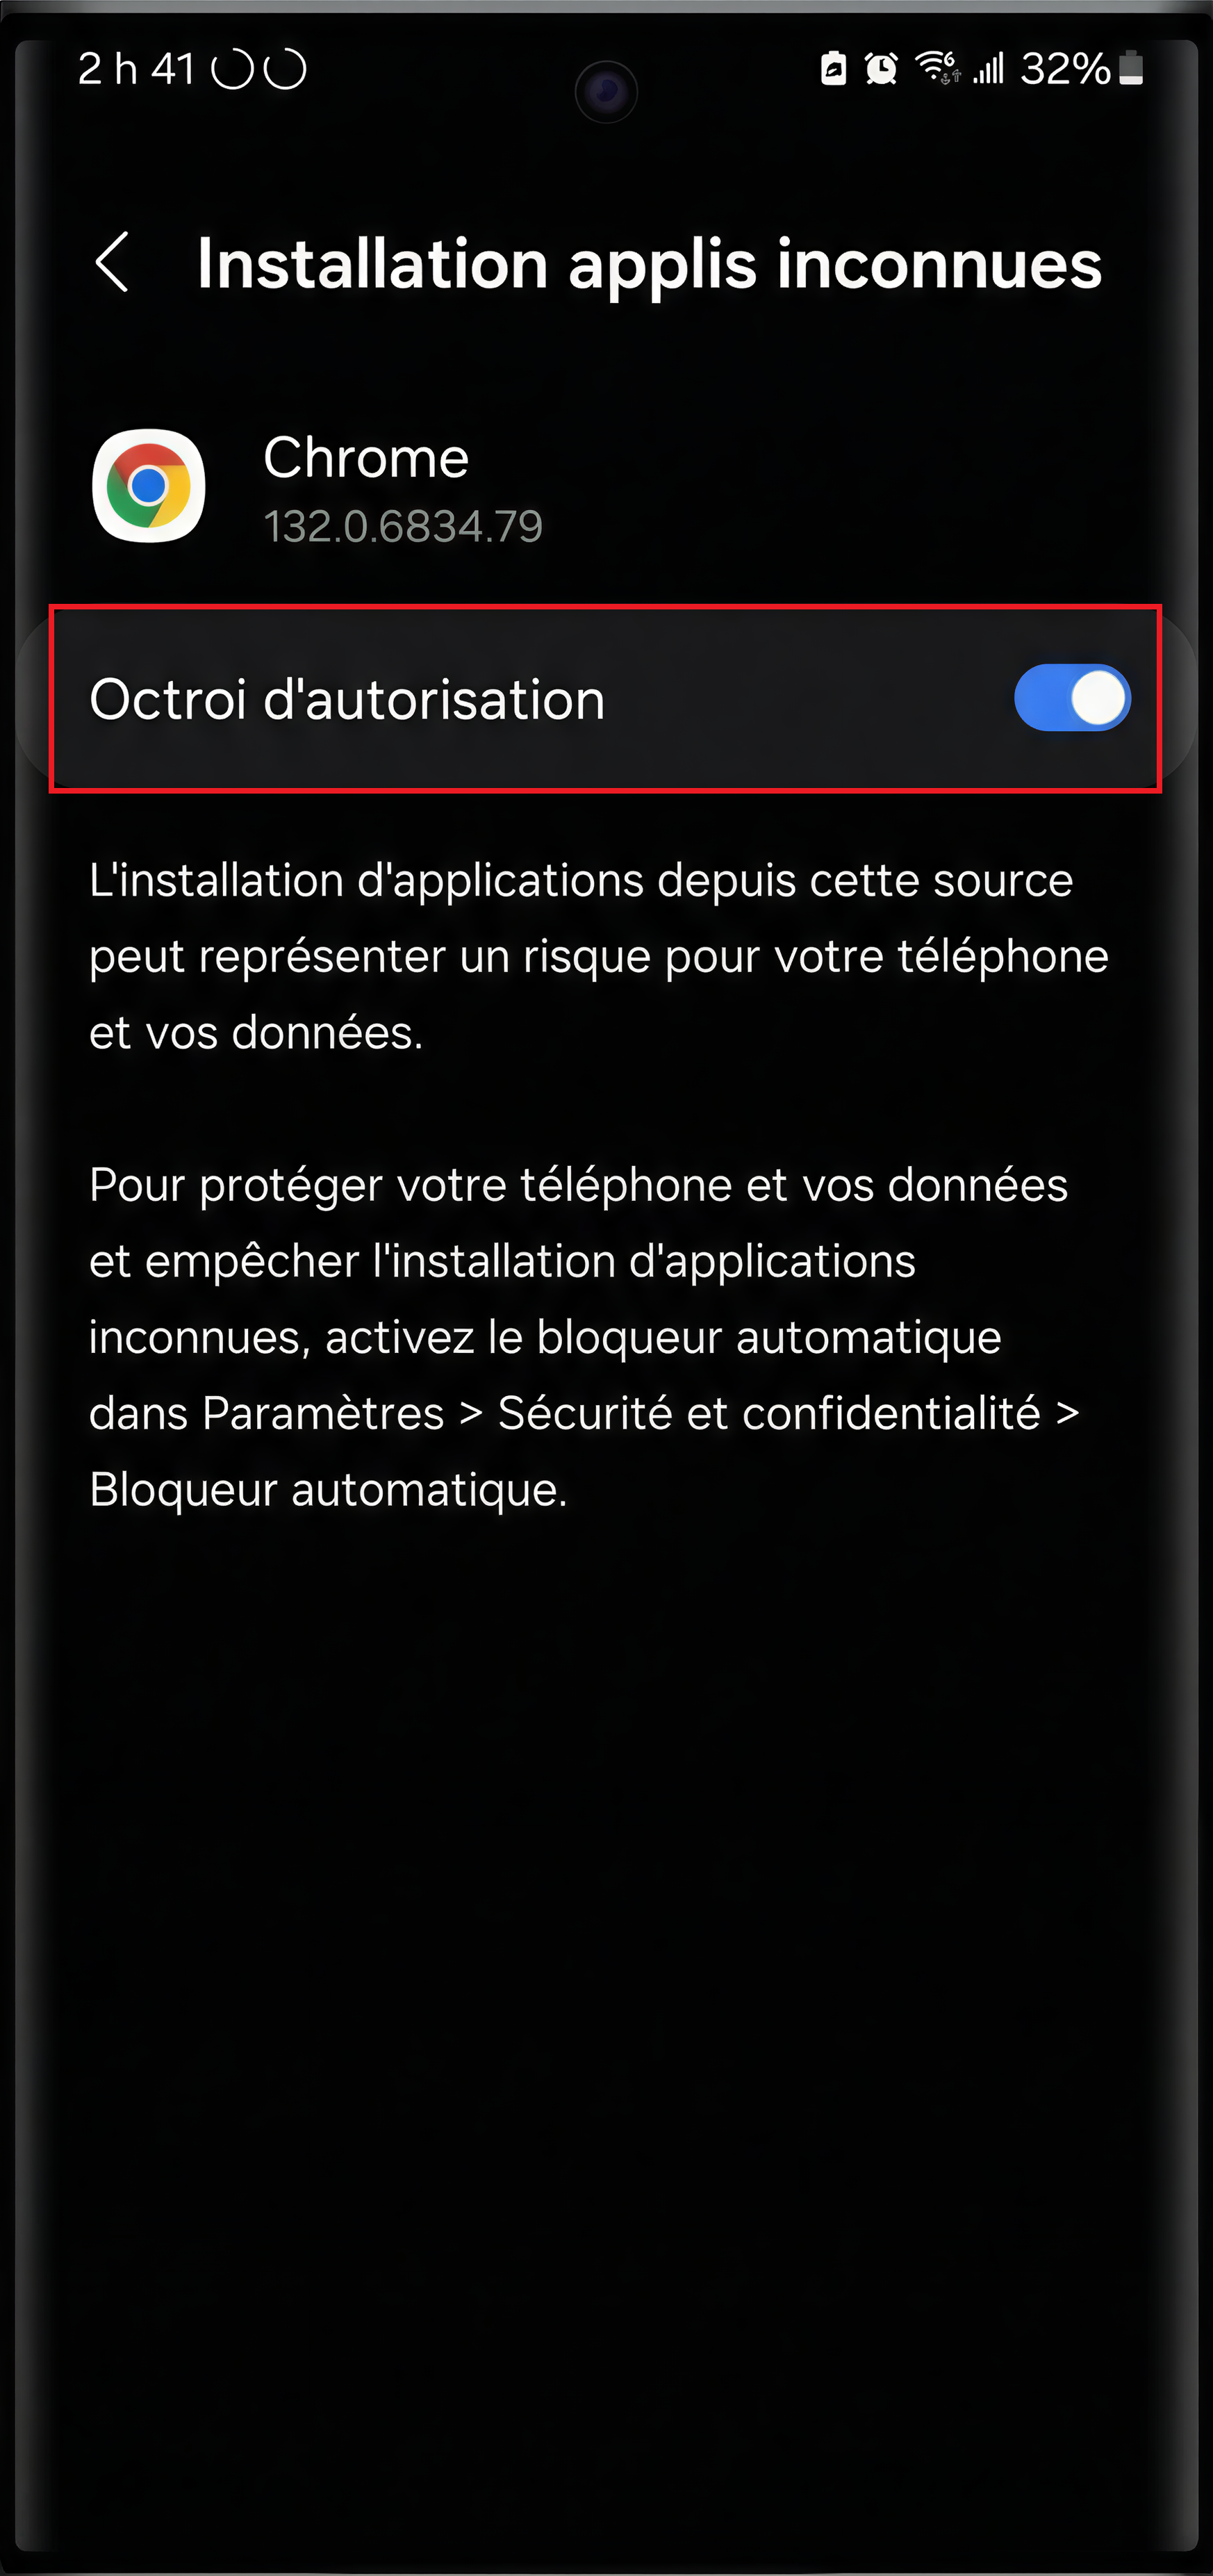
Then activate Granting of authorization (allow Chrome to install apps).

Android - activate Authorization

Step 5: Install the application

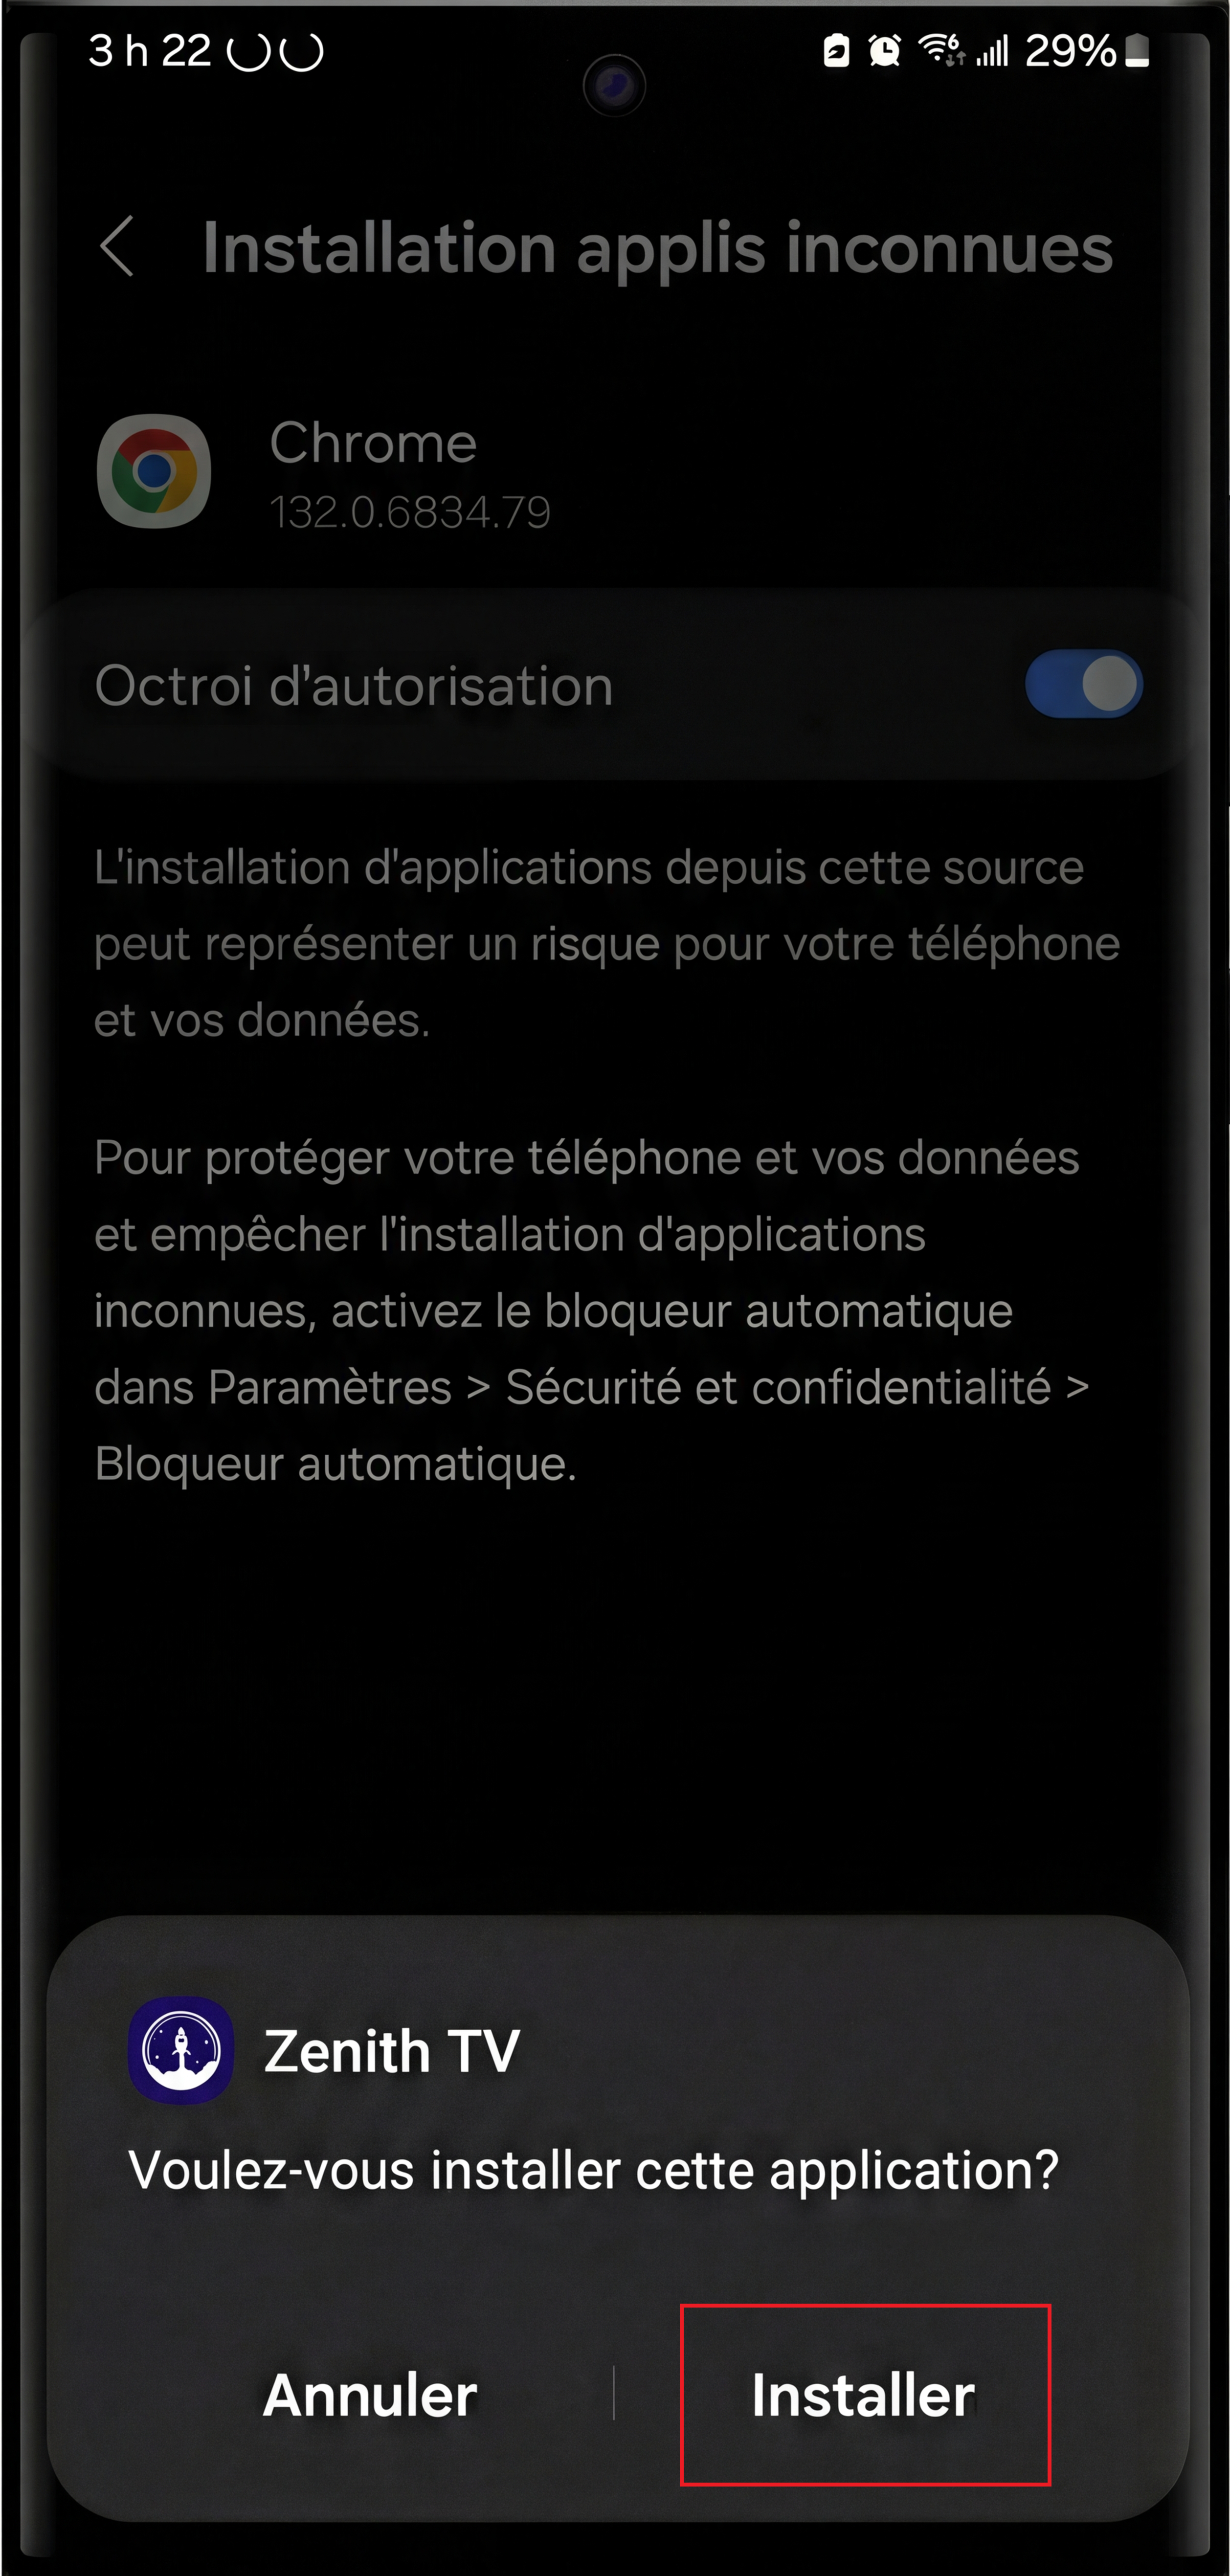
Return to the installation screen, then press Install.

Android - Confirm installation (Install)

Step 6: Application configuration

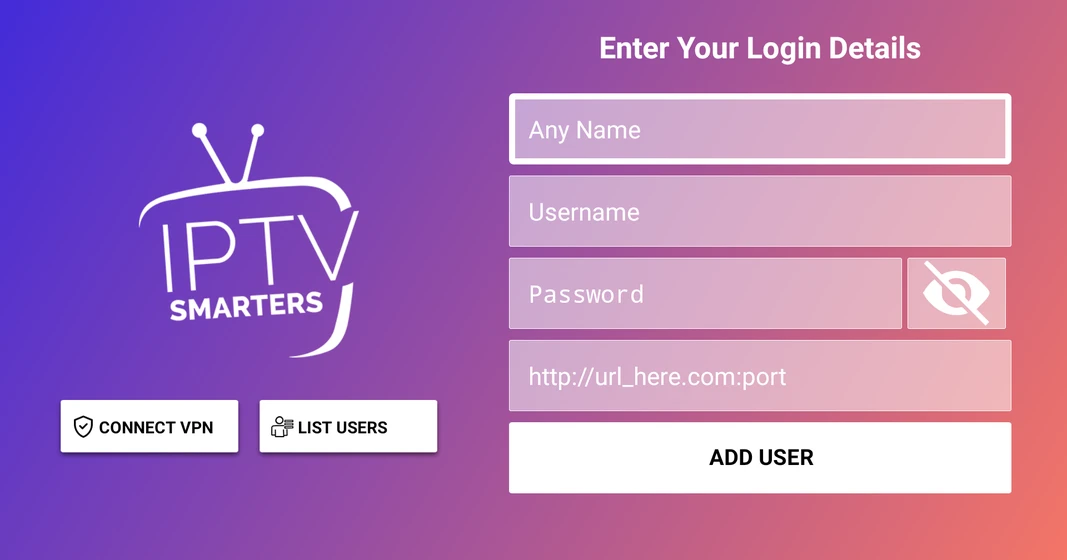
After installation, open ZenithTV from your home screen or application drawer. On first launch, select the "mobile" display mode. Then enter your credentials to finalize the configuration. You can enter whatever you like for the "Playlist Name" (the very first box).

Step 7: Enjoy Zenith TV

Your application is now ready to use. You can now enjoy ZenithTV to watch your favorite channels, access movies, series and much more. Don't forget to check the official website regularly to download updates and take advantage of new features.

💡 Further information
Discover all the application's features and tips.

See the complete guide
Recommended

Smarters Player Lite - Apple (iPhone / iPad / Apple TV)

Step 1: Open the App Store

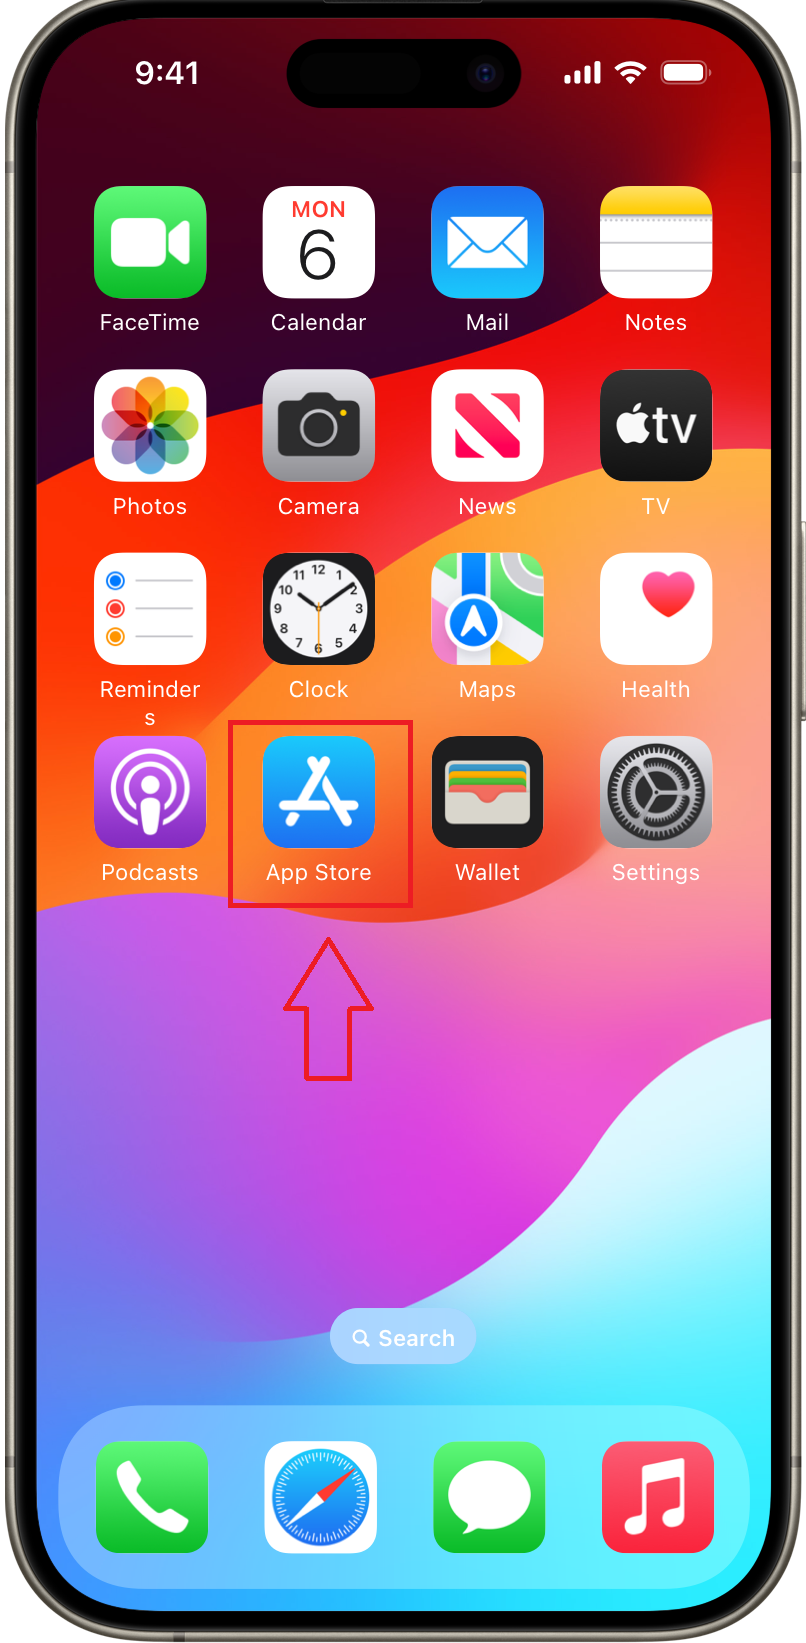
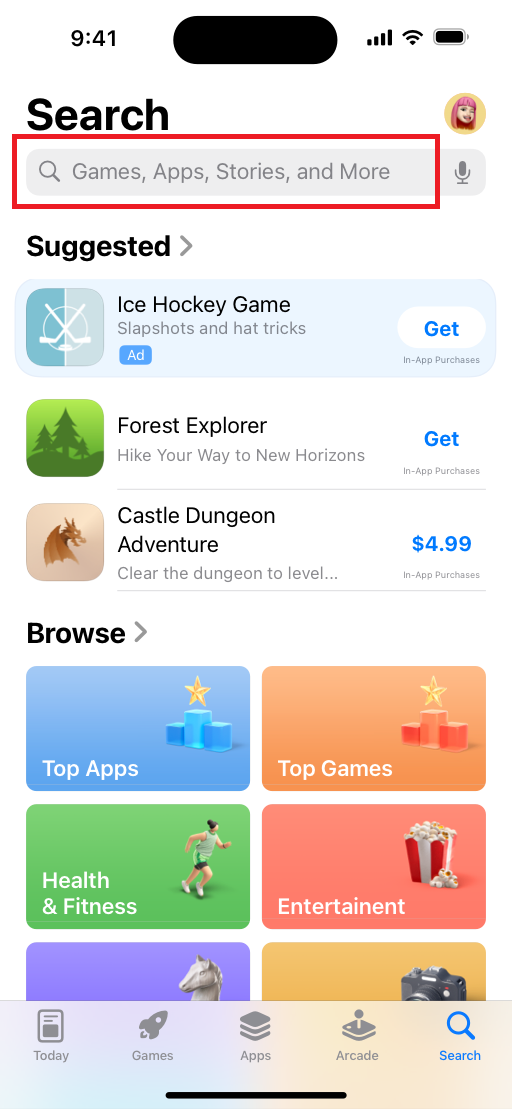
On your iPhone / iPad, open the’App Store.

iPhone - App Store icon

Step 2: Search for the application

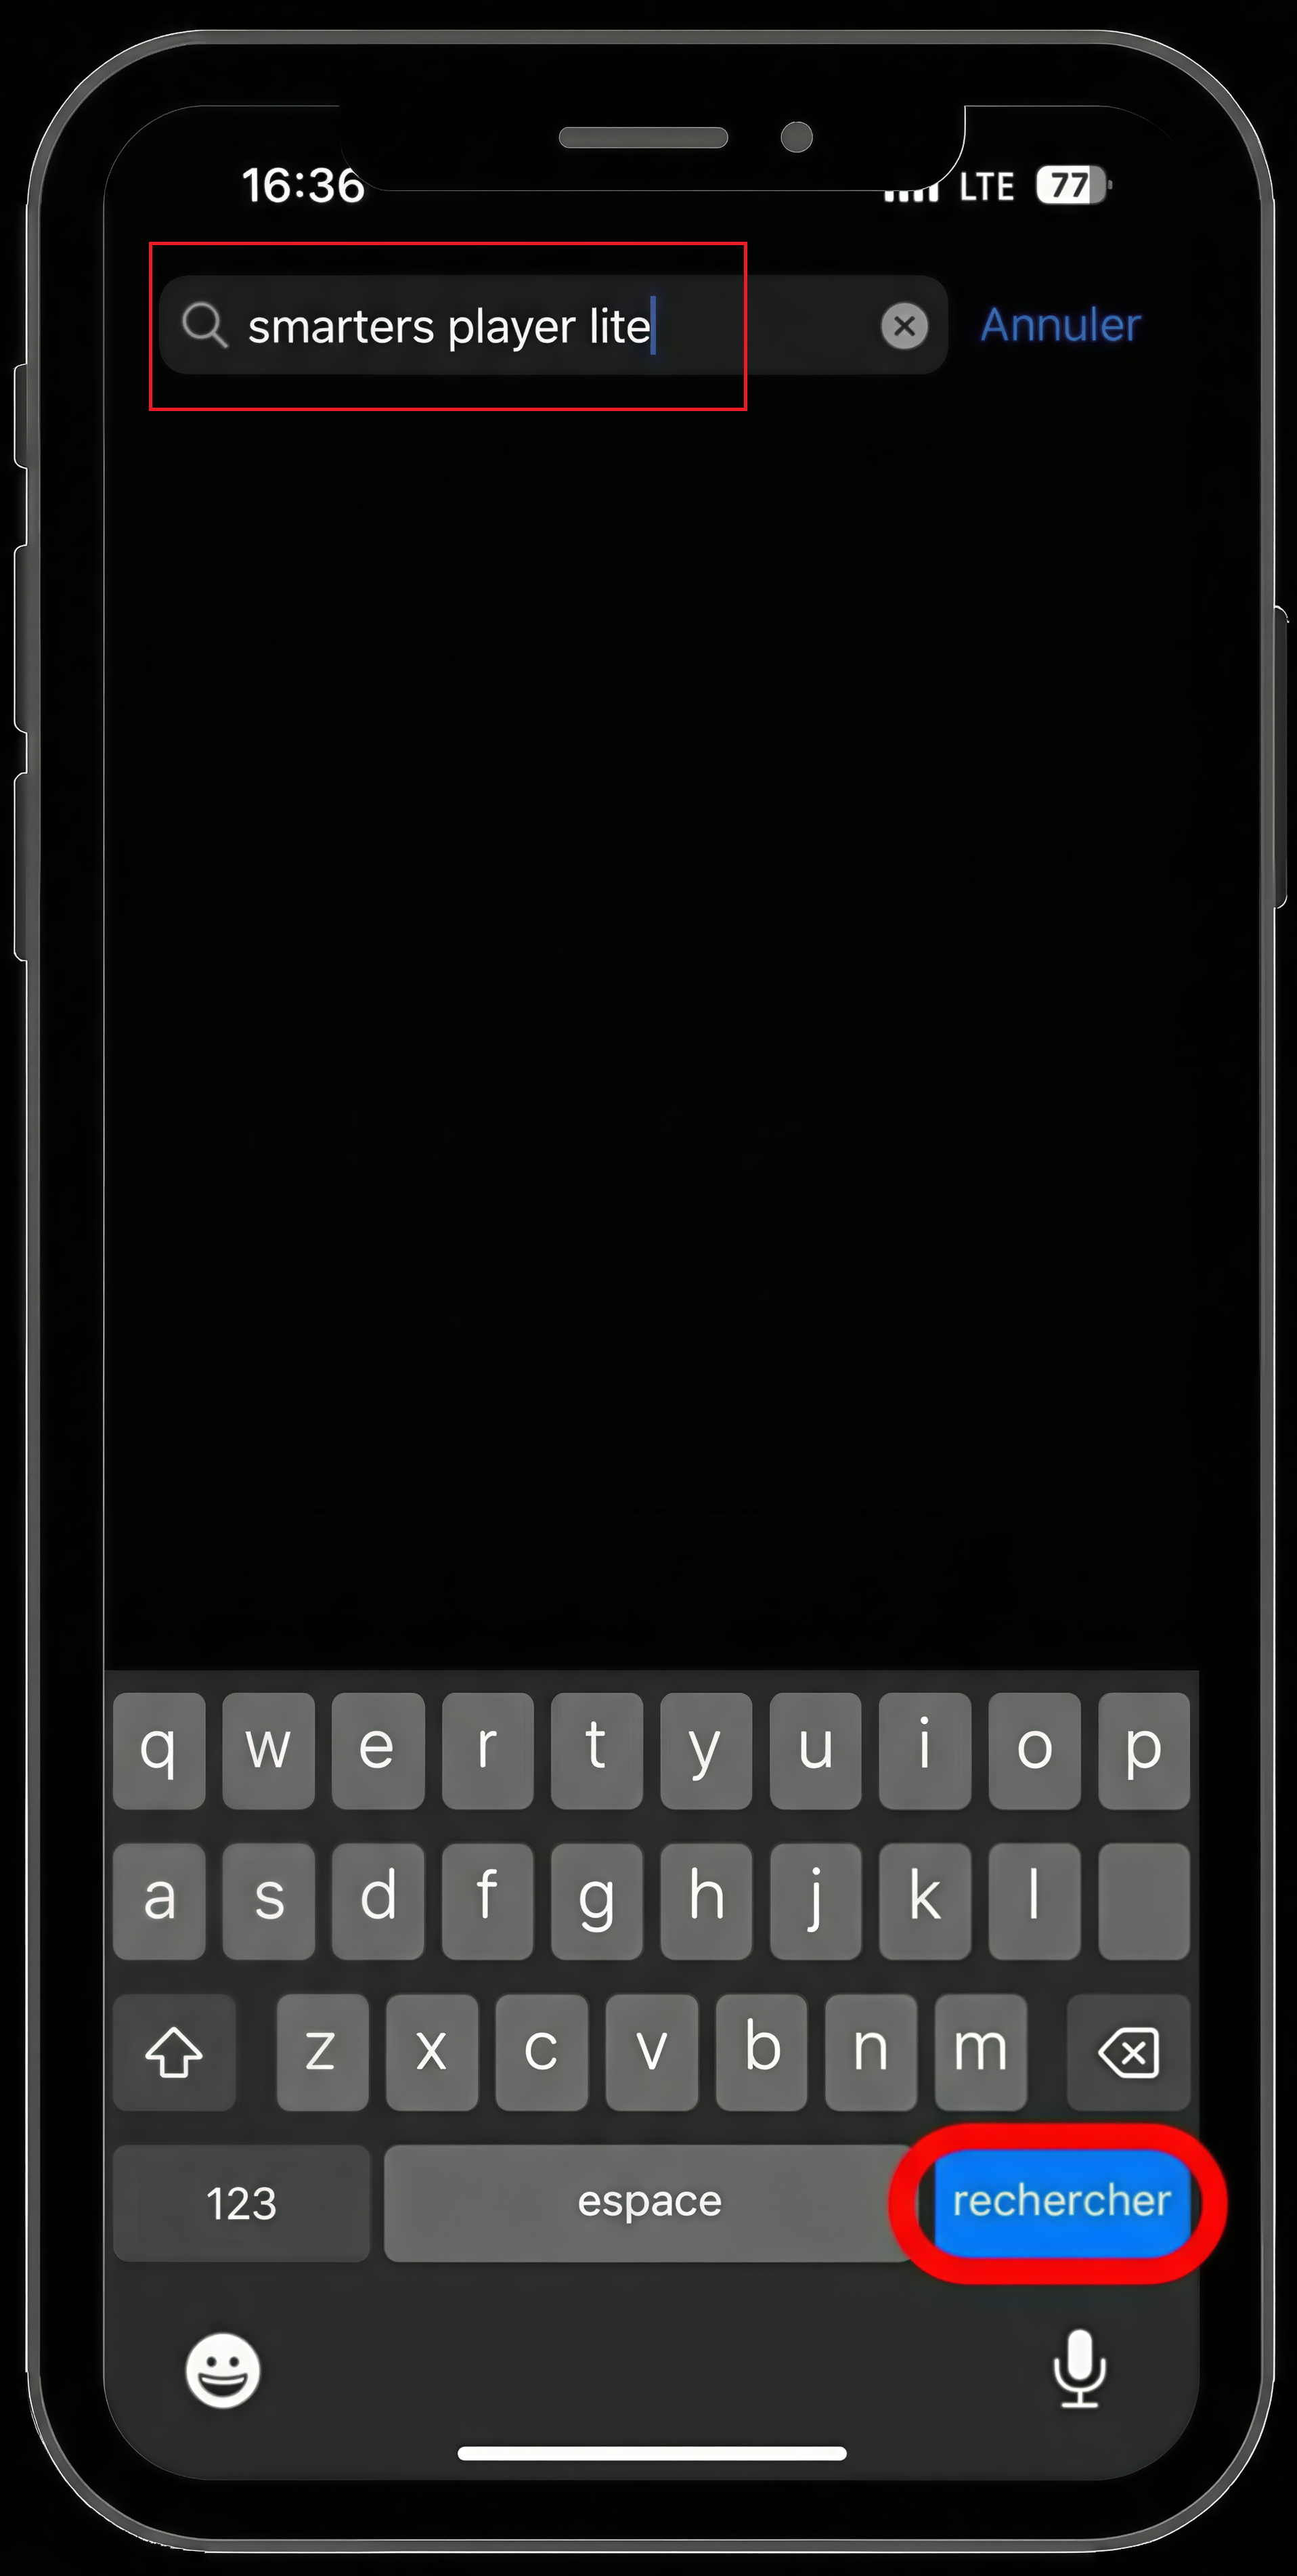
Press Search, then press : Smarters Player Lite. 👉 App Store link

App Store search bar

Search Smarters Player Lite

Step 3: Download the application

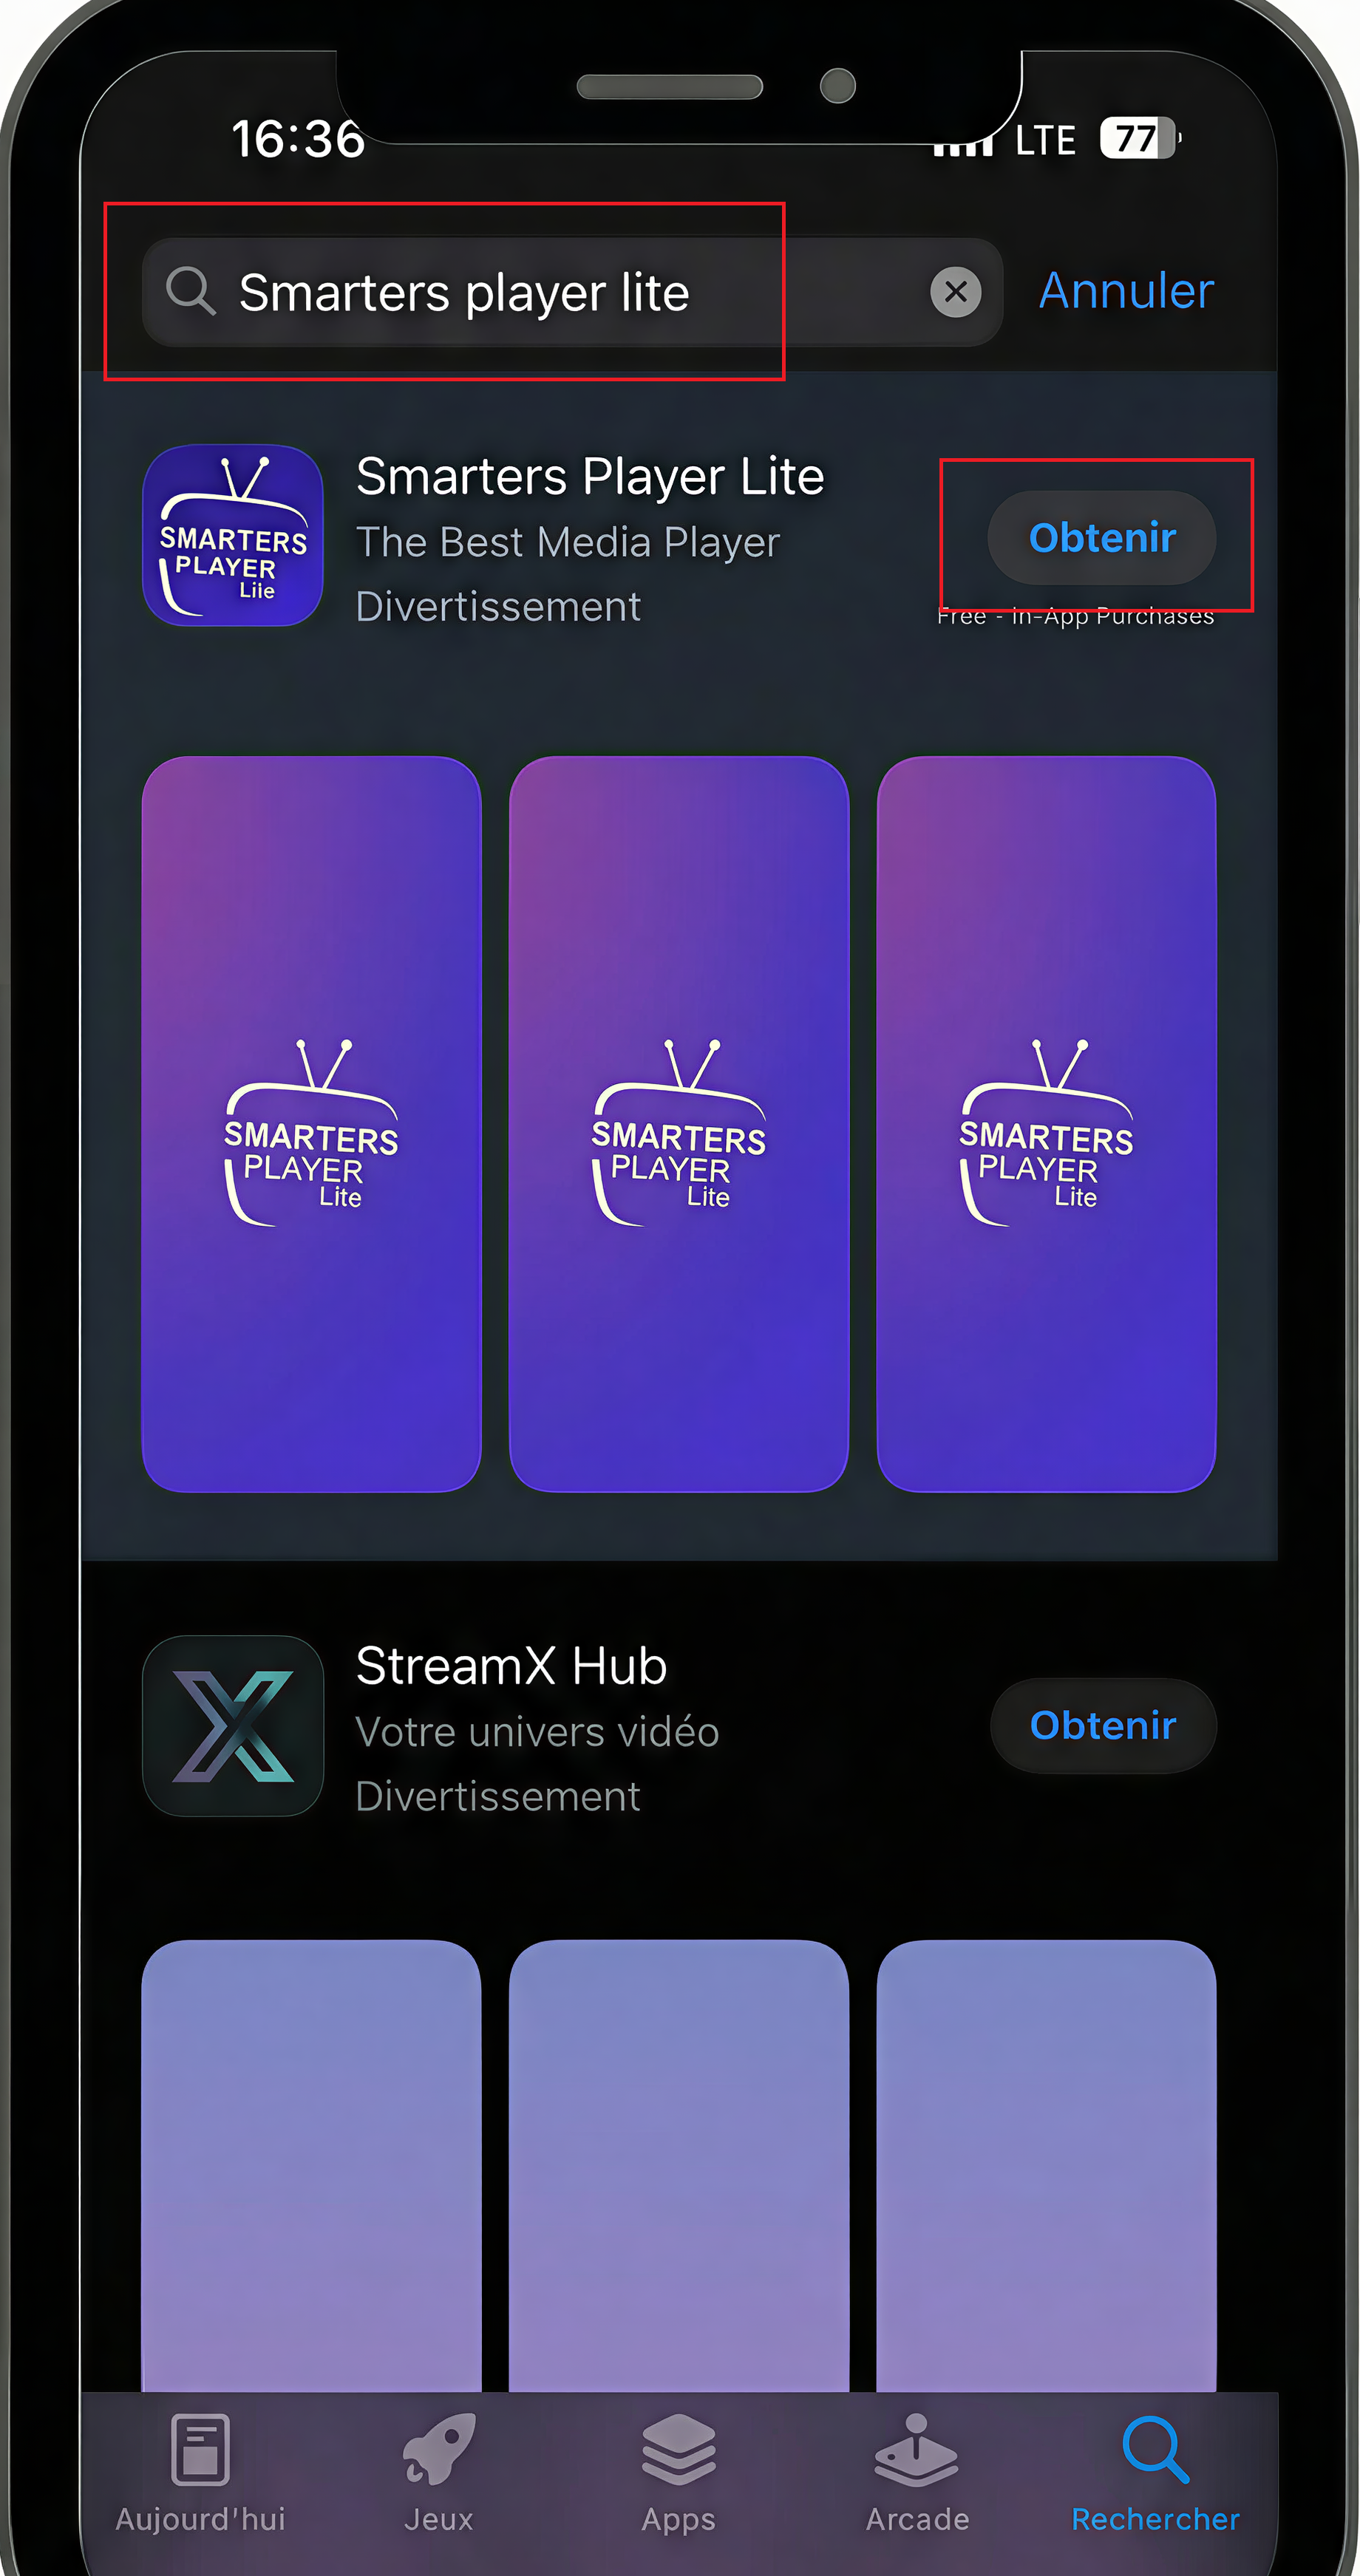
Select Smarters Player Lite then press Get.

Get button

Step 4: Open the application and choose the connection mode

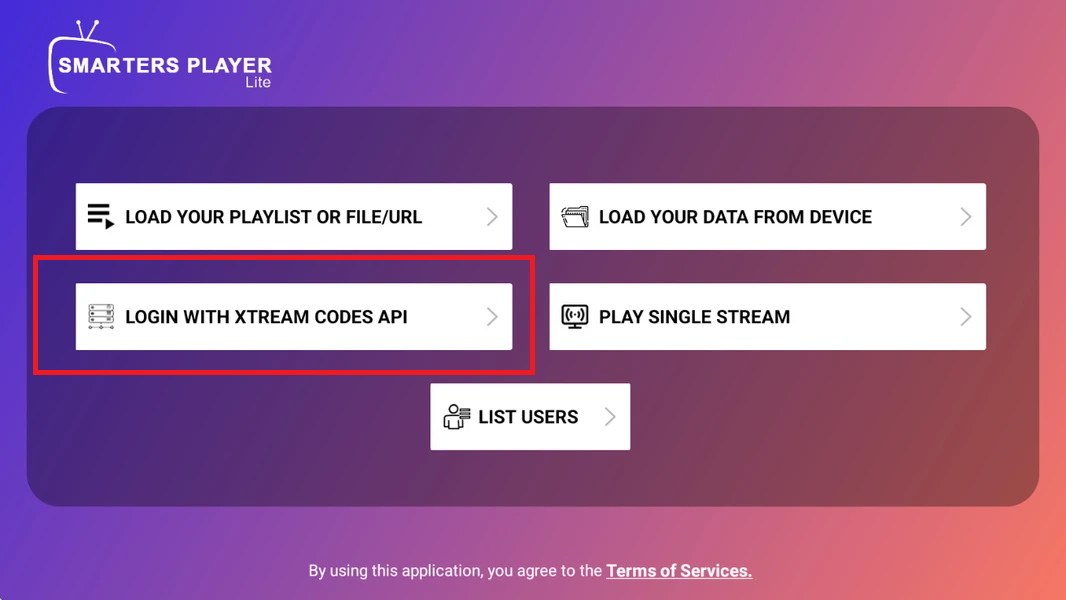
Open Smarters Player Lite, then select LOGIN WITH XTREAM CODES API.

Smarters Player Lite - choice LOGIN WITH XTREAM CODES API

Step 5: Enter your login details

Enter the login details provided.

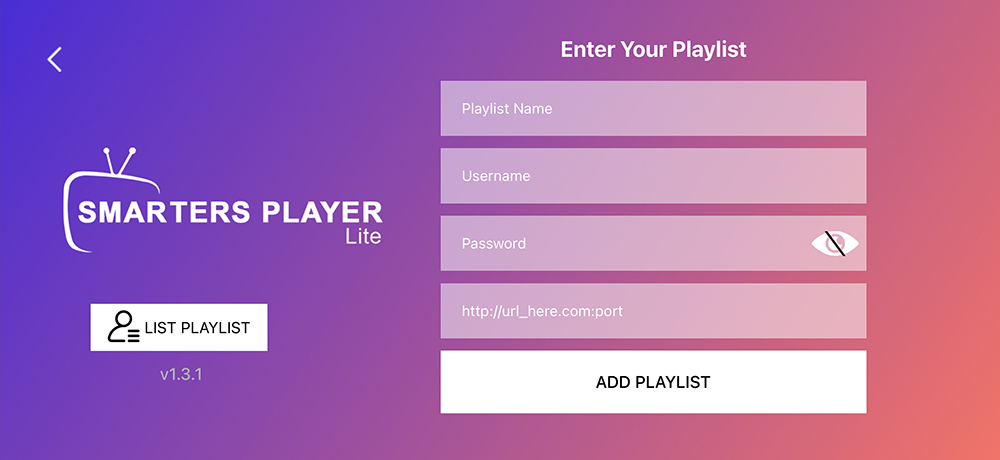
  • Playlist Name : you can enter the name of your choice.
  • Username : supplied with your order.
  • Password : supplied with your order.
  • URL : provided with your order.

Smarters Player Lite form

🎉 Congratulations! Once the information has been validated, you'll have access to all your channels and content.

Recommended

Ibo Pro Player - Apple TV

Step 1: Access the App Store

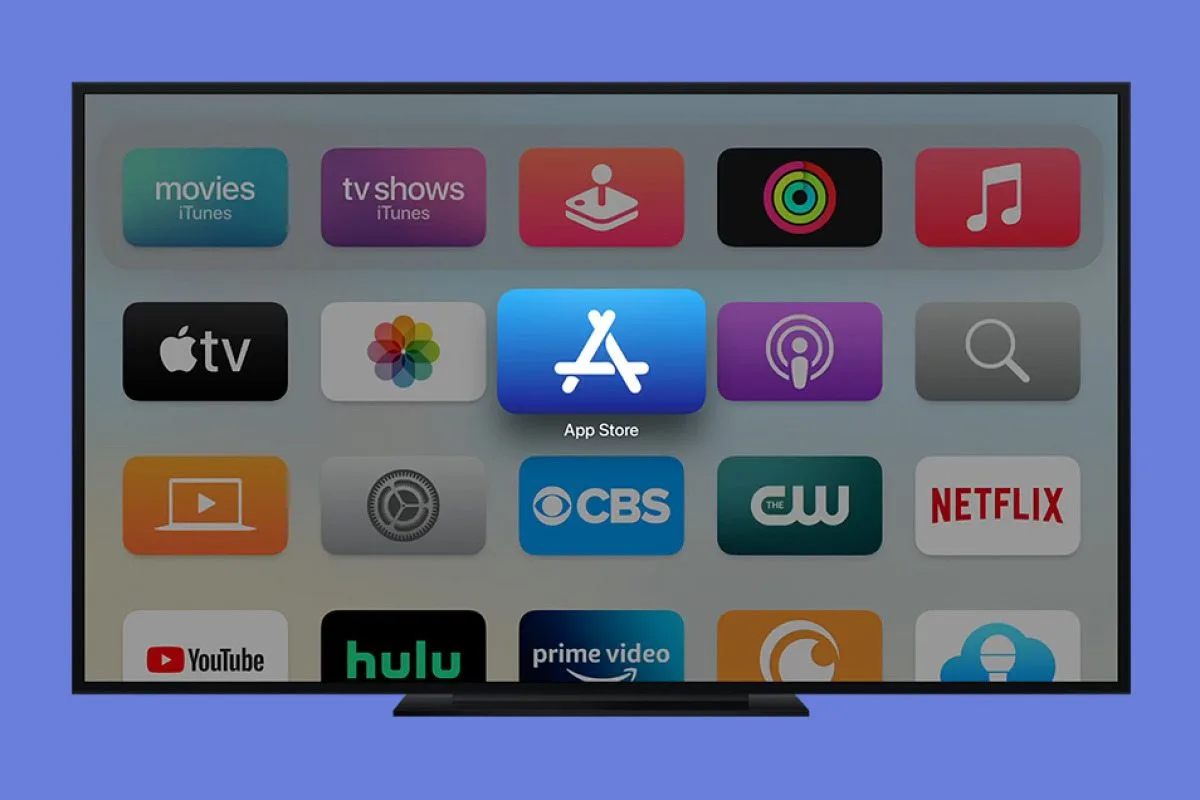
On your Apple TV, locate and open the application App Store from the home screen.

Apple TV - Open the App Store

Step 2: Search for Ibo Pro Player

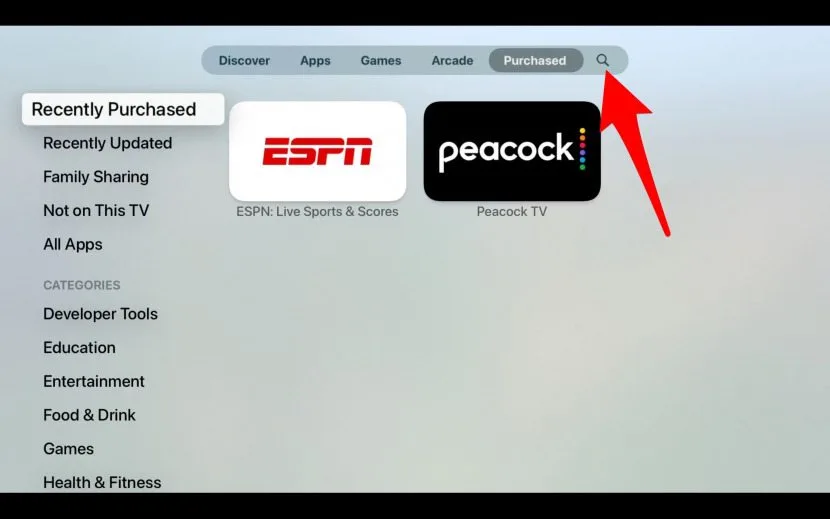
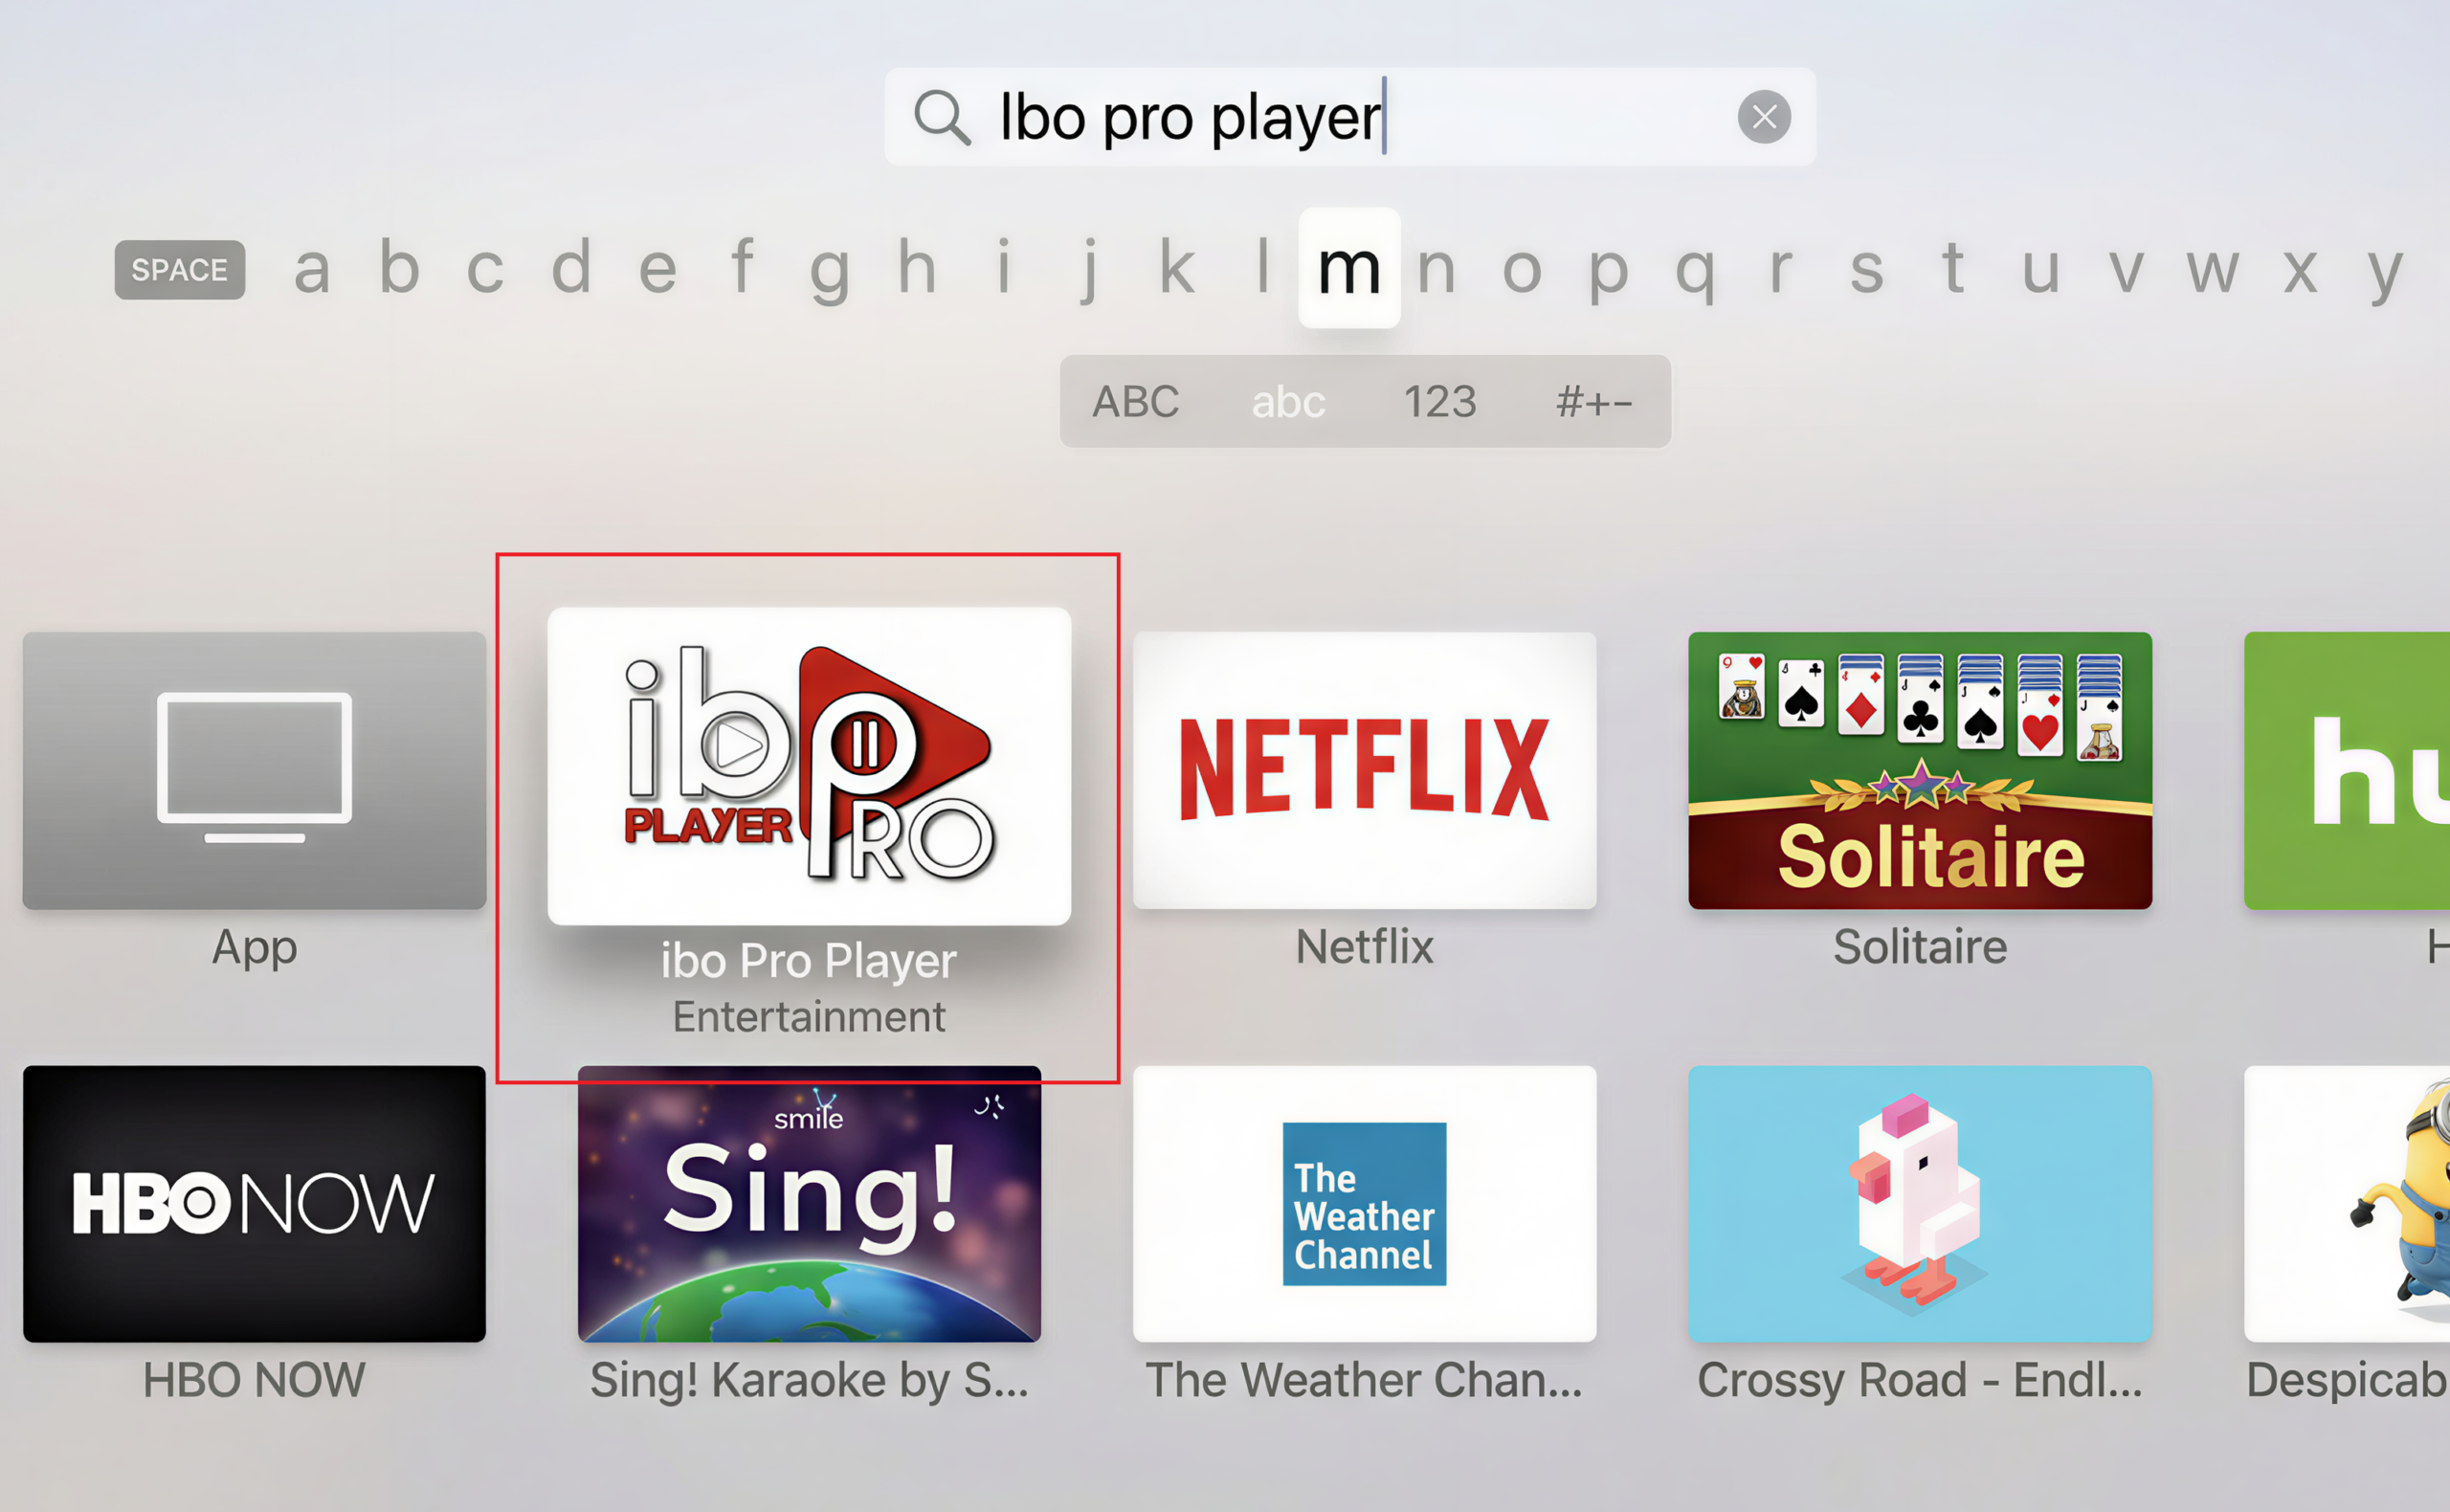
In the App Store, use the magnifying glass (Search) to type Ibo Pro Player, then confirm.

Apple TV - Search the App Store

Apple TV - Search Ibo Pro Player

Step 3: Download and install the application

Once on the Ibo Pro Player, click on Download / Get (or Install) and wait for installation to finish.

Step 4: Authentication (if requested)

If prompted by Apple, confirm with your Apple ID or Face ID / Touch ID to finalize installation.

Step 5: Recover your MAC Address and Device Key

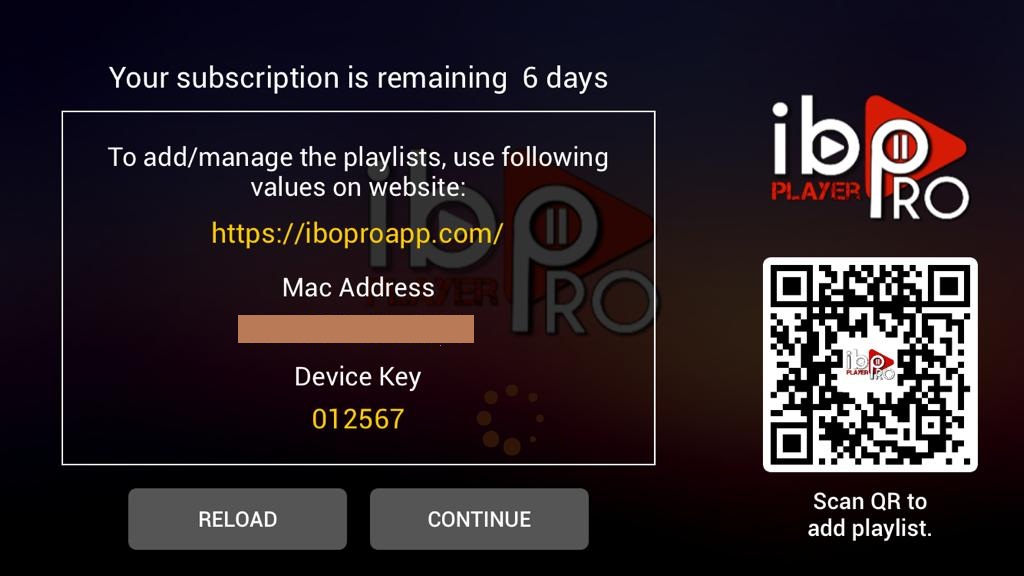
Open Ibo Pro Player. A screen will display your MAC Address and your Device Key.

➡️ Make a note of this information and fill them in directly when you place your order by selecting Apple TV as the device used.

Ibo Pro Player - MAC Address and Device Key

🎉 Congratulations! Once activated via your order, you can enjoy Zenith TV on your Apple TV.

Recommended

Zenith TV App - Chromecast with Google TV

Step 1: Access the applications menu

On your Chromecast with Google TV, go to the Home screen, then open the menu Apps or the Play Store.

Chromecast / Google TV - Home / Apps

Step 2: Install the Downloader application

Search Downloader, open the application file, then click on Install.

Search Downloader

Step 3: Allow installation from unknown sources (Do this only once)

This step simply authorizes Downloader to install Zenith TV.

  • Open Parameters (icon ⚙️) → All parameters
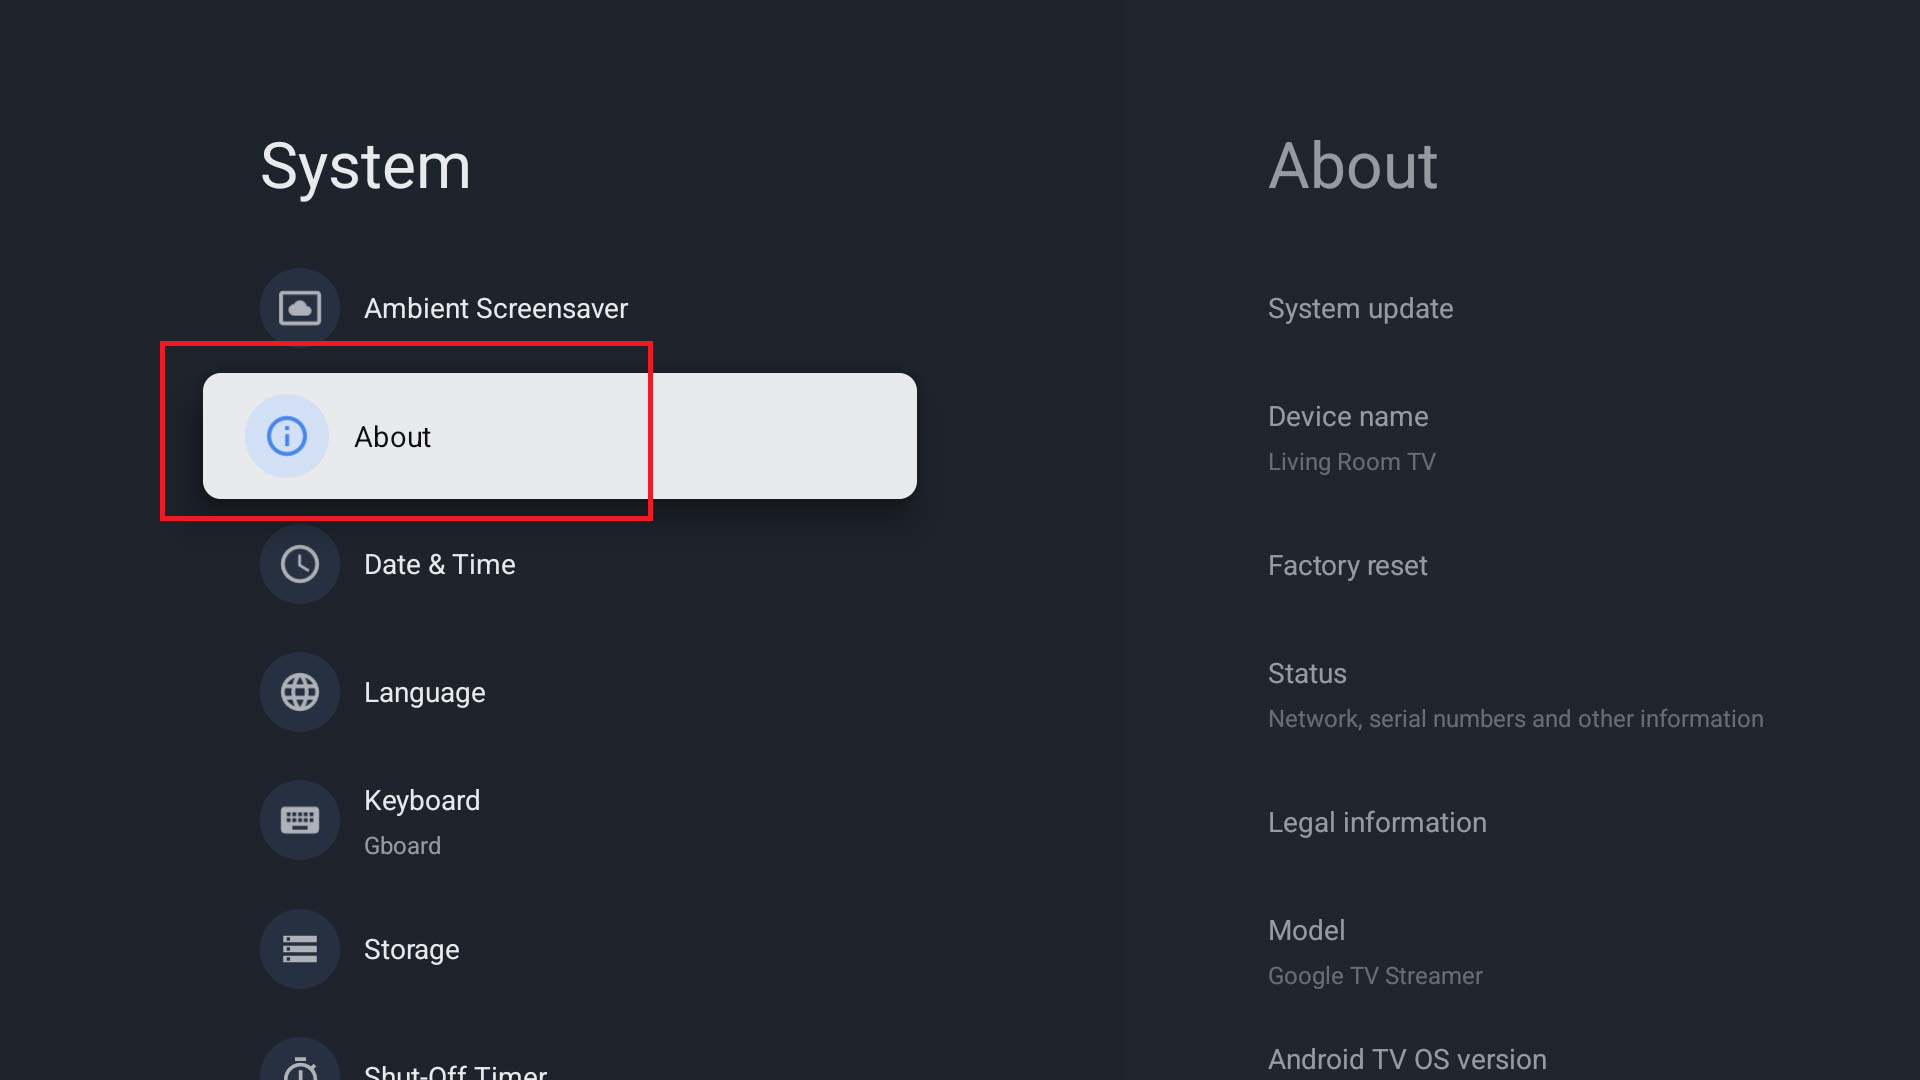
  • Go to SystemAbout us
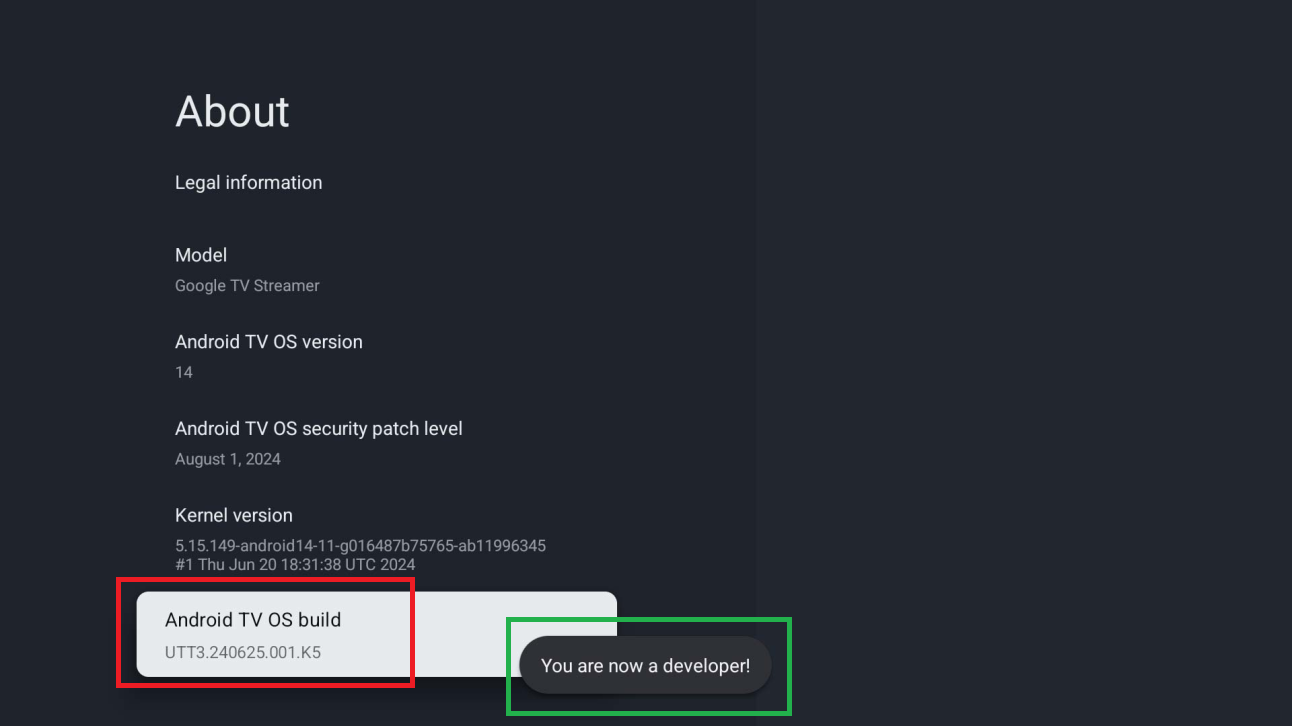
  • Press 7 times on Android TV OS build (or “Build”) to the message “You are now a developer”.”
🎥 Need help?

Step 4: Download Zenith TV via Downloader

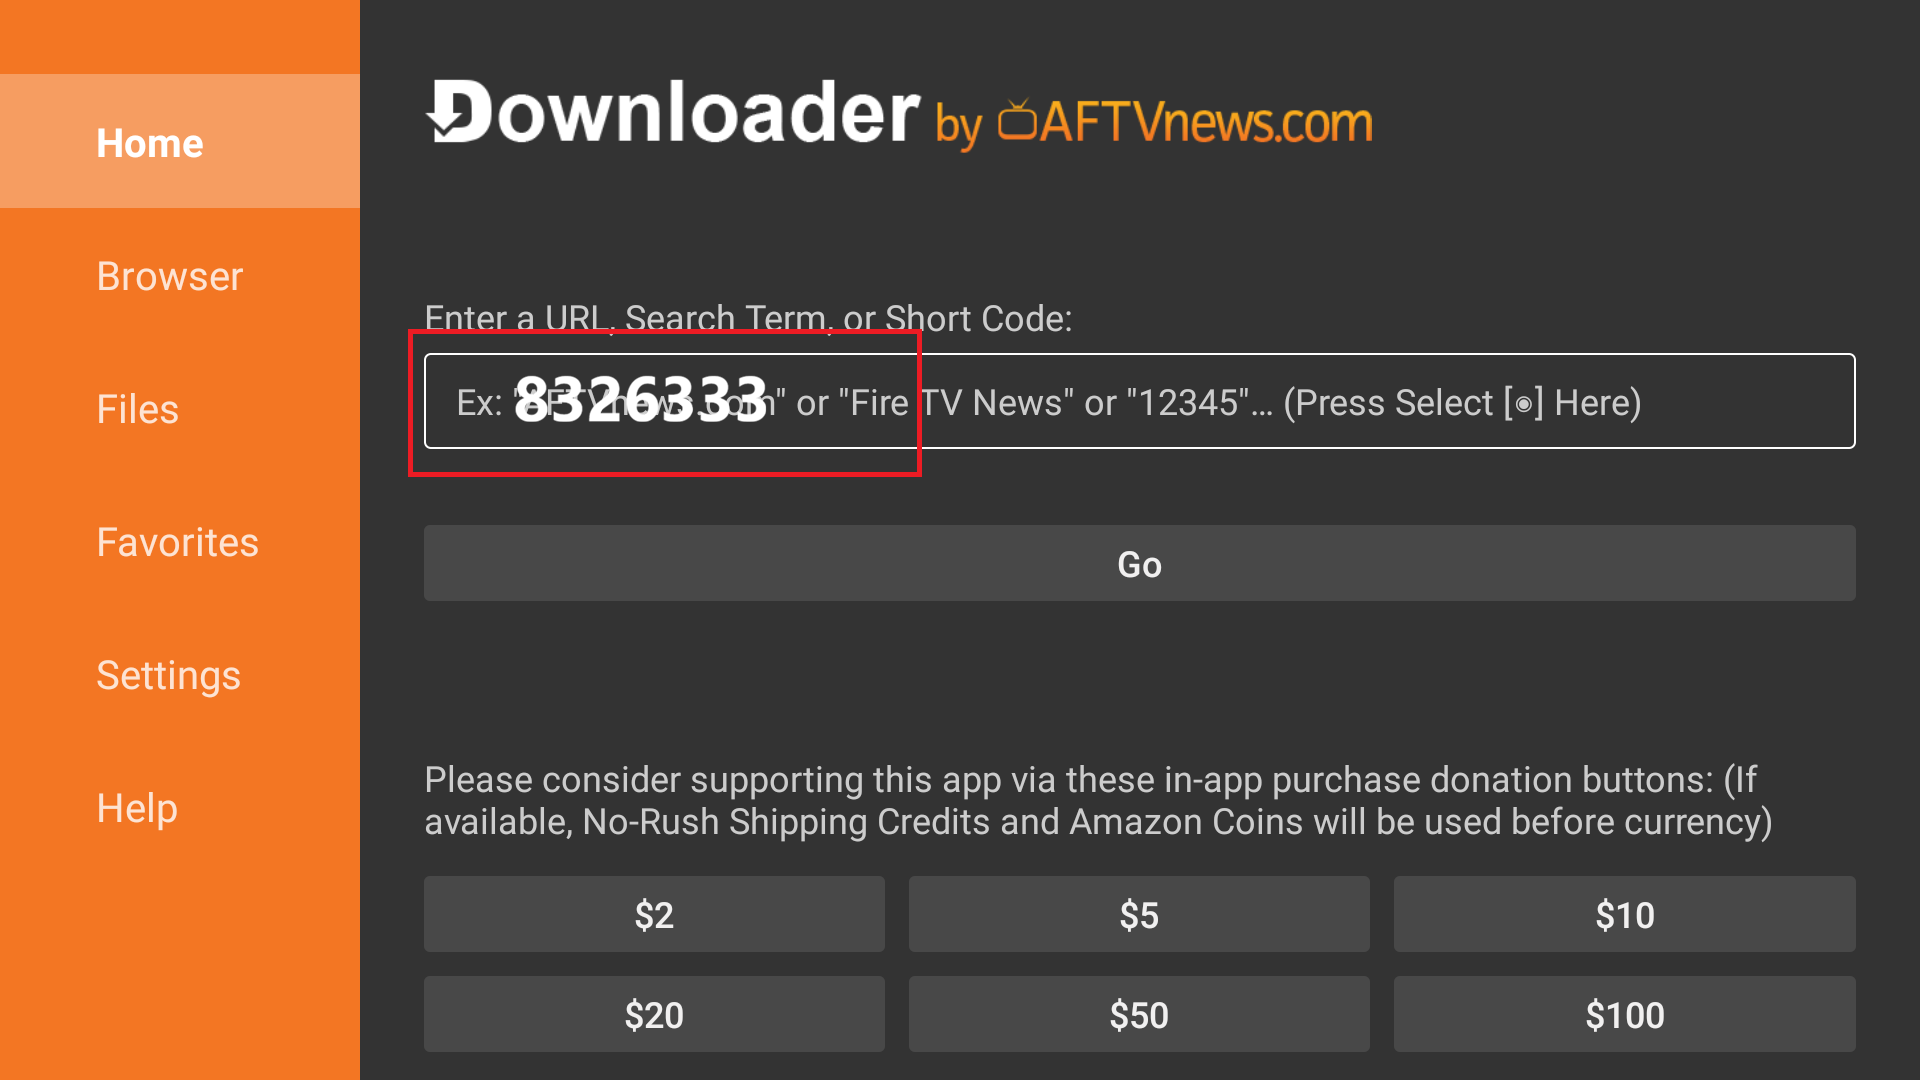
Open Downloader, enter the code 8326333, then click on Go.

Downloader - enter code 8326333

Step 5: Install the Zenith TV application

When the installation message appears, click on Settings, then activate Downloader.

Then select Install to install the application. If the “Blocked by Play Protect” is displayed, select Details, then Install anyway.

Installation lock - Settings button

Install unknown apps - Downloader ON

Install button

Step 6: Open ZenithTV and finalize configuration

Once installation is complete, click on Done or Open. If you clicked on Done, then open ZenithTV from your Home screen or application drawer.

After installation, open ZenithTV from your home screen or application drawer. On first launch, select the display mode "TV" since you're installing the application on a TV. Then enter your login details to finalize the configuration. You can set the "Playlist Name" (the very first box). If you do not have your login details, please contact our support team to obtain them.

🎉 Congratulations! Zenith TV is now ready for use on your Chromecast/Google TV.

💡 Further information
Discover all the application's features and tips.

See the complete guide
Recommended

Zenith TV App - Android TV (Sony, Philips, Sharp...)

Step 1: Access the applications menu

On your Android TV, go to the Home screen, then open the menu Apps or the Play Store.

Android TV - Home / Apps

Step 2: Install the Downloader application

Search Downloader, open the application file, then click on Install.

Android TV - Search Downloader

Step 3: Allow installation from unknown sources (Do this only once)

This step simply authorizes Downloader to install Zenith TV.

  • Open Parameters (icon ⚙️) → All parameters
  • Go to SystemAbout us
  • Press 7 times on Android TV OS build (or “Build”) to the message “You are now a developer”.”
🎥 Need help?

Step 4: Download Zenith TV via Downloader

Open Downloader, enter the code 8326333, then click on Go.

Android TV - Downloader - enter code 8326333

Step 5: Install the Zenith TV application

When the installation message appears, click on Settings, then activate Downloader.

Then select Install to install the application. If the “Blocked by Play Protect” is displayed, select Details, then Install anyway.

Android TV - Install block - Settings button

Android TV - Install unknown apps - Downloader ON

Android TV - Install button

Step 6: Open ZenithTV and finalize configuration

Once installation is complete, click on Done or Open. If you clicked on Done, then open ZenithTV from your Home screen or application drawer.

After installation, open ZenithTV from your home screen or application drawer. On first launch, select the display mode "TV" since you're installing the application on a TV. Then enter your login details to finalize the configuration. You can set the "Playlist Name" (the very first box). If you do not have your login details, please contact our support team to obtain them.

🎉 Congratulations! Zenith TV is now ready to use on your Android TV.

💡 Further information
Discover all the application's features and tips.

See the complete guide
Recommended

Zenith TV App - Android boxes (Nvidia Shield, T95, Onn, Mecool...)

Step 1: Access the applications menu

On your Android box, go to the Home screen, then open the menu Apps or the Play Store.

Boîtier Android - Home / Apps

Step 2: Install the Downloader application

Search Downloader, open the application file, then click on Install.

Boîtier Android - Search Downloader

Step 3: Allow installation from unknown sources (Do this only once)

This step authorizes Downloader to install Zenith TV on your Android box.

  • Open Parameters
  • Go to Applications or Security
  • Activate Allow unknown applications for Downloader
🎥 Need help?

Step 4: Download Zenith TV via Downloader

Open Downloader, enter the code 8326333, then click on Go.

Android box - Enter code 8326333

Step 5: Install the Zenith TV application

When the installation message appears, click on Settings, then activate Downloader.

Then select Install to install the application. If the “Blocked by Play Protect” is displayed, select Details, then Install anyway.

Android box - Installation lock - Settings button

Boîtier Android - Authorize Downloader

Boîtier Android - Install button

Step 6: Open ZenithTV and finalize configuration

After installation, open ZenithTV from your home screen or application drawer. On first launch, select "TV", enter your login details, then enter the name of your choice in "Playlist Name". If you don't have your login details, please contact our support team.

🎉 Zenith TV is now ready to use on your Android box.

💡 Further information
Discover all the application's features and tips.

See the complete guide
Recommended

Zenith TV App - Firestick

ℹ️ Information : Some new Fire TV Stick models work with Vega OS, a system that does not allow the installation of external applications such as Zenith TV.

✅ Models Firestick 4K and Firestick 4K Max using Fire OS are compatible with Zenith TV.

❌ The model Firestick 4K Select (Vega OS) is not compatible with our service.

➡️ Read more

Step 1: Access the applications menu

On your Amazon Firestick, use the remote control to navigate to the main menu.

Fire TV main menu

Step 2: Find the Downloader application

In the main menu, use the search function to find the application you are looking for. Downloader. Type Downloader using the on-screen keyboard, then select the application from the results.

Downloader search on Fire TV

Downloader download

Step 3: Install Downloader

Once on the application page, click on Download or Get to install Downloader on your Firestick.

Installing Downloader on Firestick

Step 4: Allow installation from unknown sources

This step is fast and do it once only. It simply authorizes installation of Zenith TV via the Downloader application.

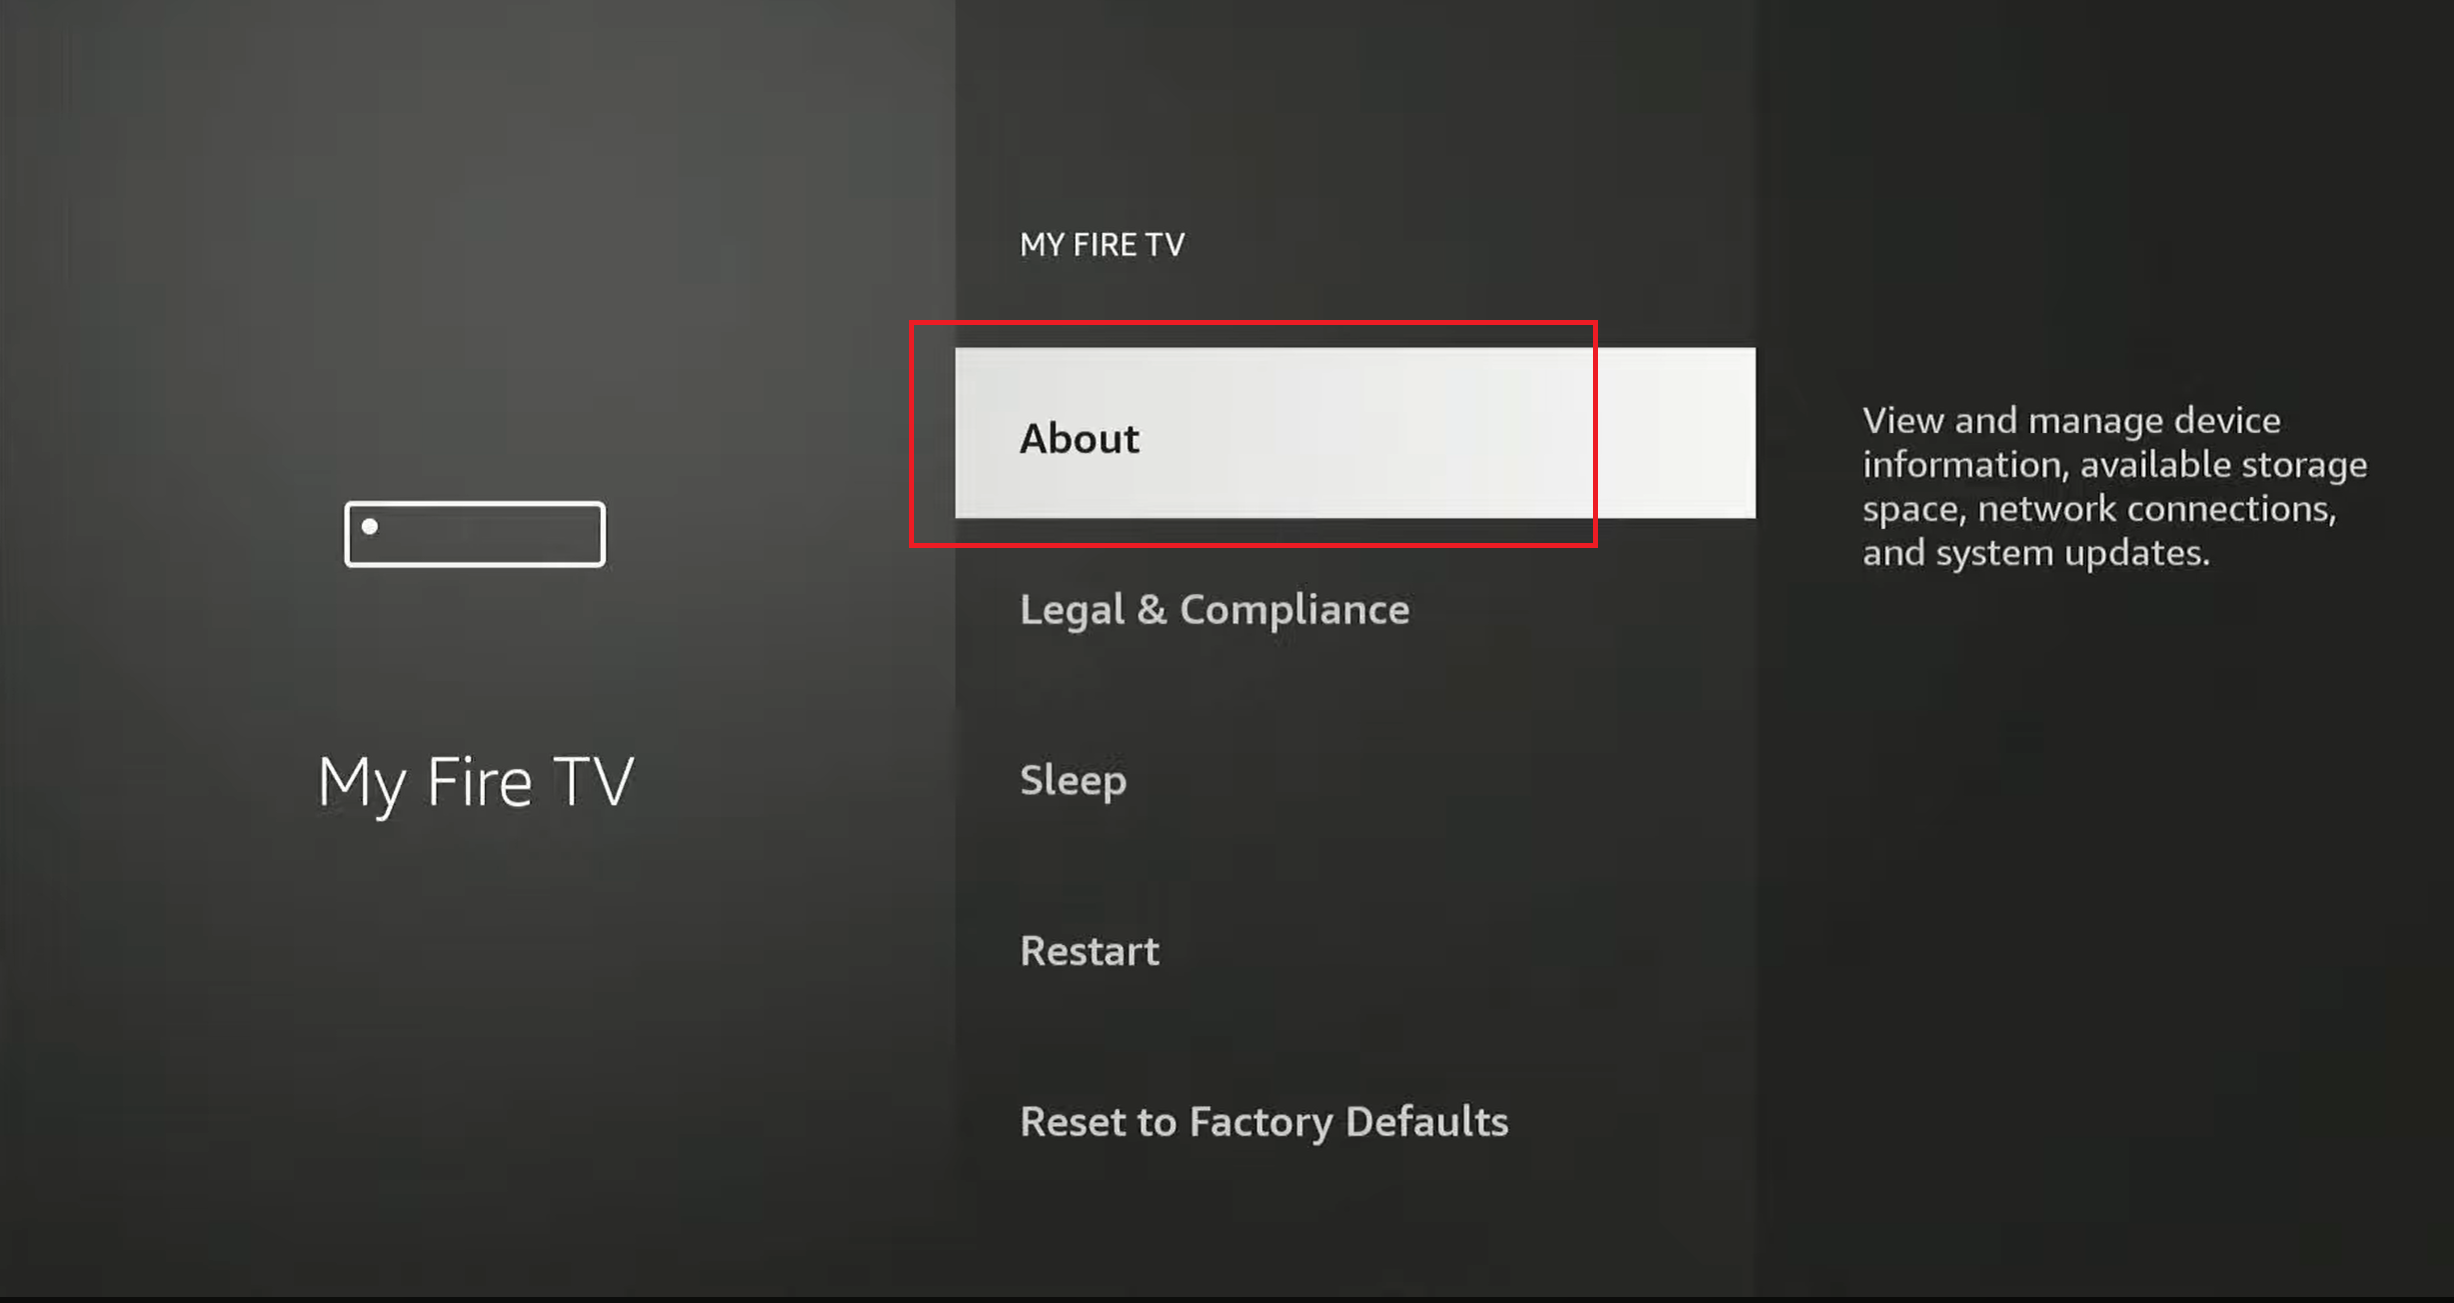
From your Firestick home screen :

  • Go to ParametersMy Fire TVAbout us
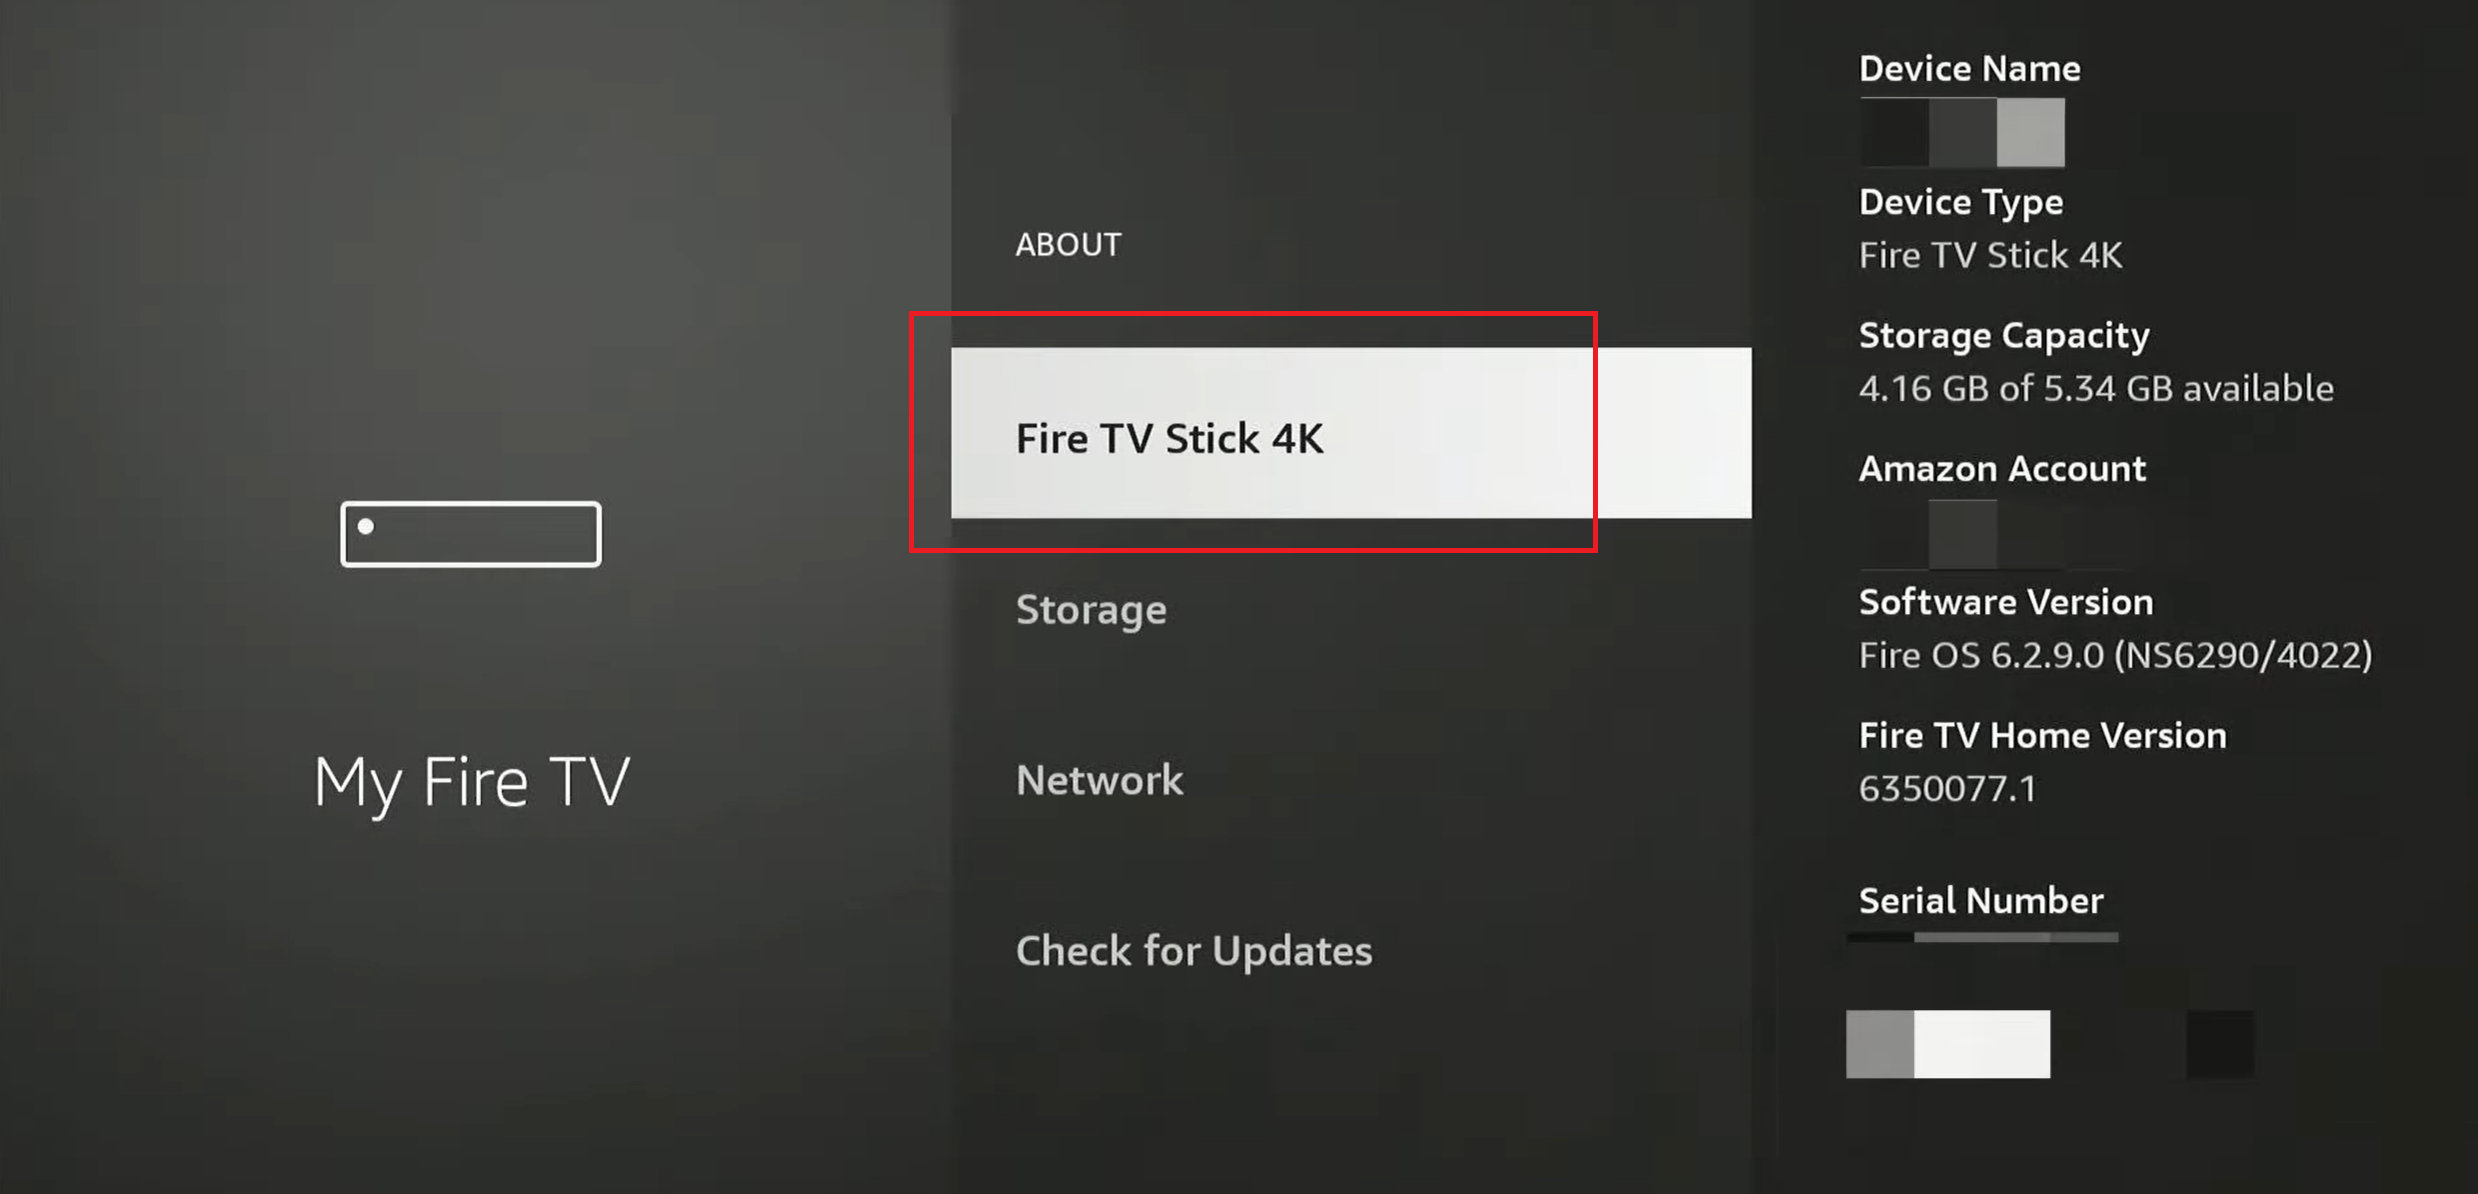
  • Select the name / model of your Firestick
  • Press 7 times until you see the message indicating that developer mode is activated
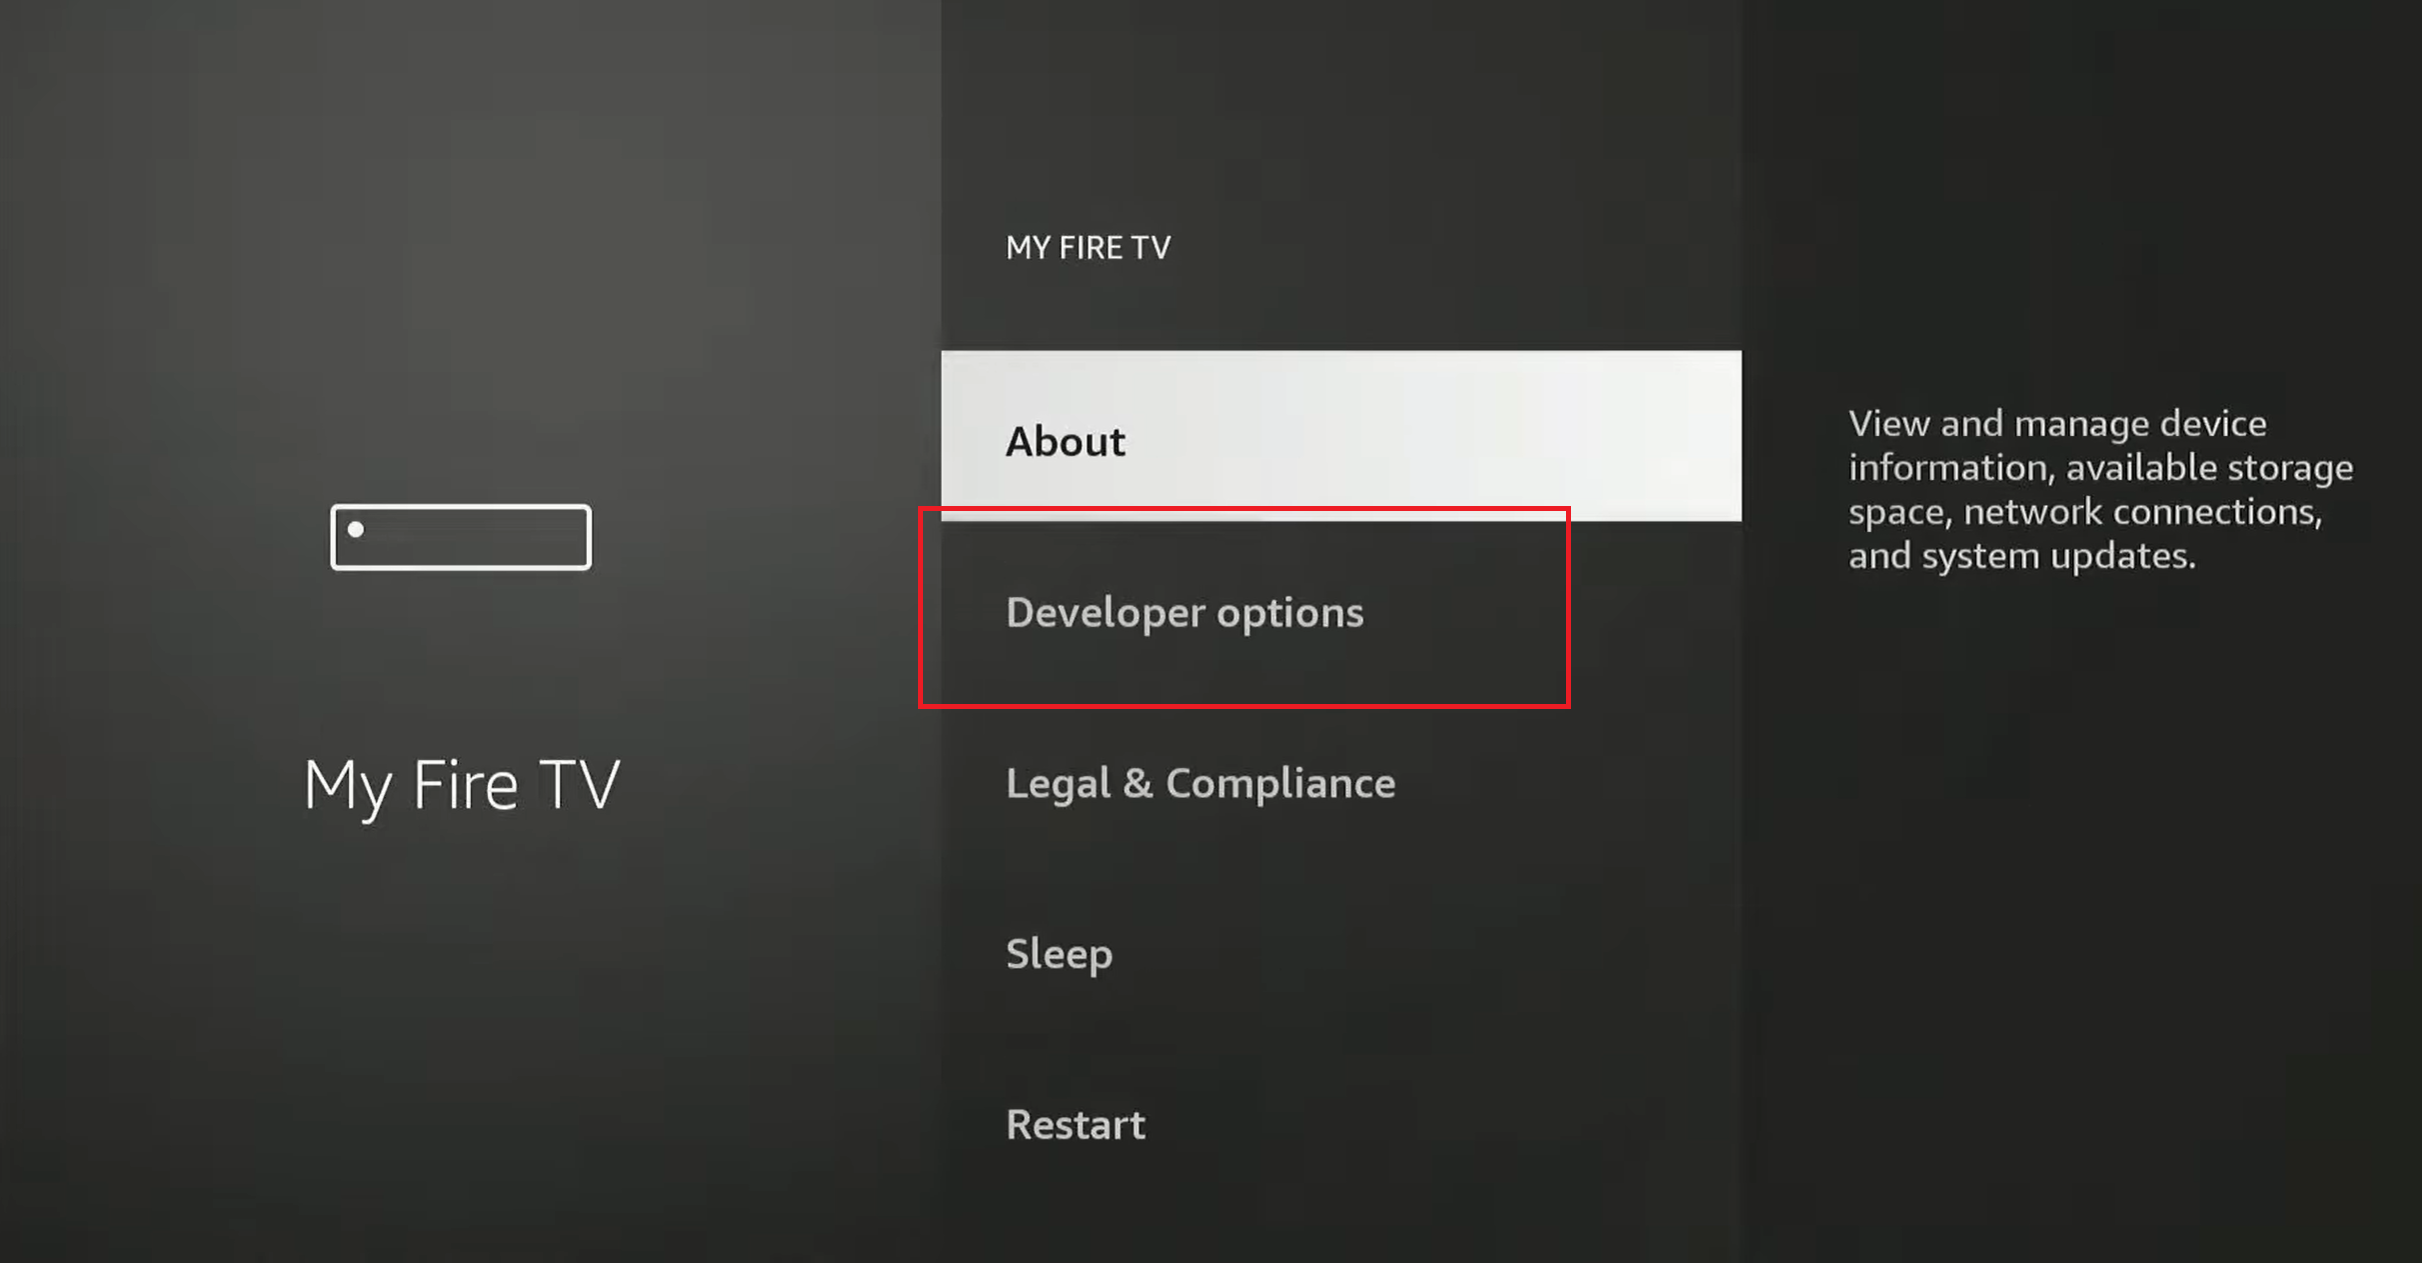
  • Go back in time My Fire TV
  • Open Options for developers
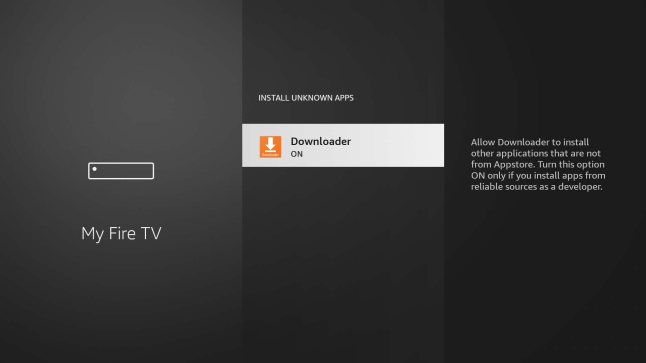
  • Activate Installation of unknown applications, then set Downloader on ON
🎥 Need help?

Step 5: Install Zenith TV

Open Downloader, enter the code 8326333, then click on Go to download ZenithTV.apk. Once the download is complete, click on Install.

Zenith TV installation via Downloader

Step 6: Application configuration

Open ZenithTV, select display mode TV, then enter your login details. The Playlist Name can contain the name of your choice.

🎉 Congratulations! Zenith TV is now ready to use on your Firestick.

💡 Further information
Discover all the application's features and tips.

See the complete guide
Recommended

Ibo Pro Player - Roku / Hisense / TCL

Step 1: Access the main menu

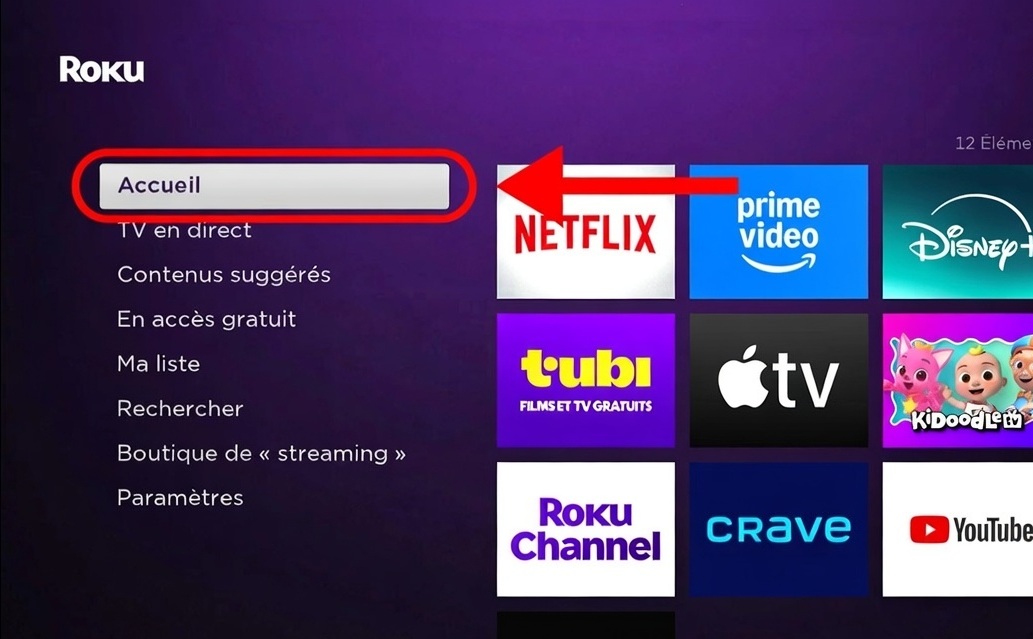
On your Roku TV, press the Home on your remote control to return to the main screen.

Roku - Home screen

Step 2: Add applications

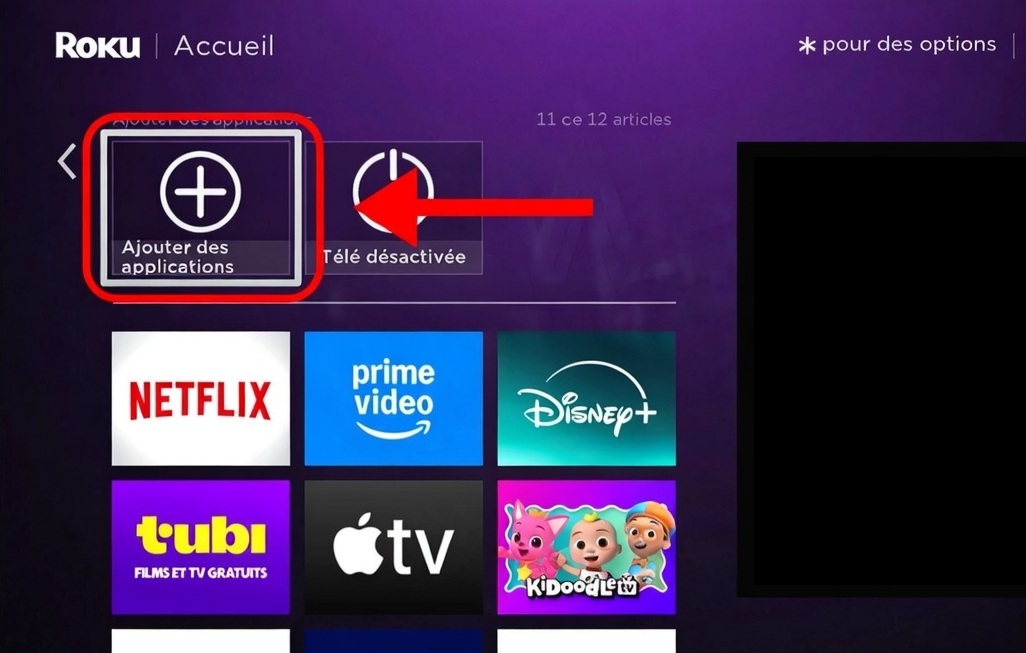
On the Home screen, scroll right until you find the icon Add applications (the +), then select it.

Roku - Add applications

Step 3: Open search

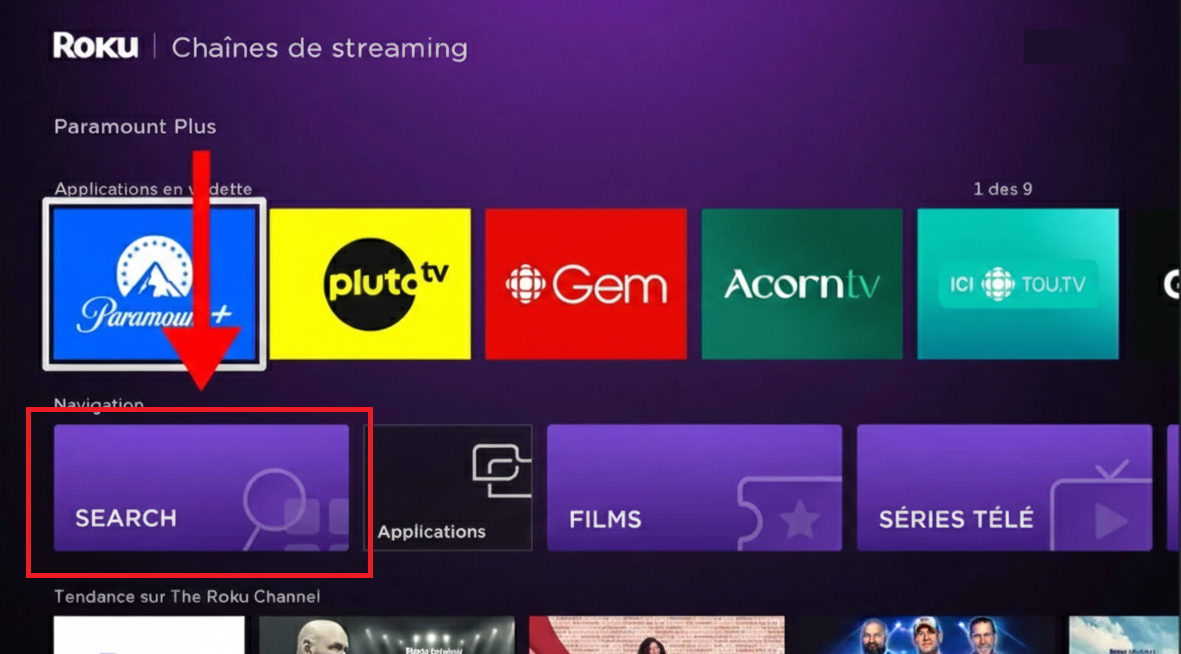
In the Streaming channels, scroll down to the Navigation, then select Search (Search).

Roku - Search button in Streaming channels

Step 4: Search for Ibo Player Pro

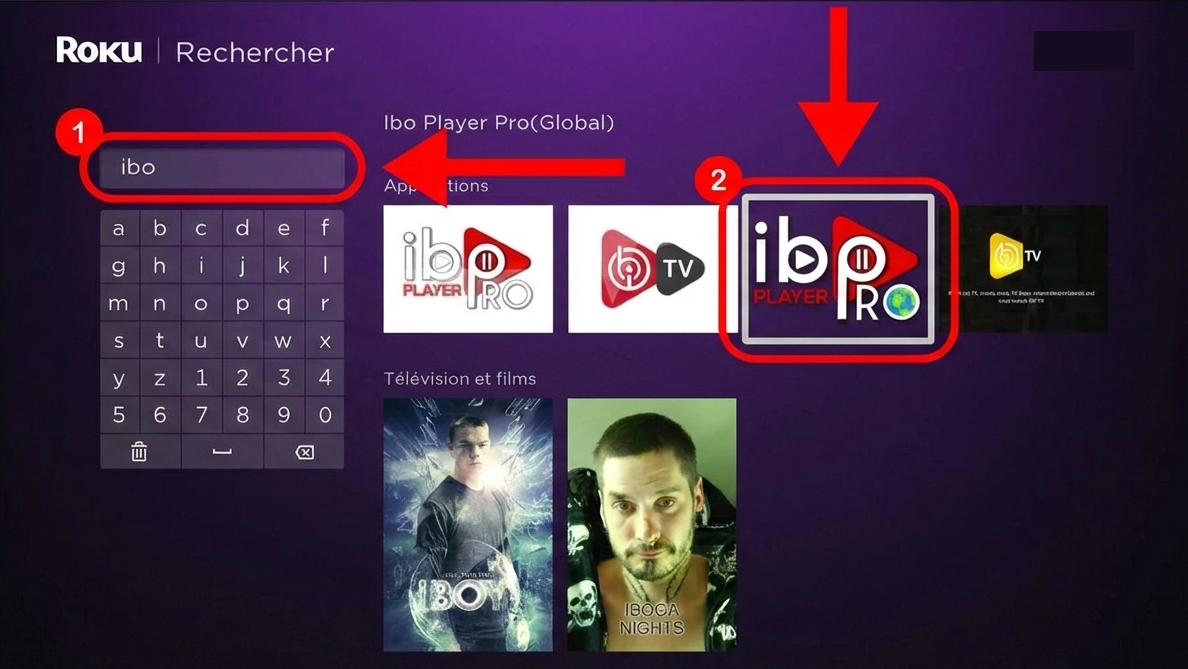
Using the virtual keyboard, type ibo in the search bar. The application Ibo Player Pro(Global) will appear in the results on the right. Please select it.

Roku - Search for ibo and select Ibo Player Pro

Step 5: Add the chain

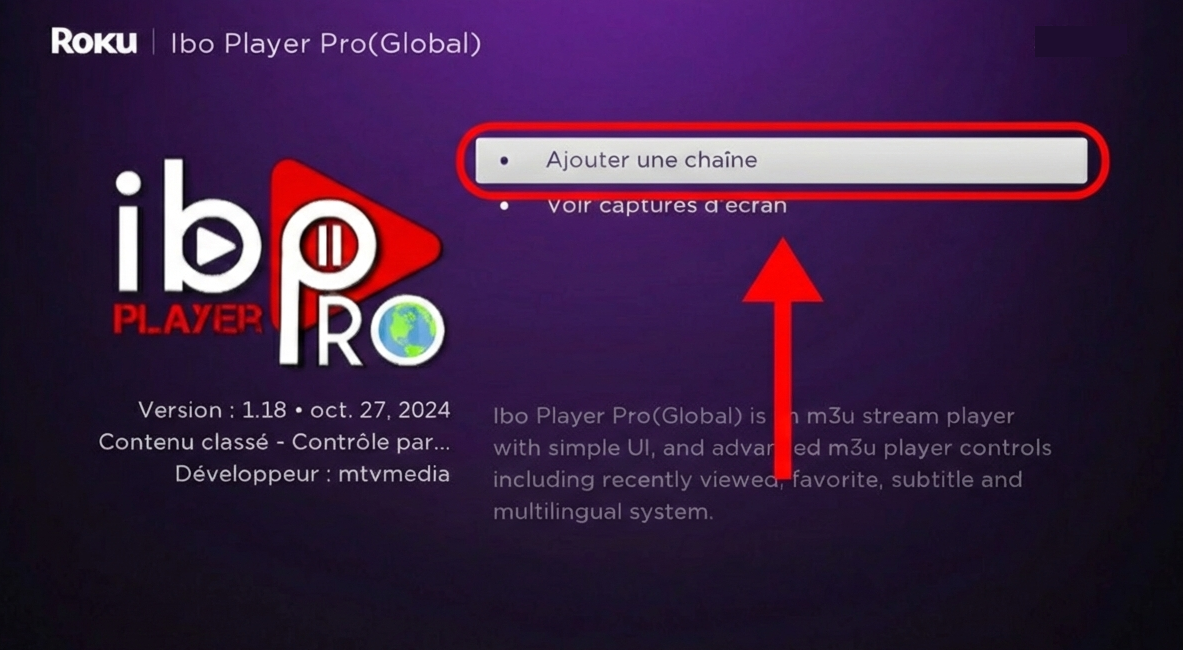
On the application page Ibo Player Pro(Global), click on Add a channel to start installation.

Roku - Add a channel (Ibo Player Pro)

Step 6: Accept the conditions

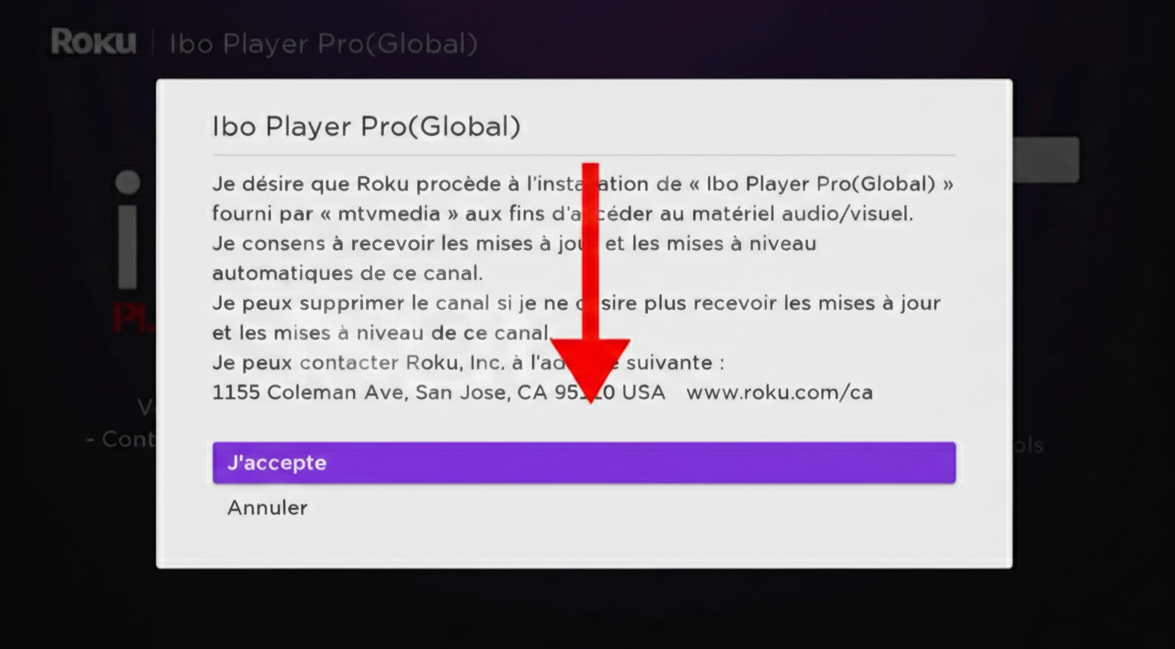
A confirmation window will appear. Click on I accept to authorize installation of the application.

Roku - Accept installation conditions

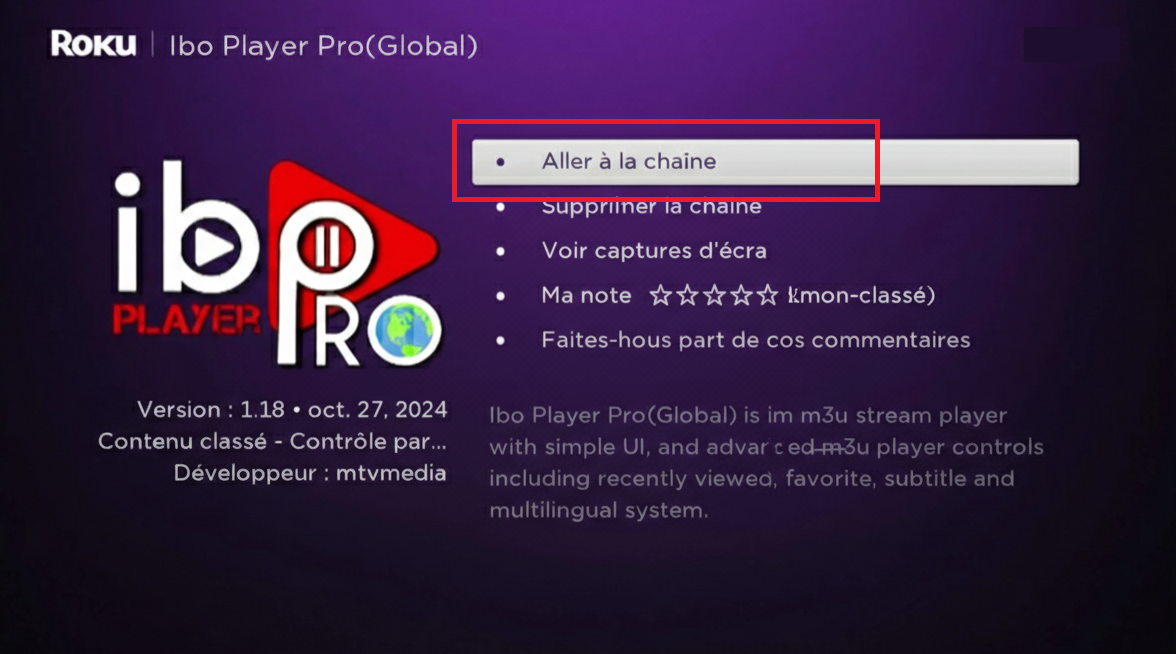
Step 7: Open the application

Once installation is complete, click on Go to channel to open directly Ibo Player Pro.

Roku - Go to channel (Ibo Player Pro installed)

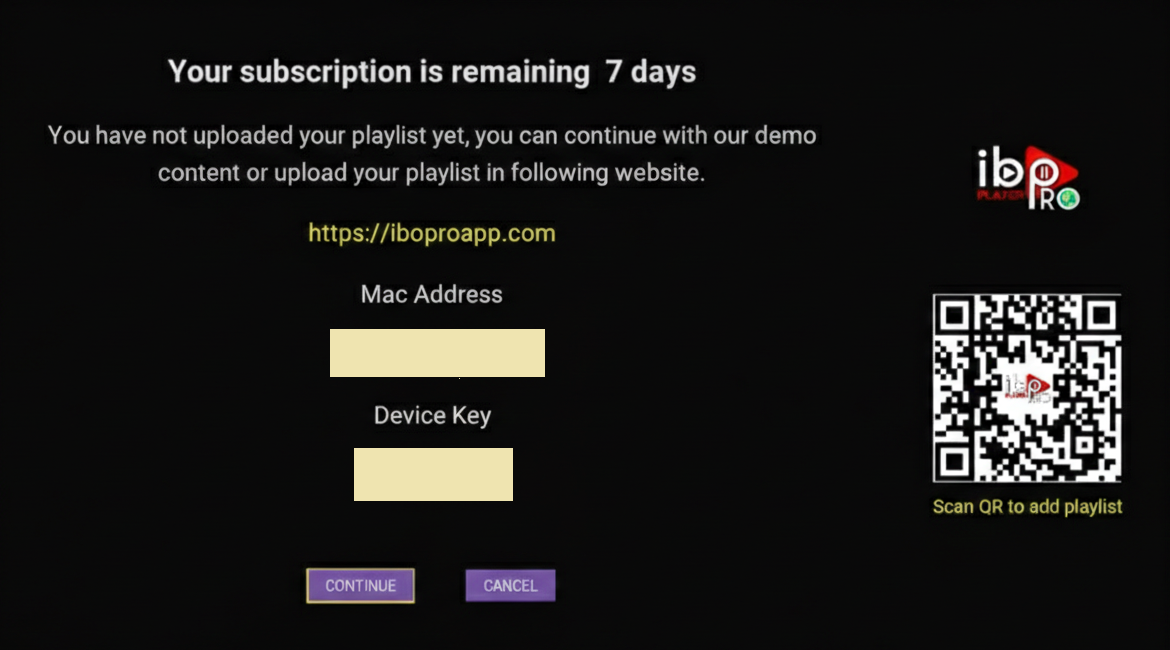
Step 8: Write down your Mac Address and Device Key

On first launch, a screen will display your Mac Address and your Device Key. Take a screenshot or photo with your phone, then enter this information directly when you place your order on the site (select Ibo Pro Player as the device used).

Ibo Player Pro - Mac Address and Device Key

🎉 Congratulations! You have now installed and configured Ibo Player Pro on your Roku / Hisense / TCL TV. Once activated by our team, you'll be able to enjoy our service our service on your TV.

Recommended

MyTV Online - Formuler Z10 / Z11

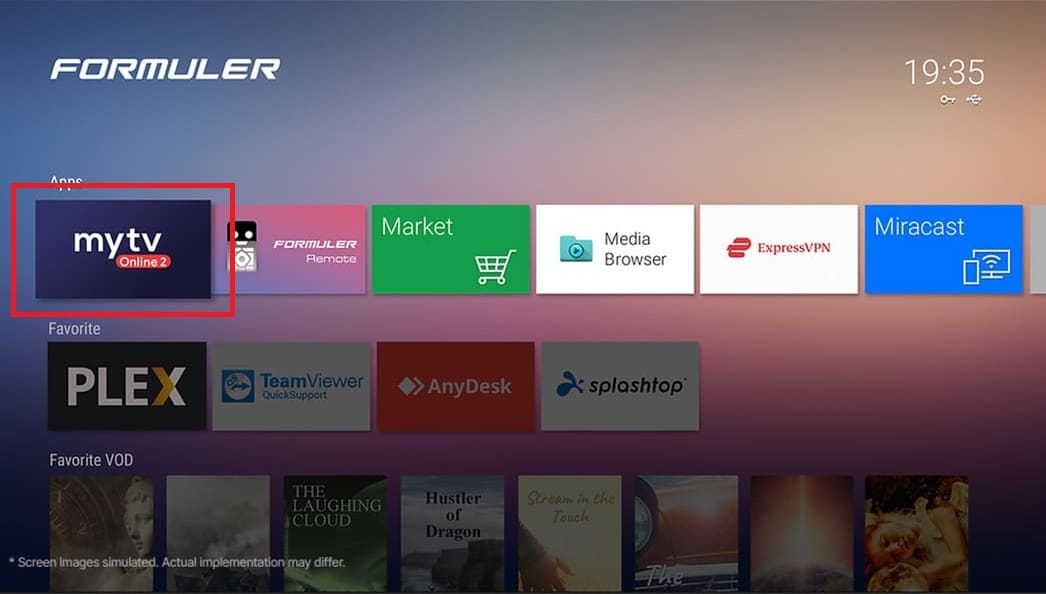
Step 1: Open MyTV Online

Switch on your Formuler box (Z10, Z11...), then open the application MyTV Online from the Home screen. Depending on your model and system version, these may be MyTV Online 2 or MyTV Online 3.

Formuler home screen - MyTV Online

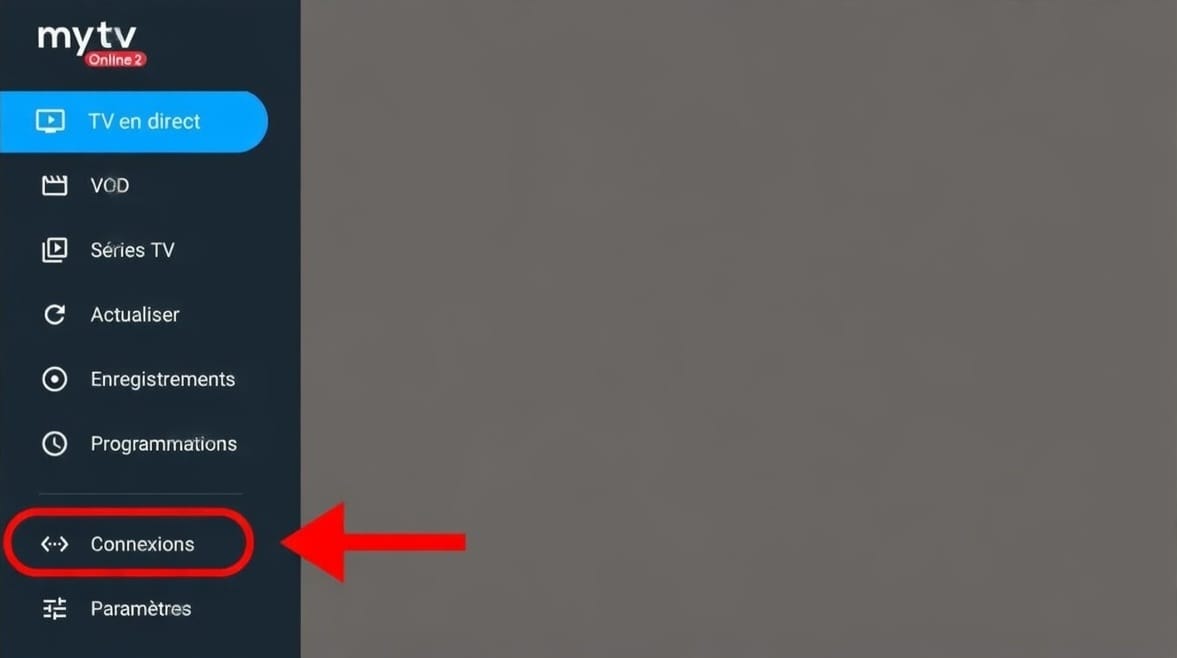
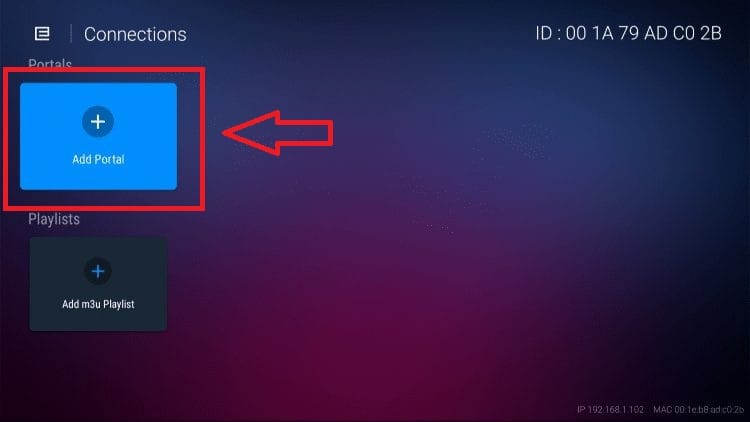
Step 2: Go to the Connections section

In MyTV Online, first open the menu on the left of the screen. Depending on the version installed, access the Sources, Contents or Connections.

MyTV Online menu - Connections section

Step 3: Add a portal

Select the option for'add a new portal (button + or Add Portal).

MyTV Online - Add Portal

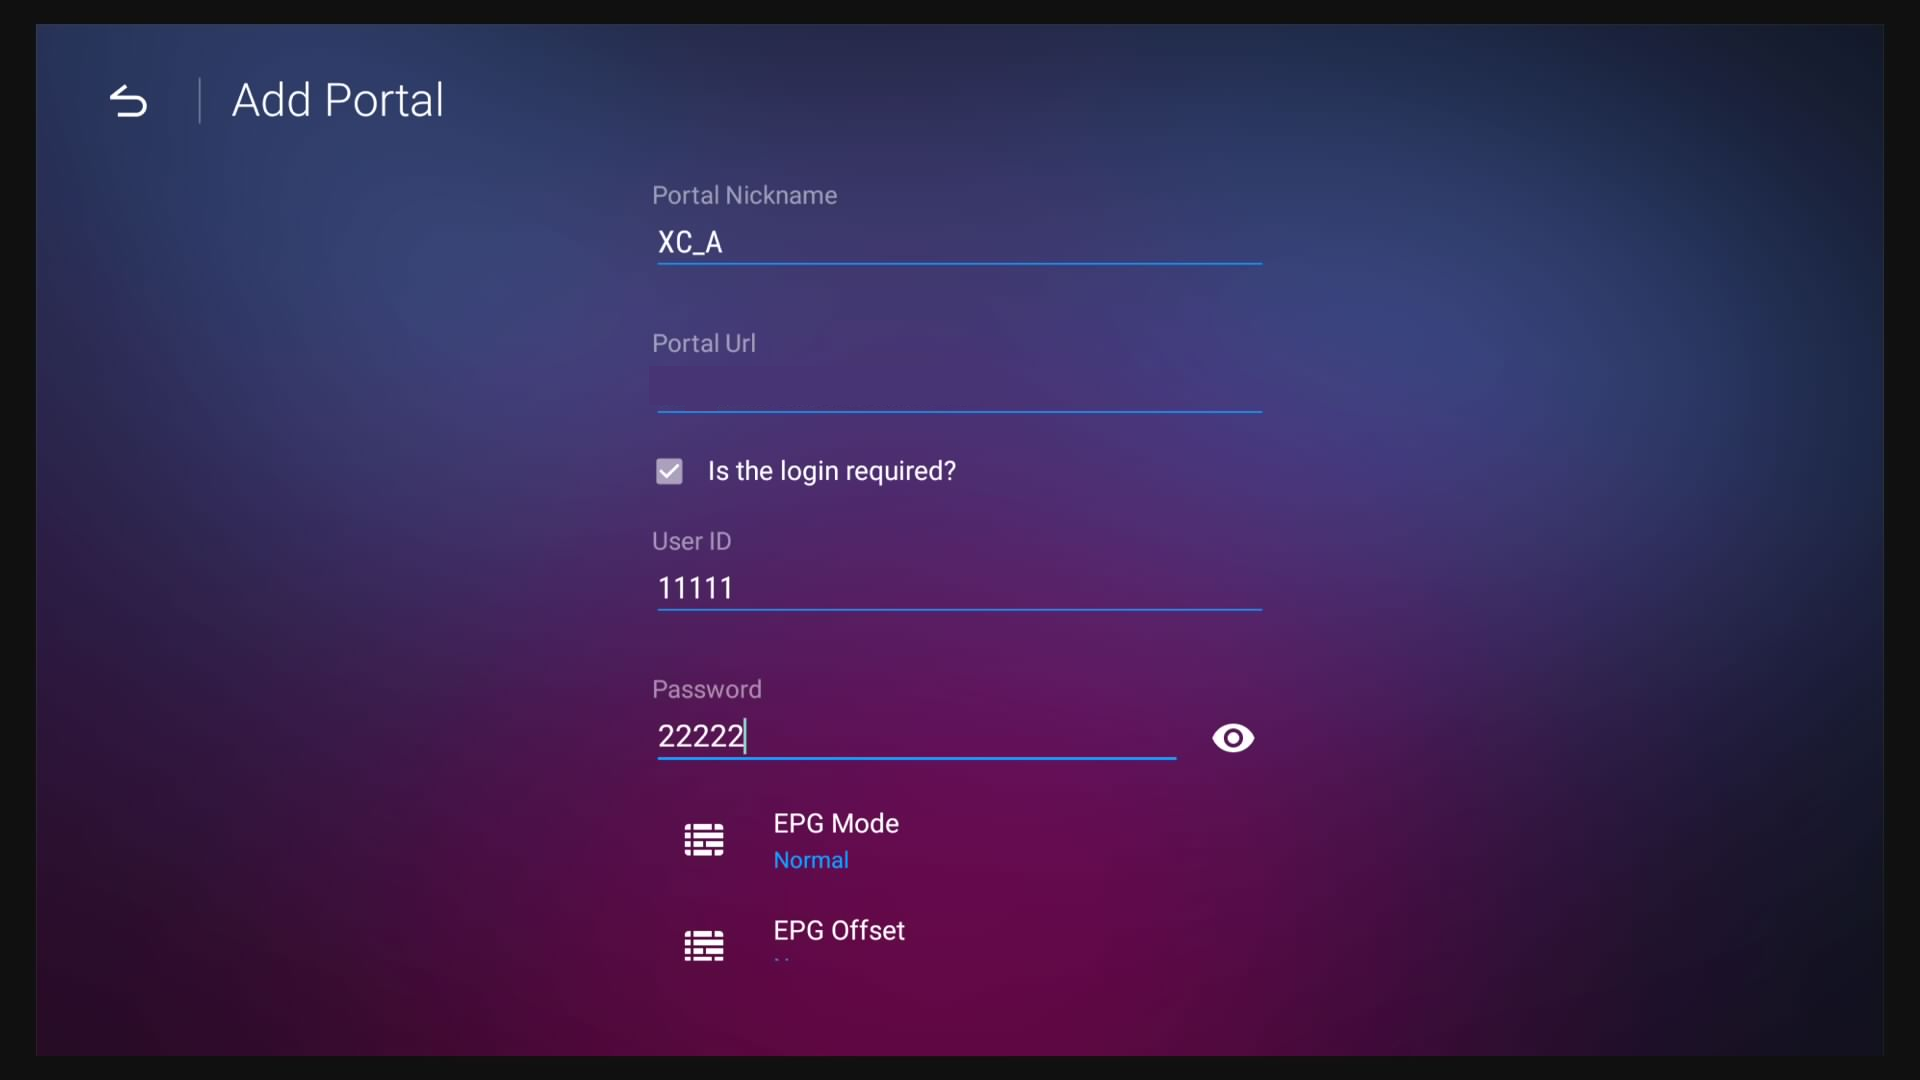
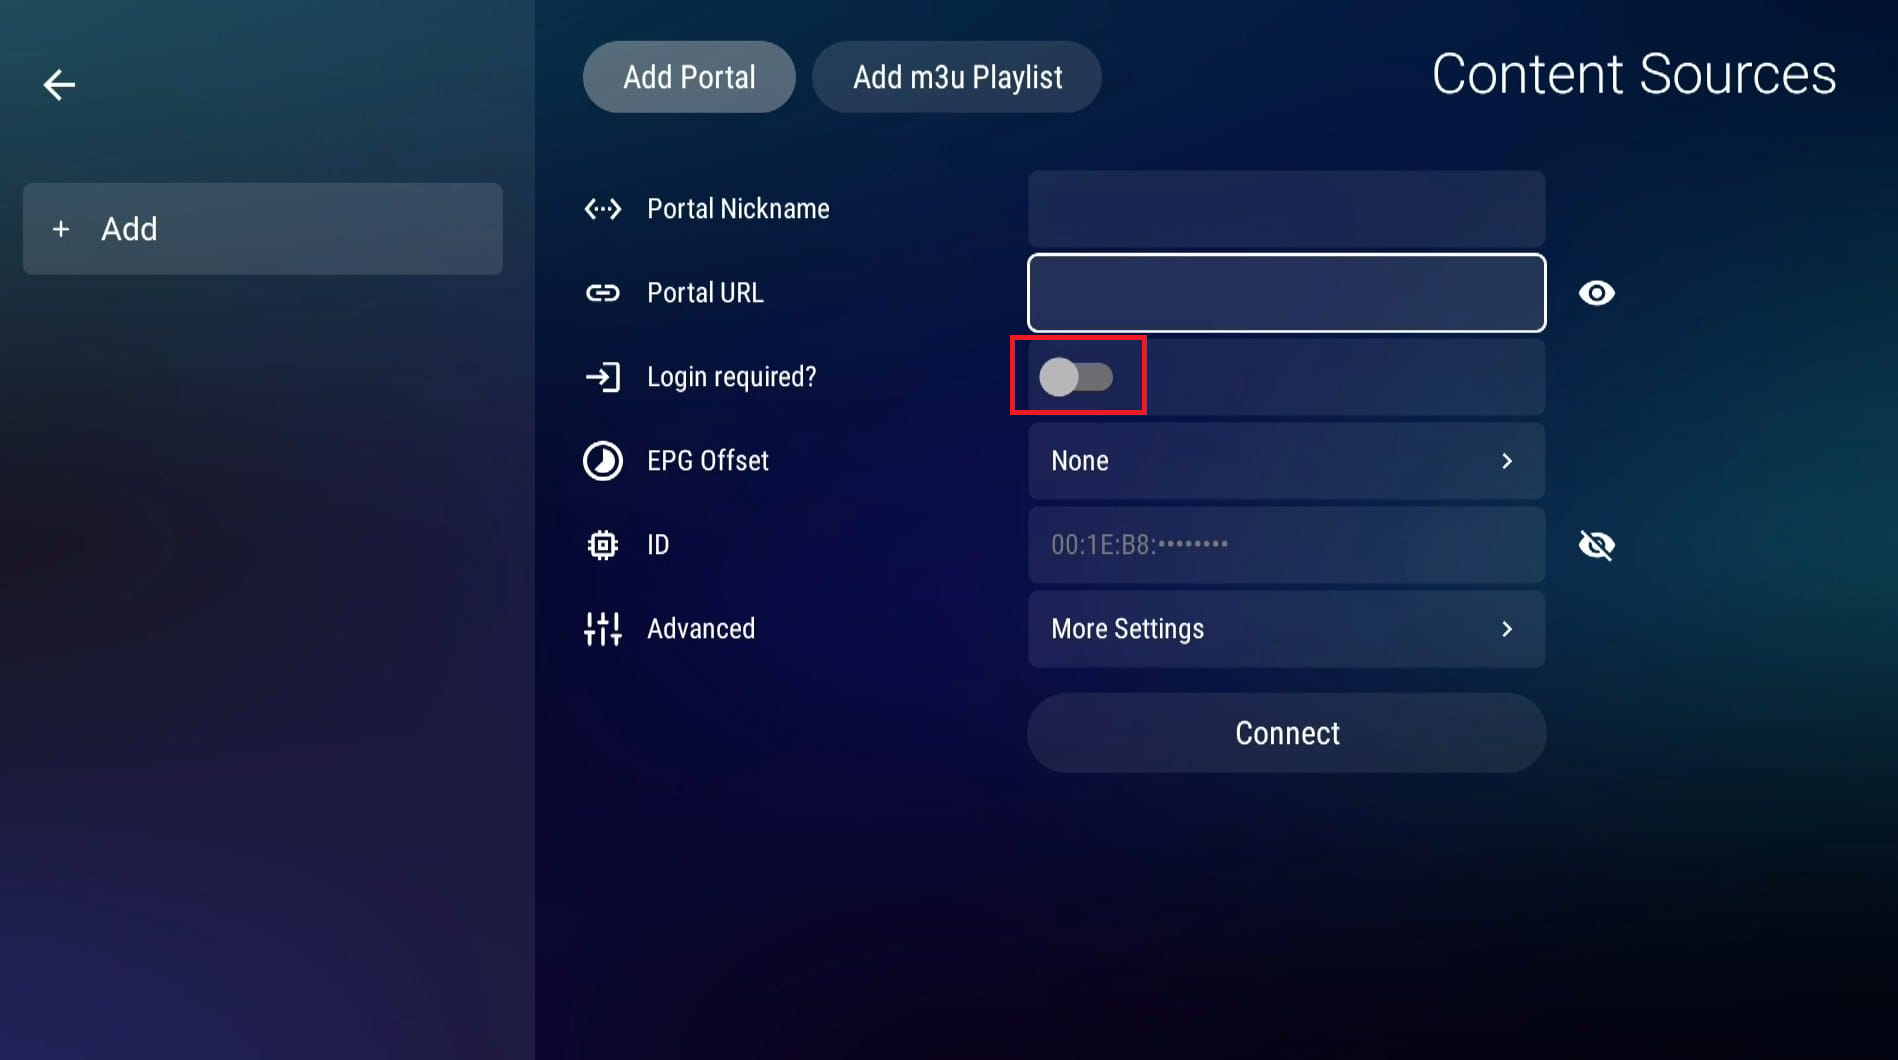
Step 4: Enter login details

Enter the following information:

  • Portal URL enter the portal URL provided by Zenith TV
  • Login requis / Login required activate this option
  • User name Enter the supplied user name
  • Password Enter the password provided

The interface may vary slightly depending on the version of MyTV Online used:

MyTV Online 2 - IPTV portal added

MyTV Online 3 - IPTV portal added

Once all the information has been correctly entered, validate to register the portal. The application will then automatically connect to the server and load the channels and content.

Step 5: Enjoy the content

When loading is complete, you can access live channels, movies and series directly from MyTV Online. Your Zenith TV service is now ready to use on your Formuler box.

Recommended

Zenith TV - Windows

Step 1: Download installation file

Select your Windows version to start the download:

Once downloaded, you'll get the installation file (ZenithTV Setup 2.0.exe).

Step 2: Open the downloaded file

The file will appear in your Downloads. Click on Open file to open it.

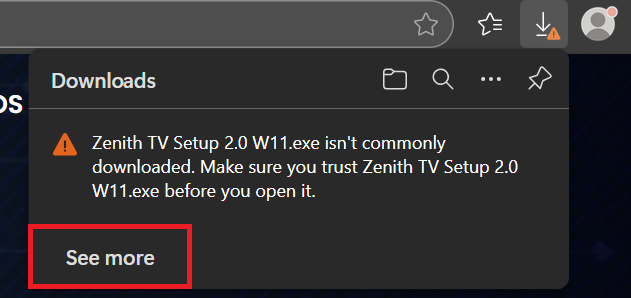
⚠️ Important: The steps below (with images) are only if Windows displays a security warning when downloading or opening the file.

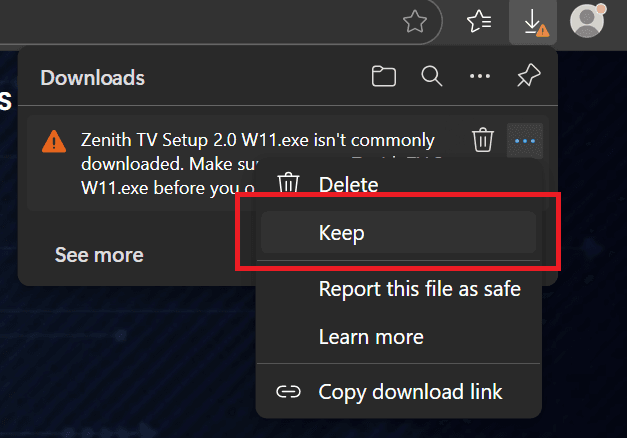
If Windows displays a security warning, click on "See more" :

Windows Defender - See more

Then click on Keep to save the file :

Windows Defender - Keep

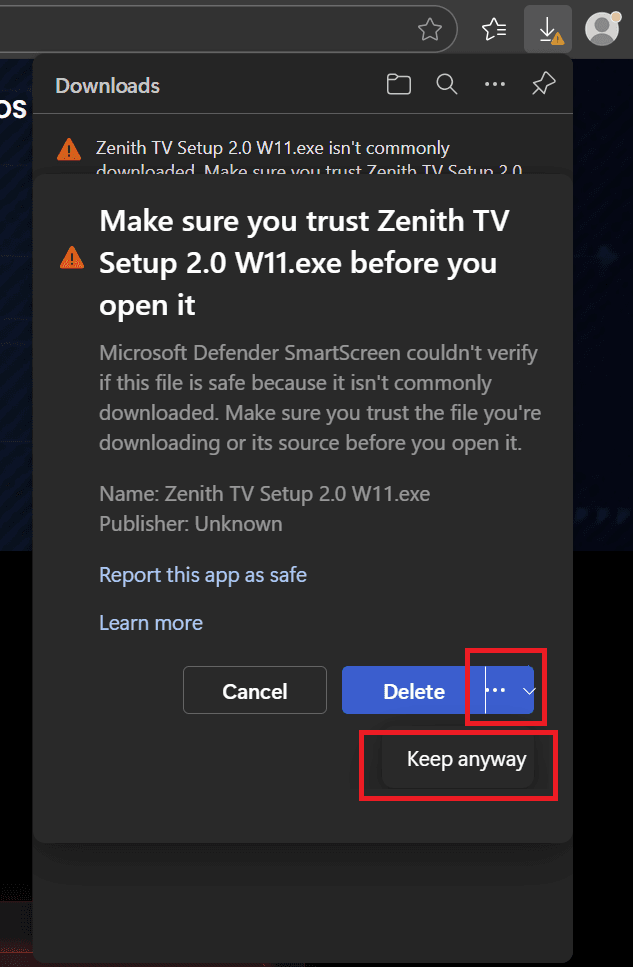
Then click on Keep anyway to confirm :

Windows Defender - Keep anyway

Step 3: Installing the application

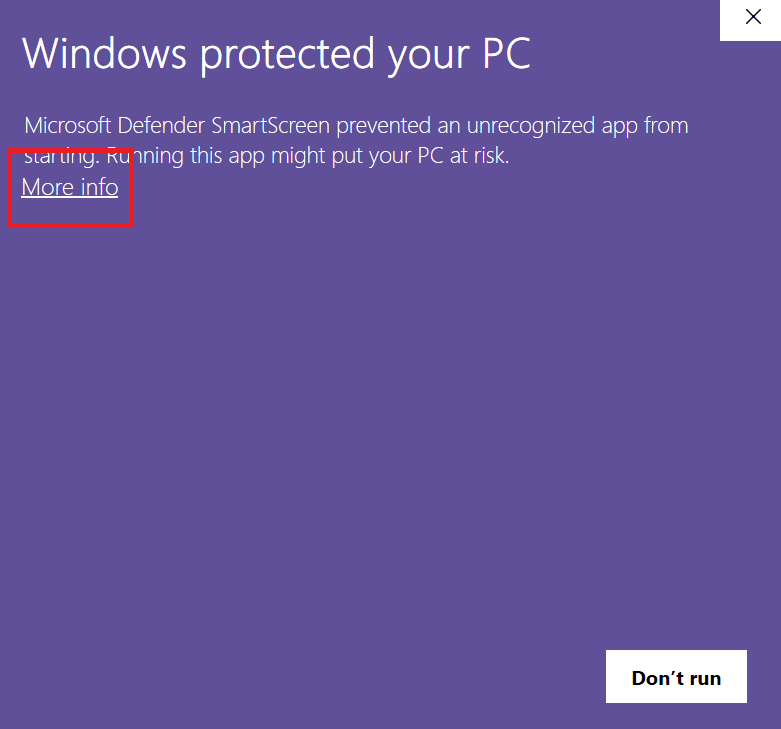
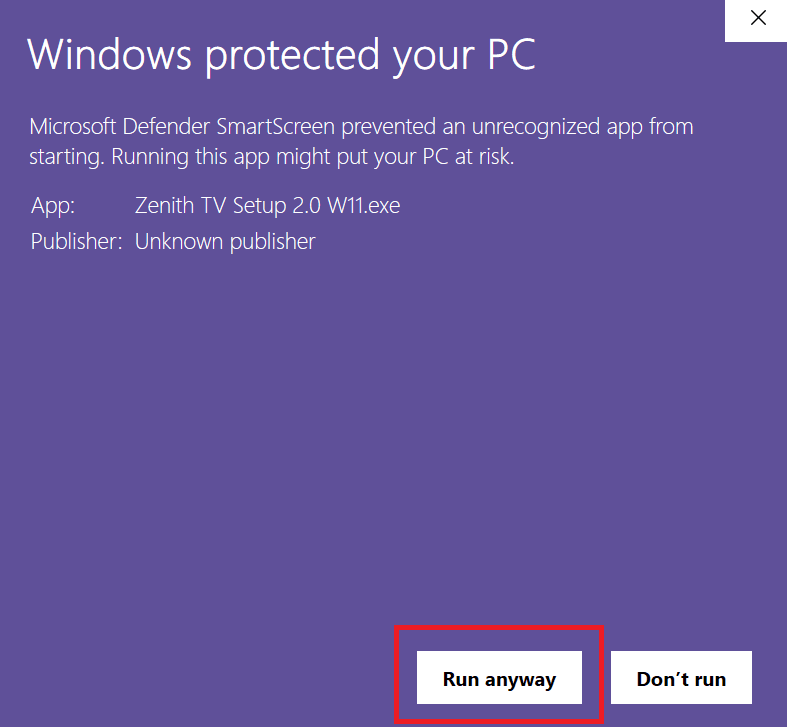
Double-click on ZenithTV Setup 2.0.exe to begin installation. If a SmartScreen message appears, click on «Read more » then on «Execute anyway». Then follow the on-screen instructions.

Windows SmartScreen - More information

Windows SmartScreen - Run it anyway

Step 4: Configuration

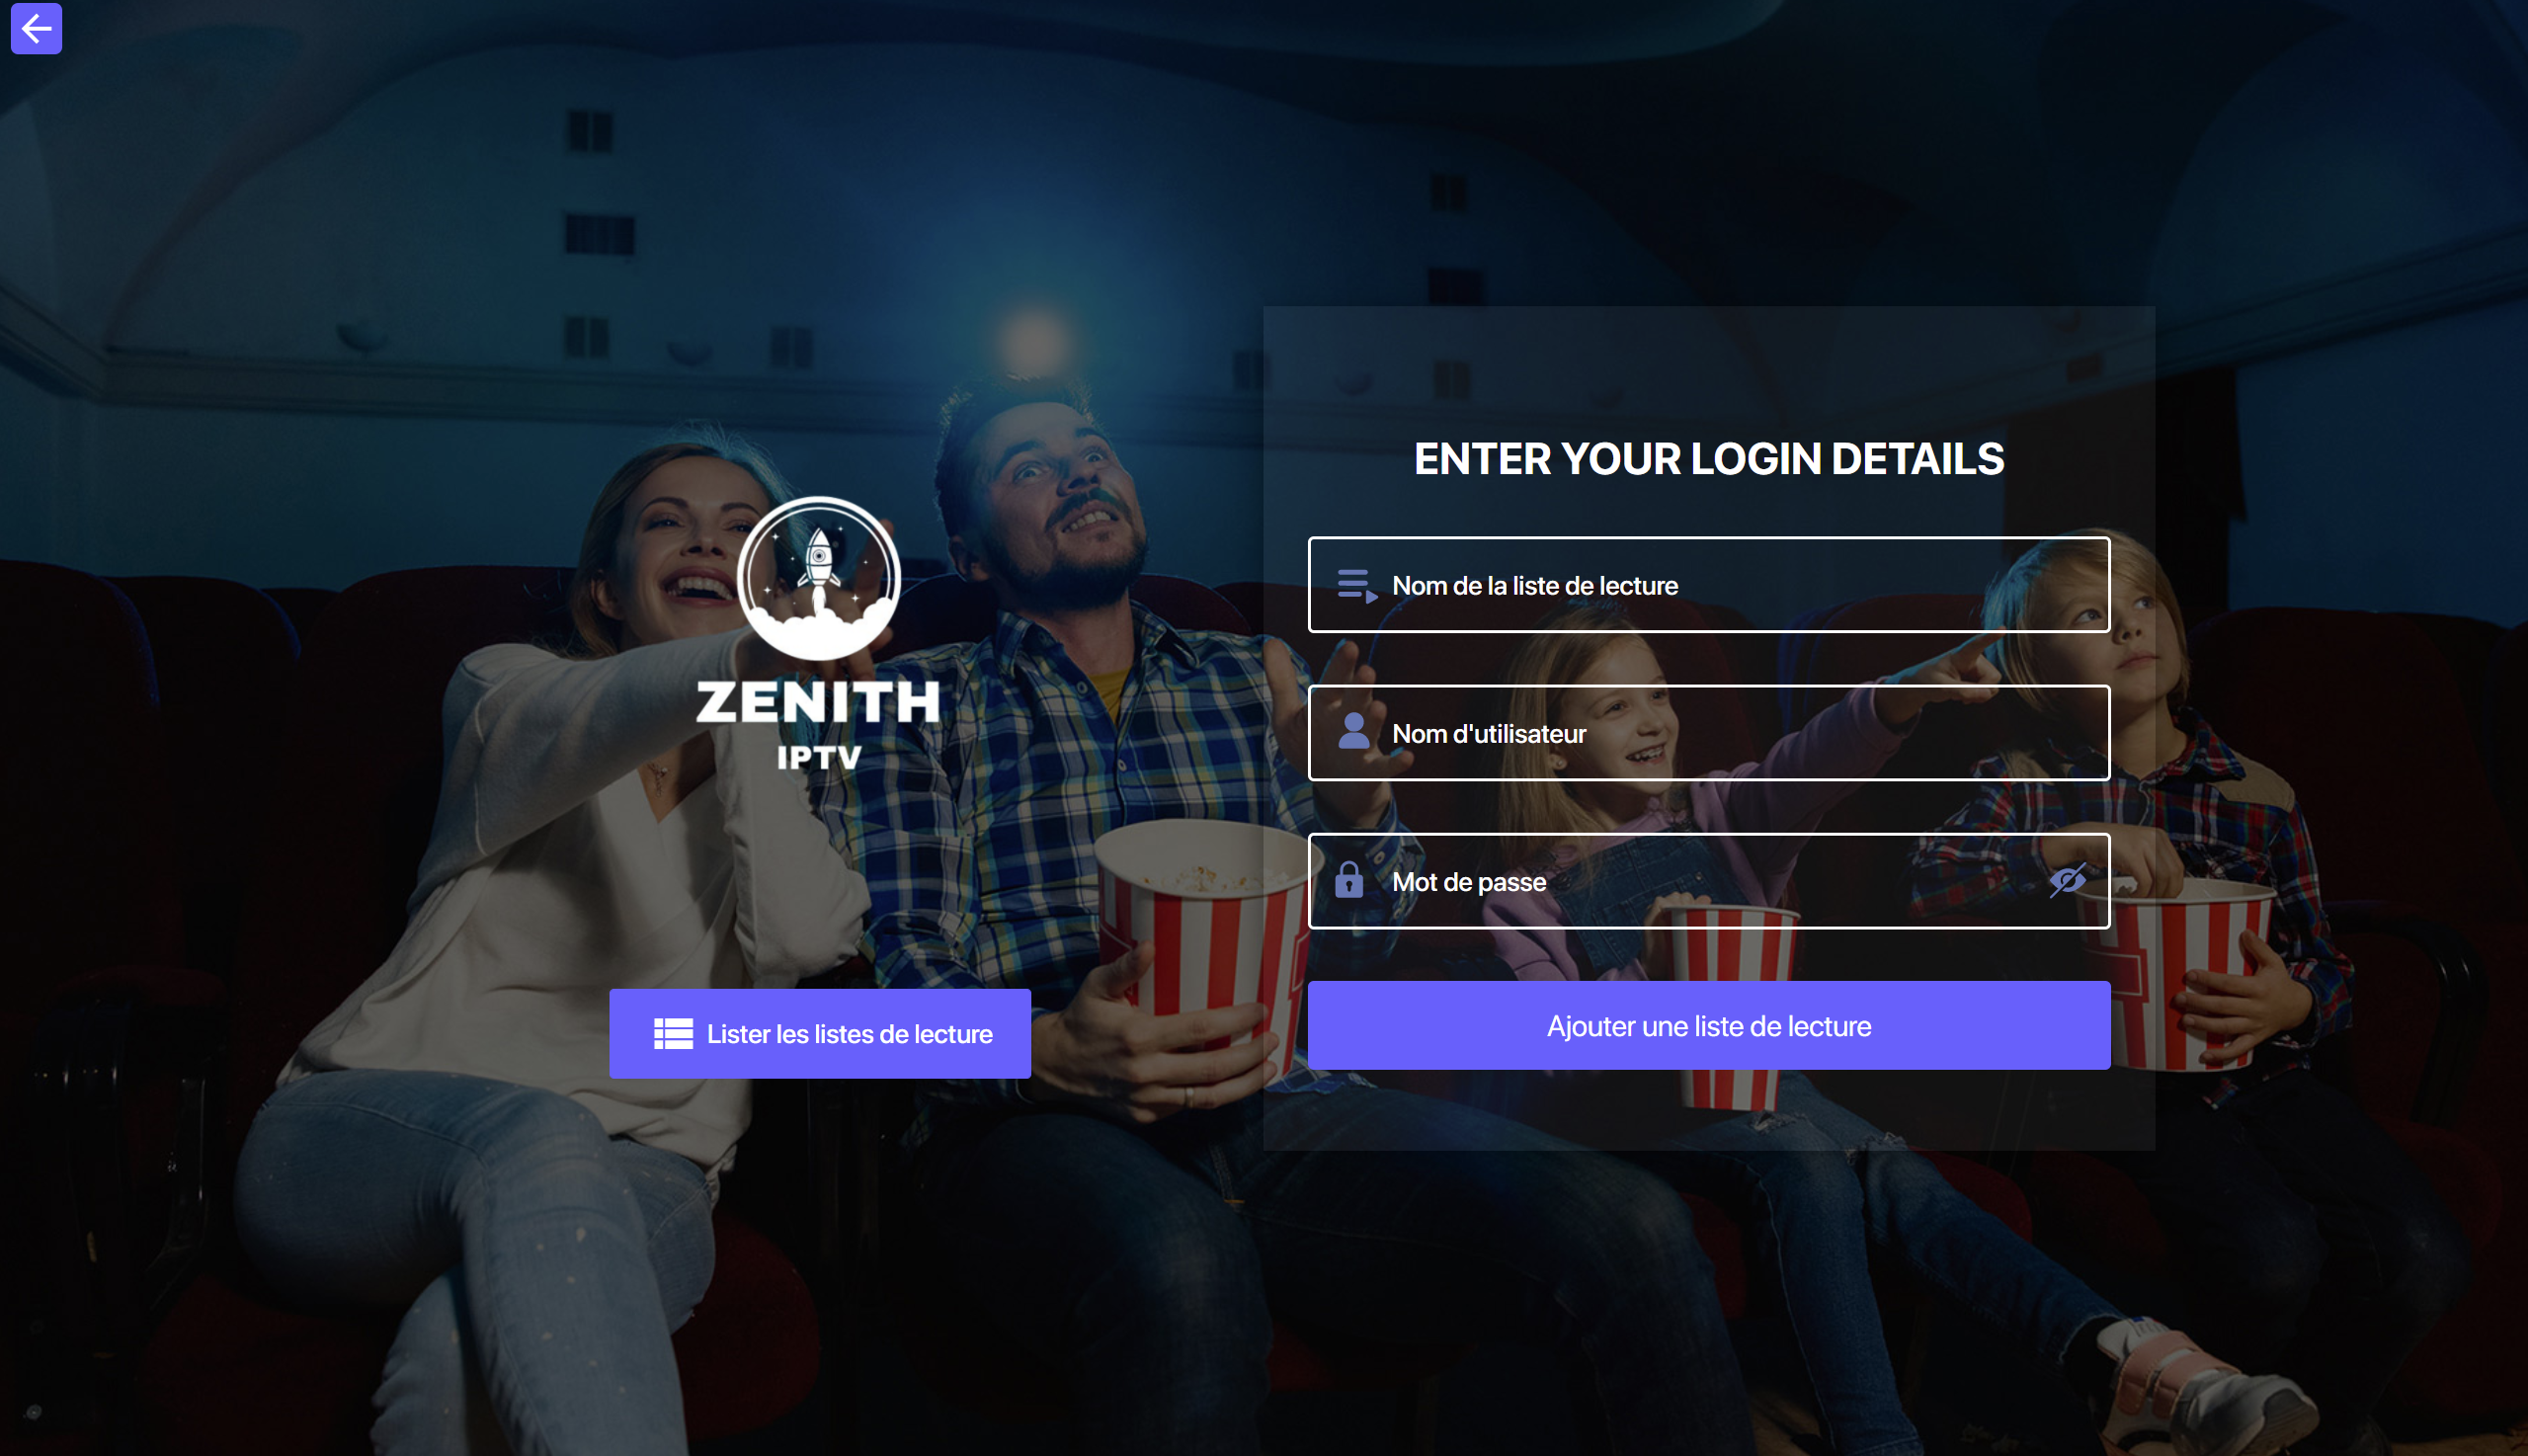
Open ZenithTV, enter your login details, choose a name for Playlist Name, then click on Add Playlist. If you don't have your login details, please contact our support team.

ZenithTV Windows connection

Step 5: Enjoy ZenithTV

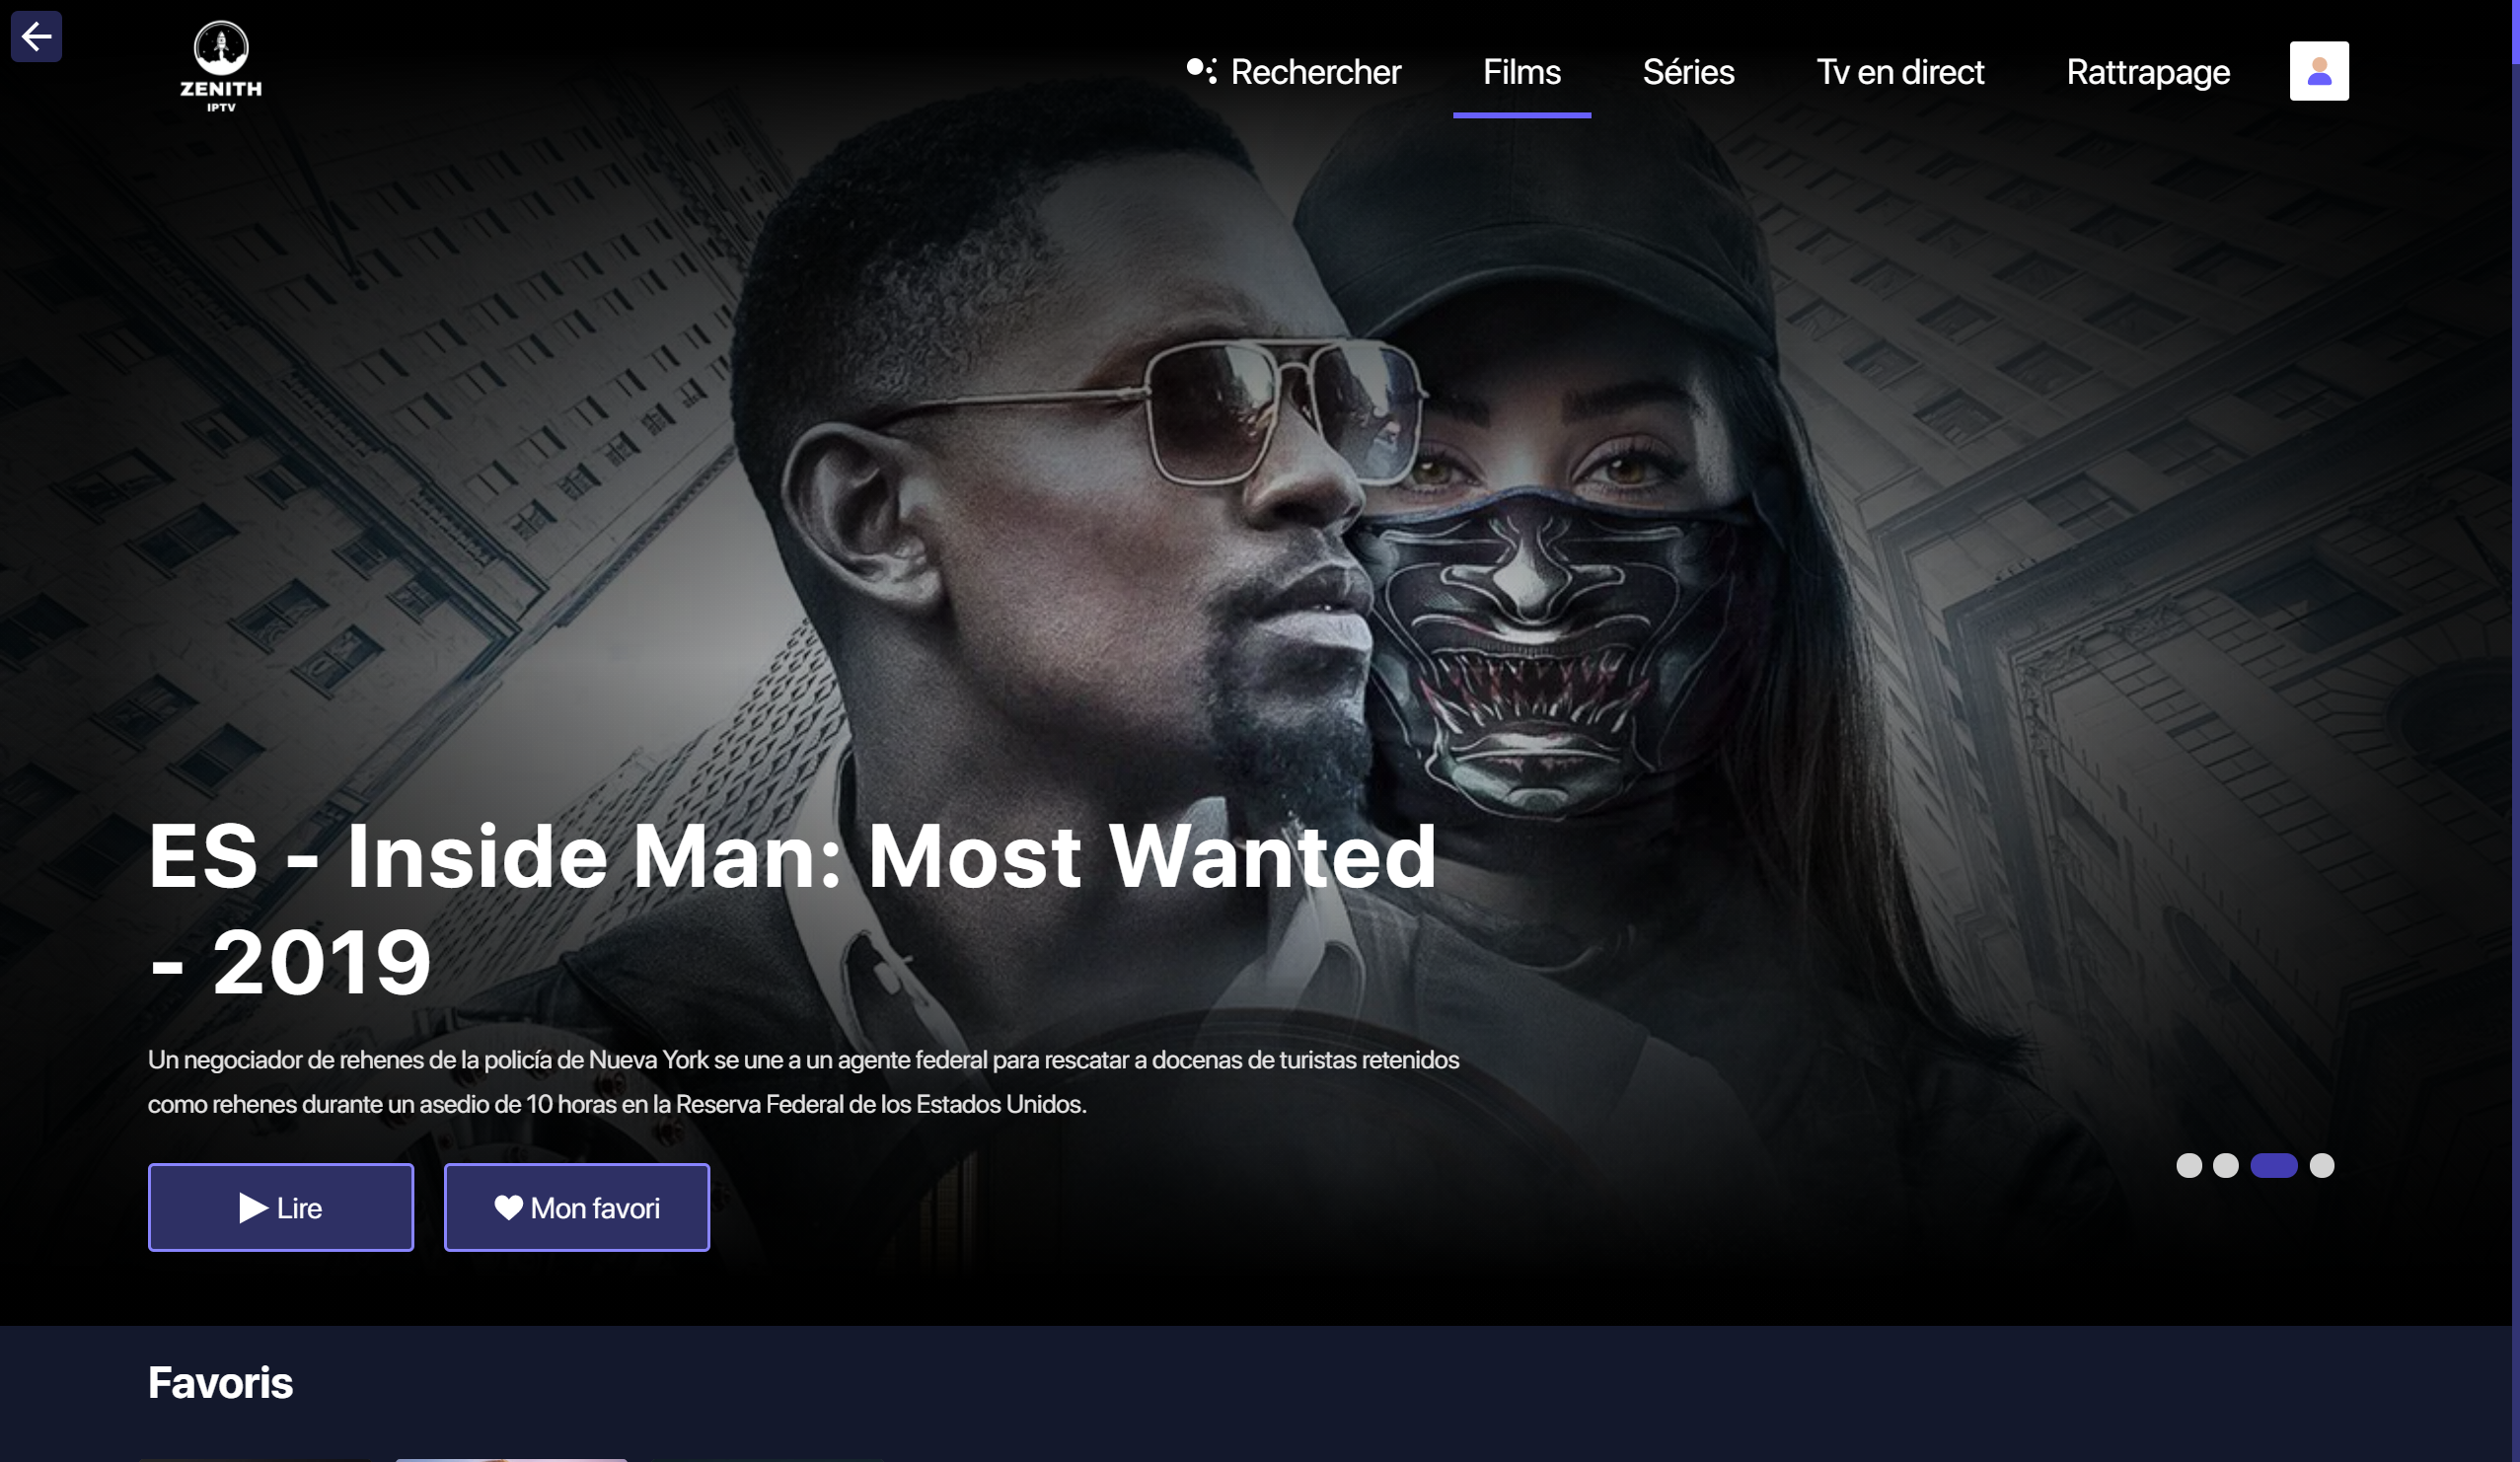
Once you've logged in, the main interface appears. You can now access all your channels, movies and series.

ZenithTV Windows interface

Recommended

Zenith TV - macOS

Step 1: Downloading the Installation File

Click on the button below to download the Zenith TV application for macOS :

The file Zenith TV-2.0.dmg will be downloaded automatically.

Step 2: Installing the Application

Once the download is complete, open the file Zenith TV-2.0.dmg from your file Downloads. A window will open: simply drag the icon ZenithTV in the Applications.

If macOS blocks the application, indicating that it comes from an unidentified developer, open System Settings → Privacy & Security, then scroll to the bottom of the page. You will see a message indicating that ZenithTV has been blocked. Click on «Authorize anyway».

Then relaunch the application ZenithTV from the Applications, then click on «Open». You only need to do this once.

Step 3: Application configuration

Open ZenithTV. On the login screen, enter the credentials provided by our team. For the Playlist Name, You can enter the name of your choice, then click on Add Playlist.

ZenithTV macOS connection

Step 4: Enjoy ZenithTV

Once you've set up your account, the main interface appears. You can now access all your channels, movies and series directly from your Mac.

ZenithTV macOS interface

Recommended

MAG Box - All models

Step 1: Find your MAG's MAC address

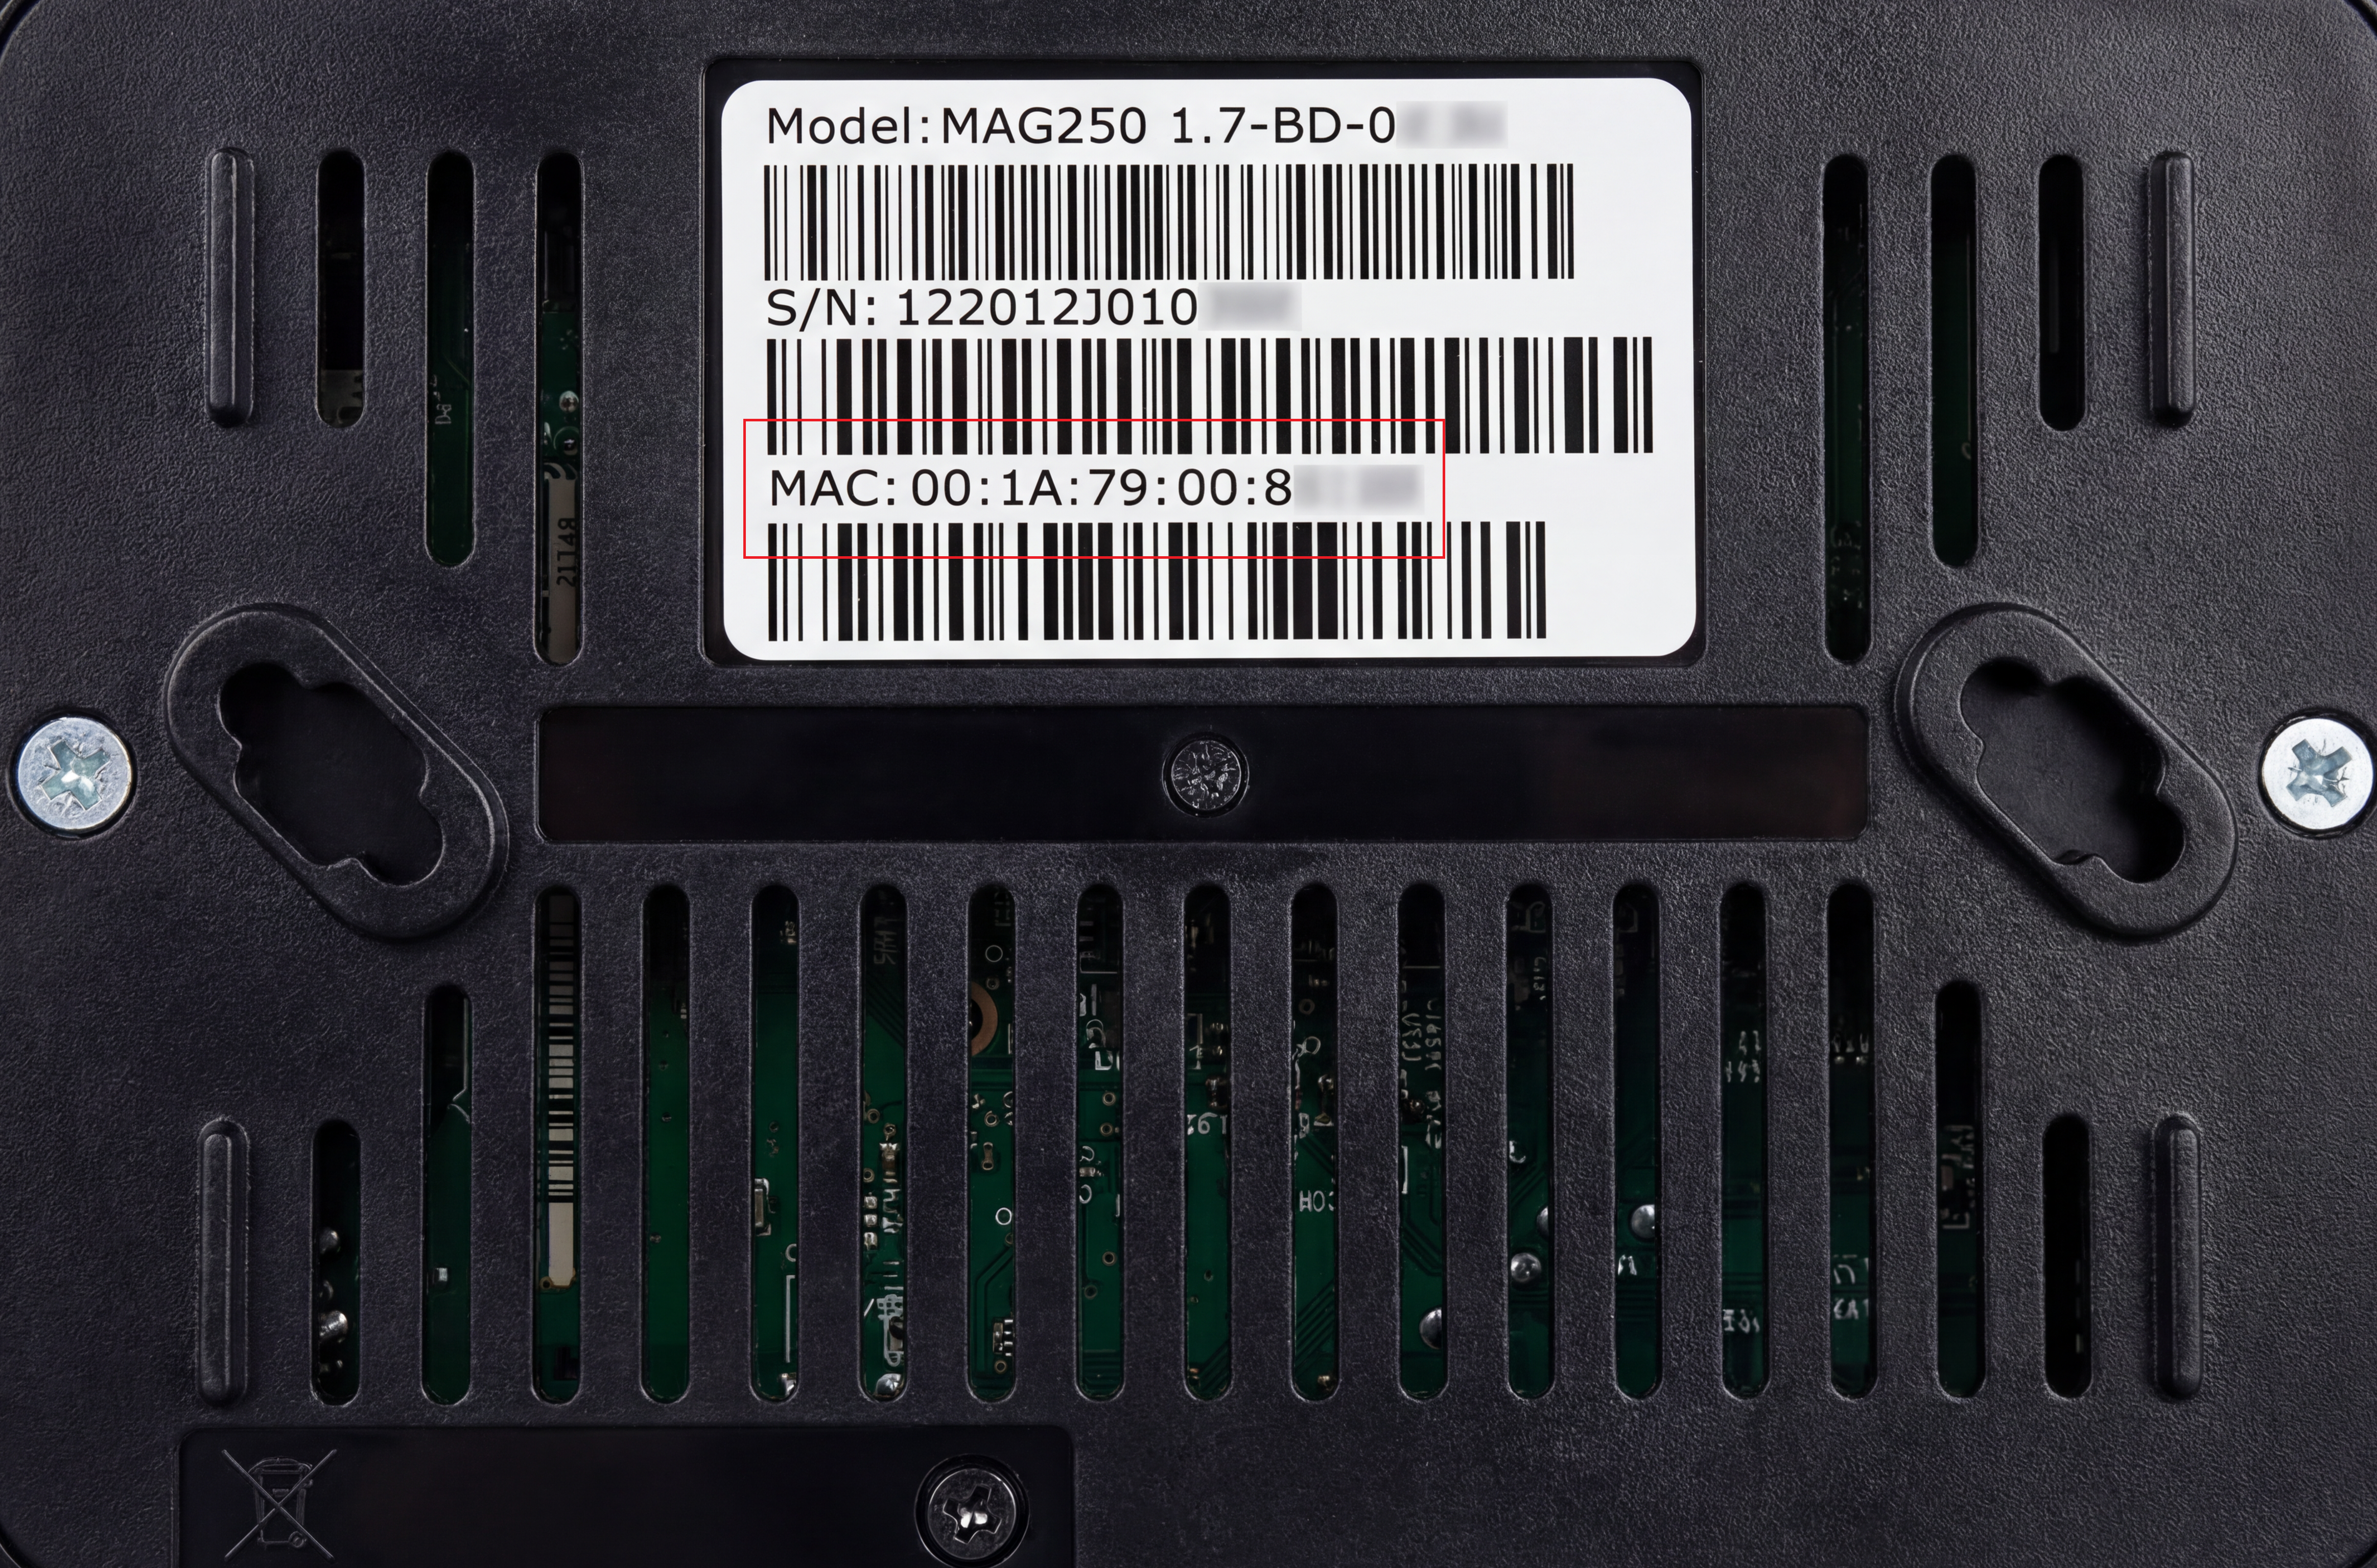
The address MAC is generally indicated at the case (label). Write it down exactly (format 00:1A:79:...), then enter it in the appropriate field when placing your order.

MAG - MAC address on label

Step 2: Open Settings

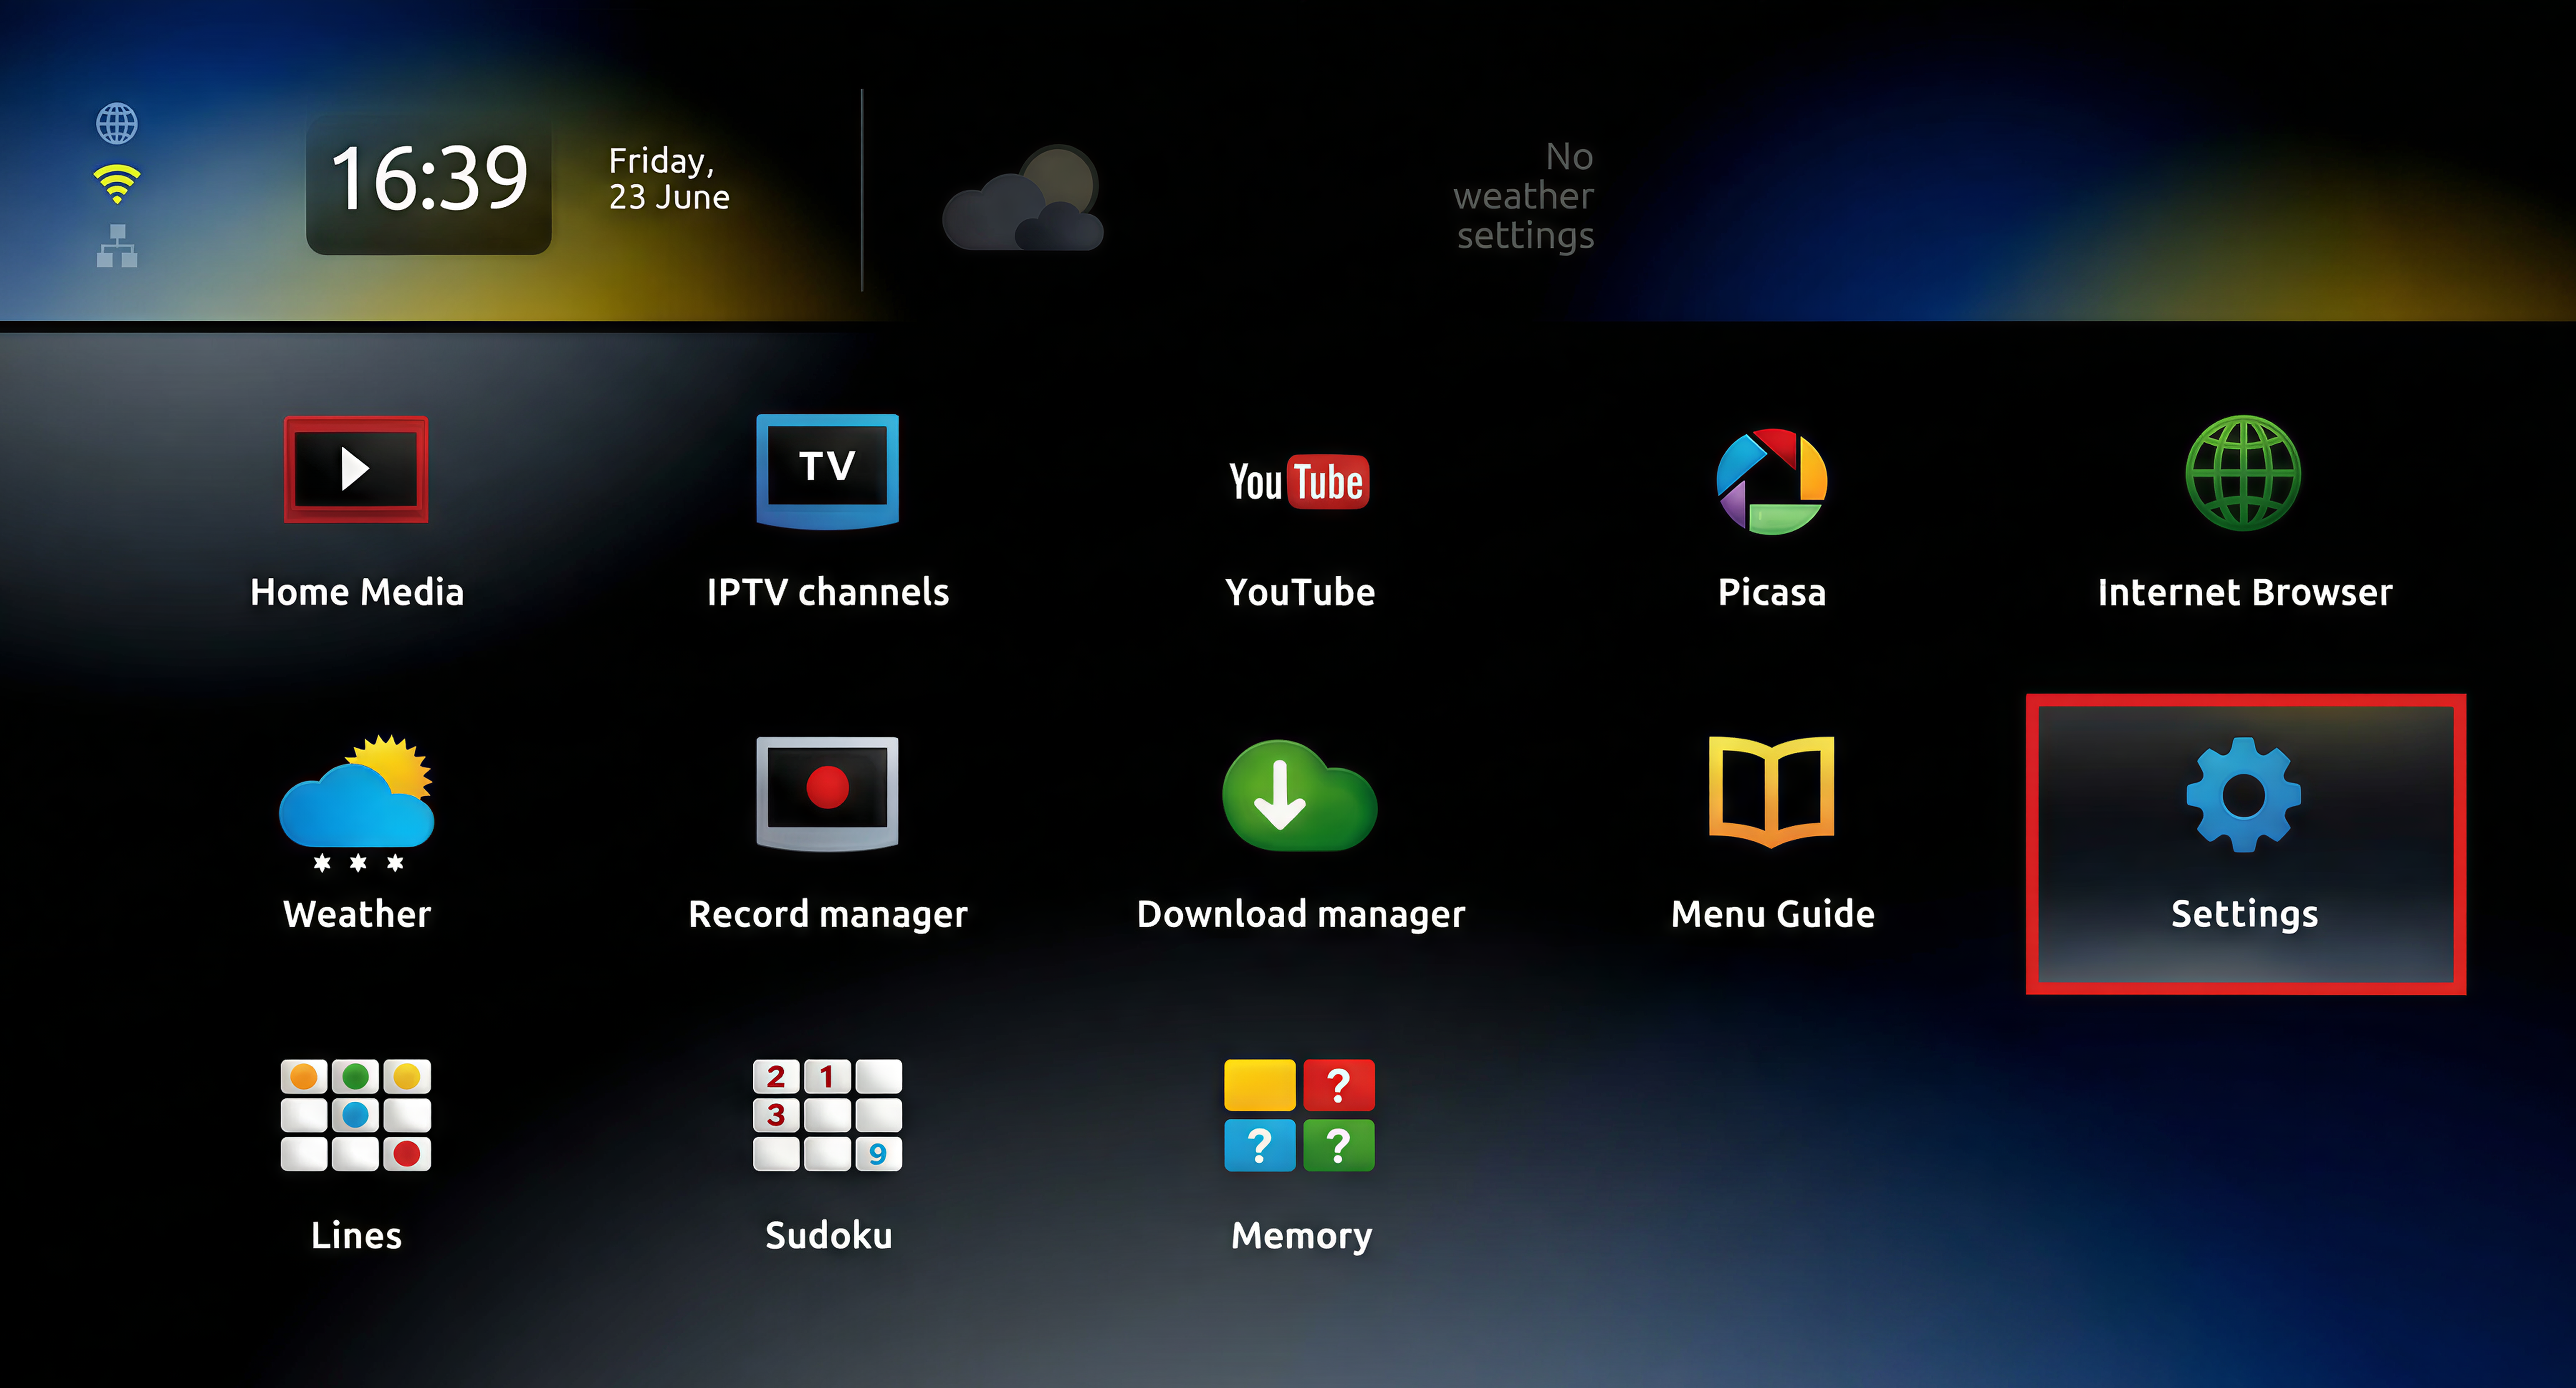
On your device's home screen, go to Settings (Settings).

MAG - Home → Settings

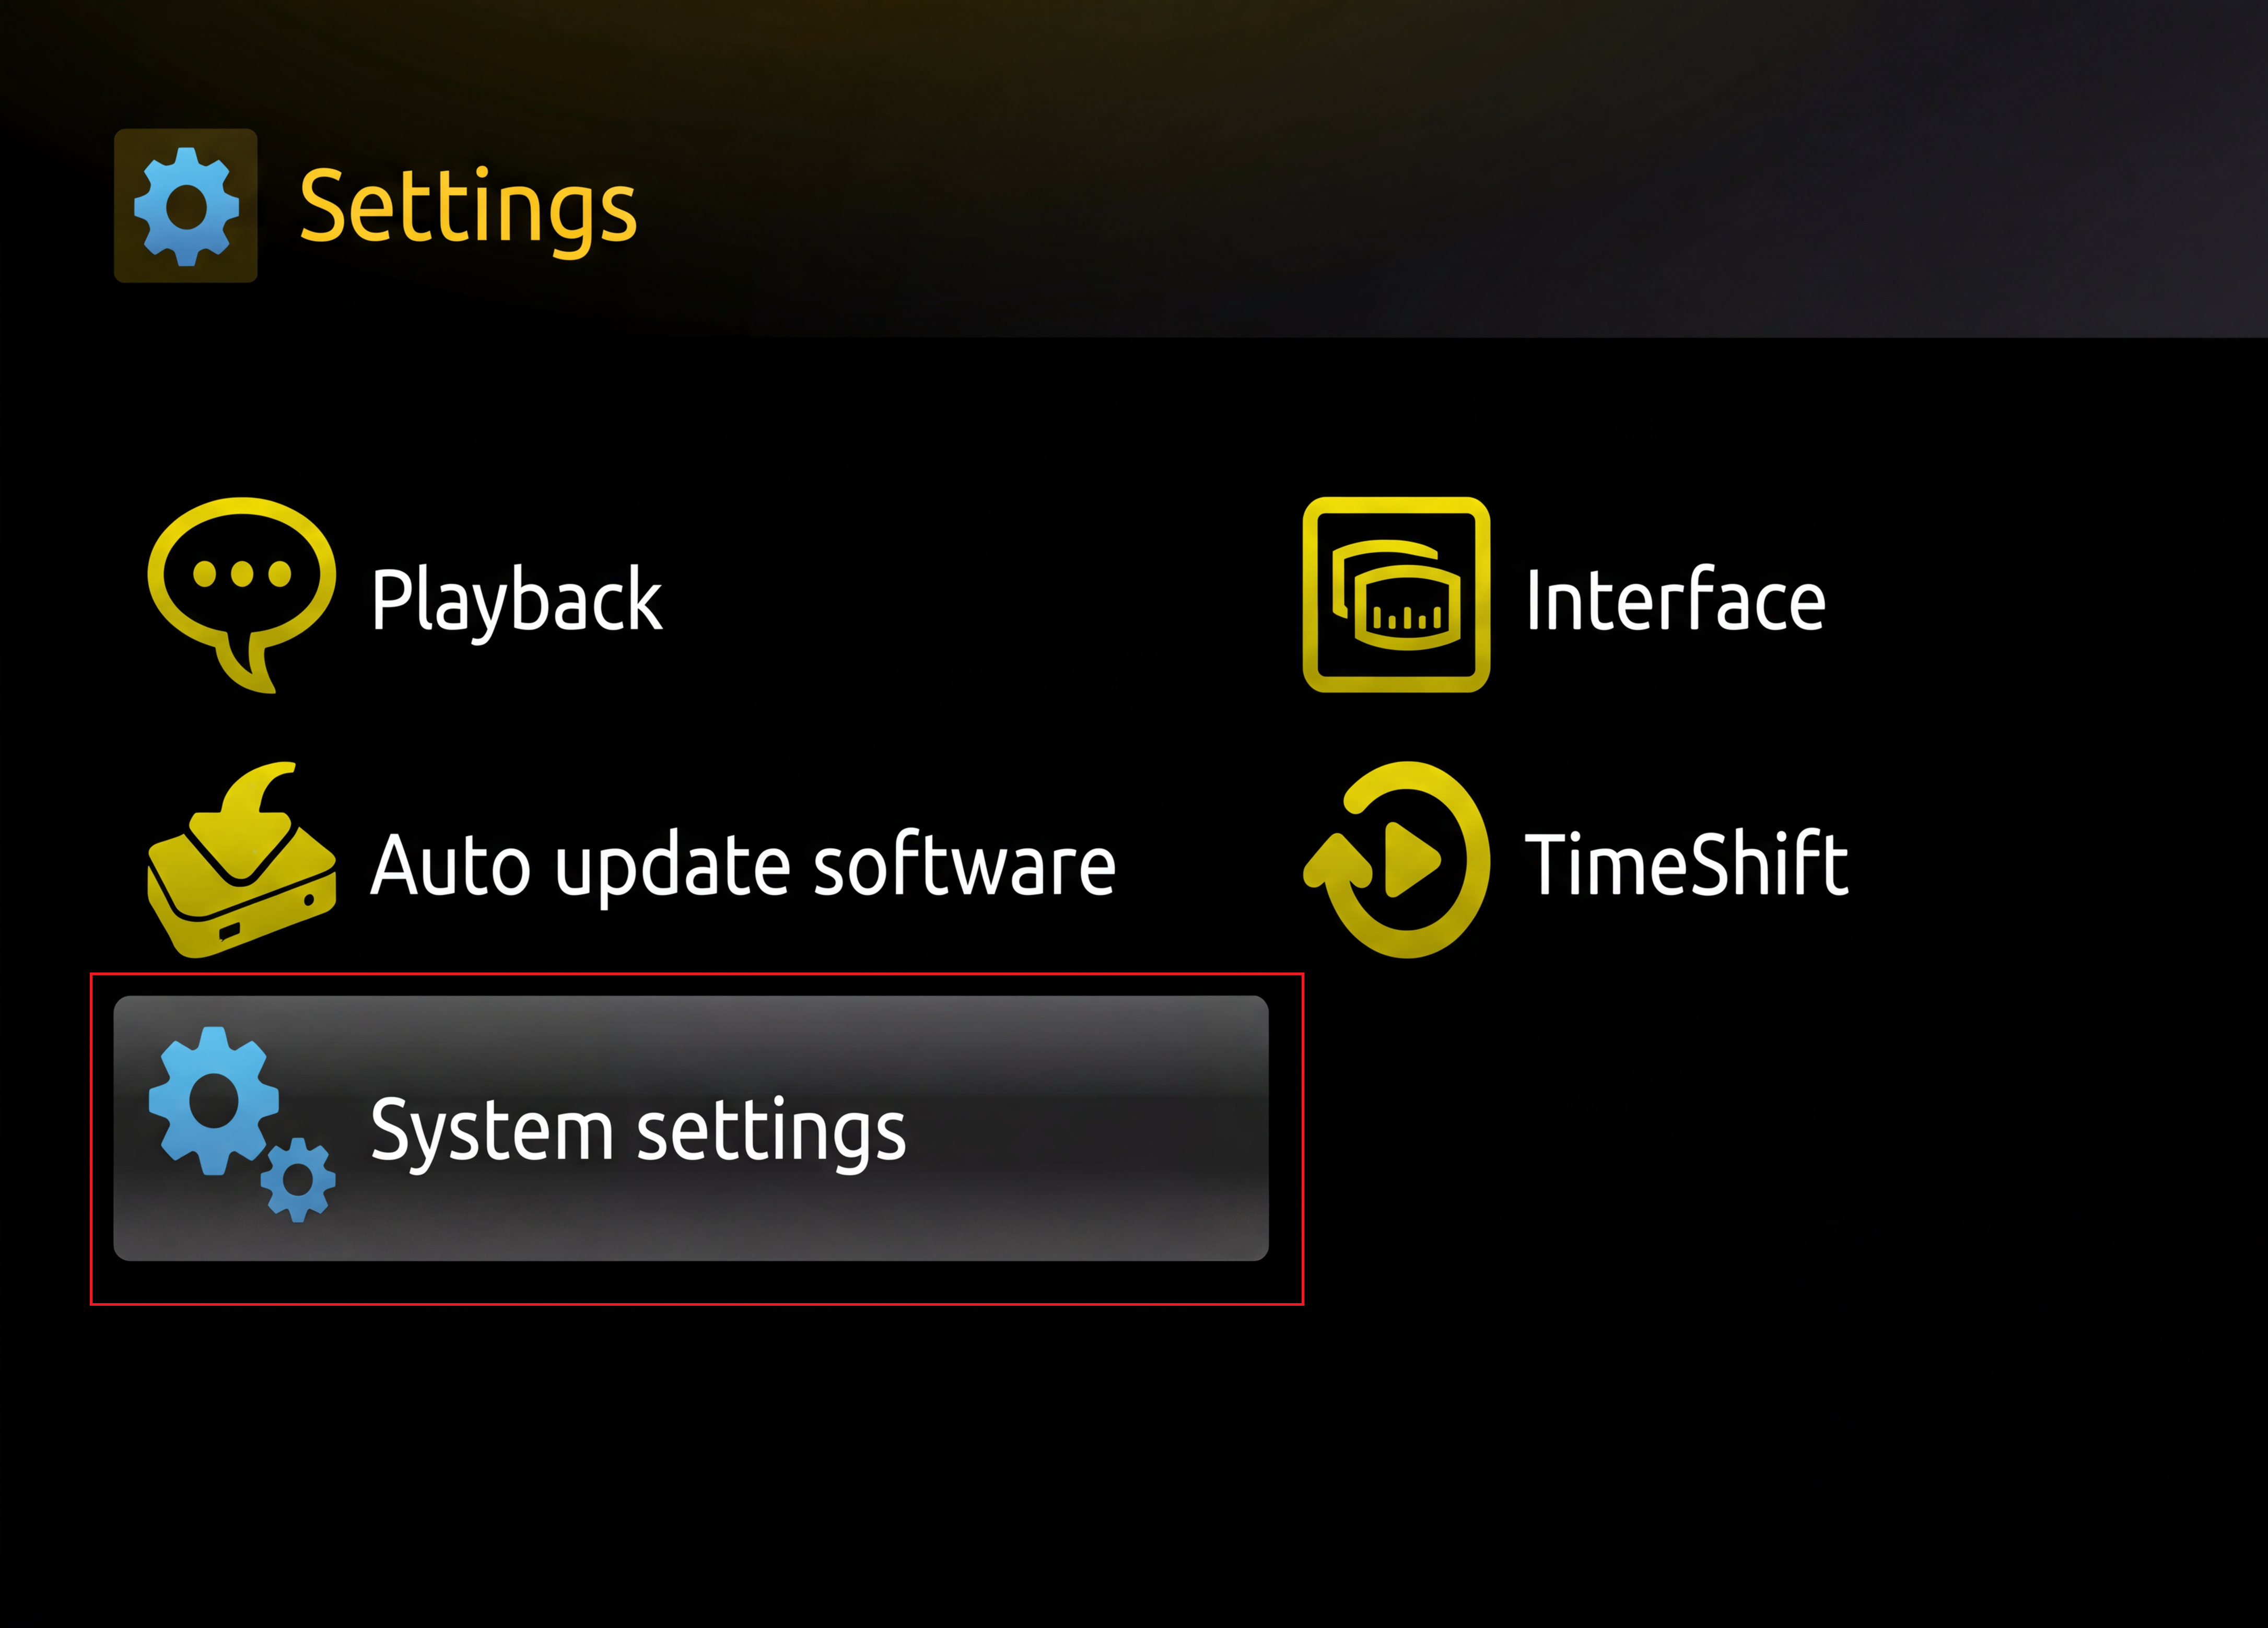
Step 3: Go to “System settings”

In the Settings menu, select System settings.

MAG - Settings → System settings

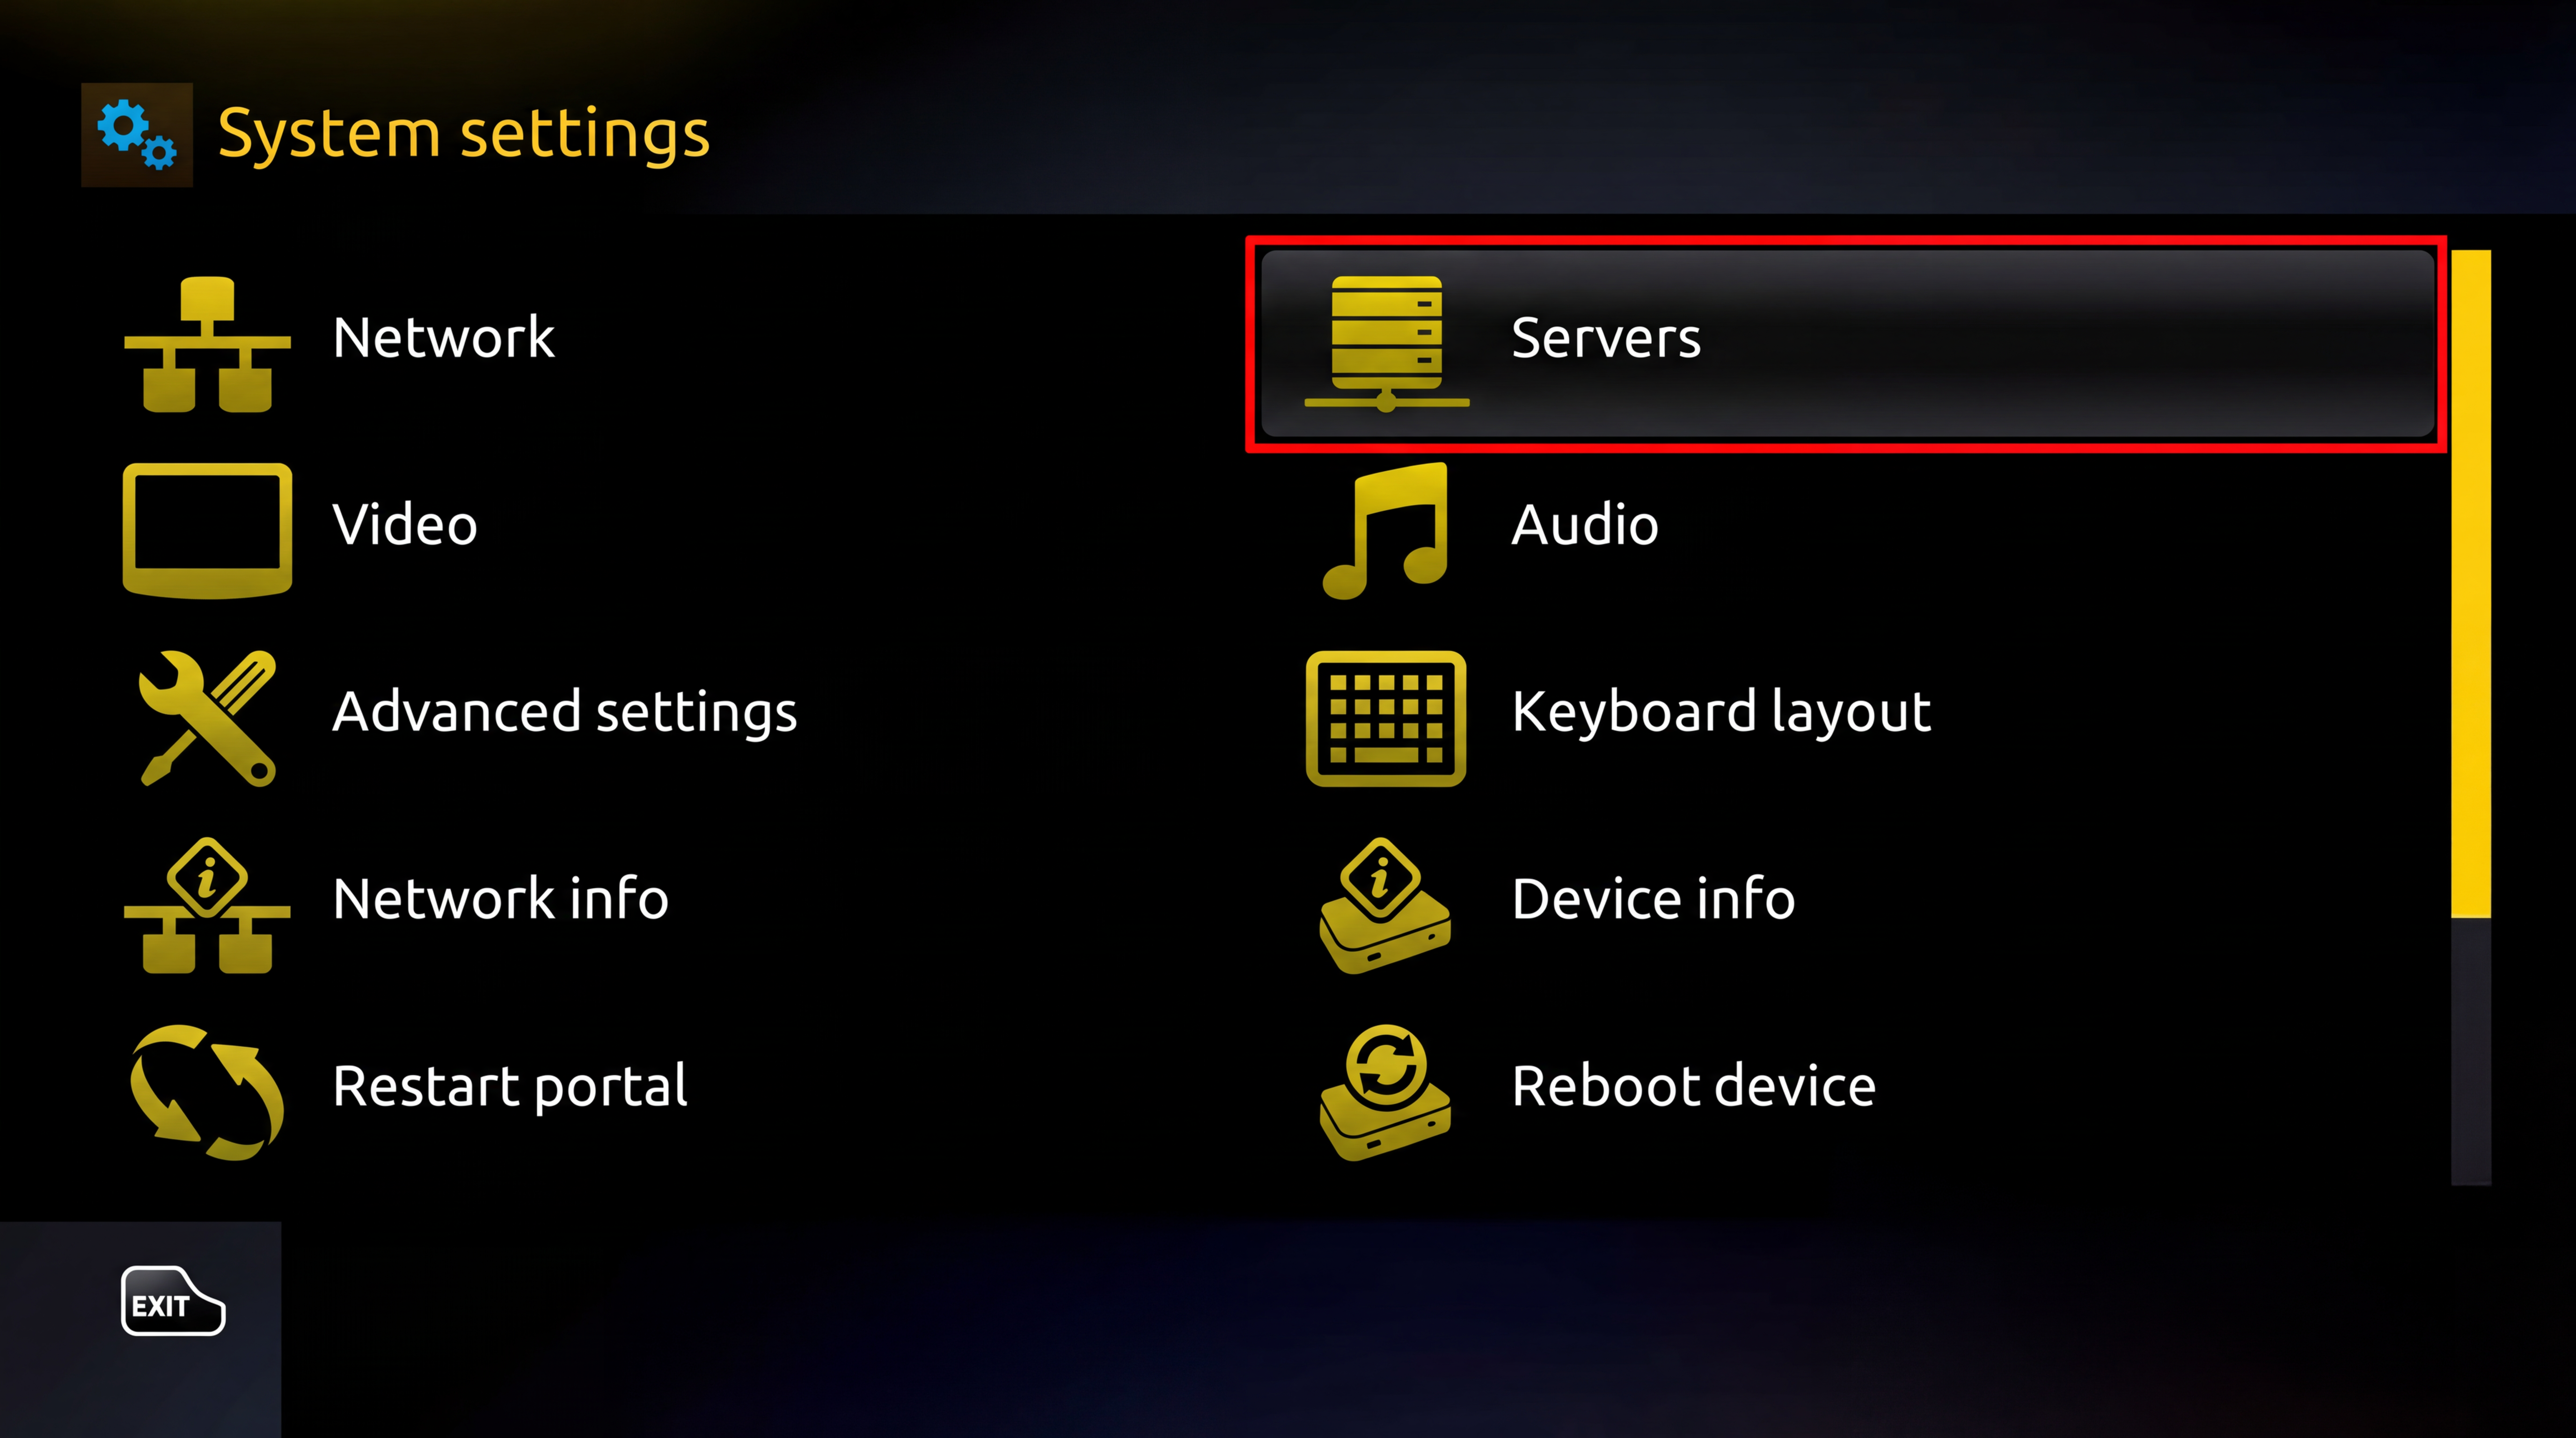
Step 4: Open “Servers”

In System settings, select Servers.

MAG - System settings → Servers

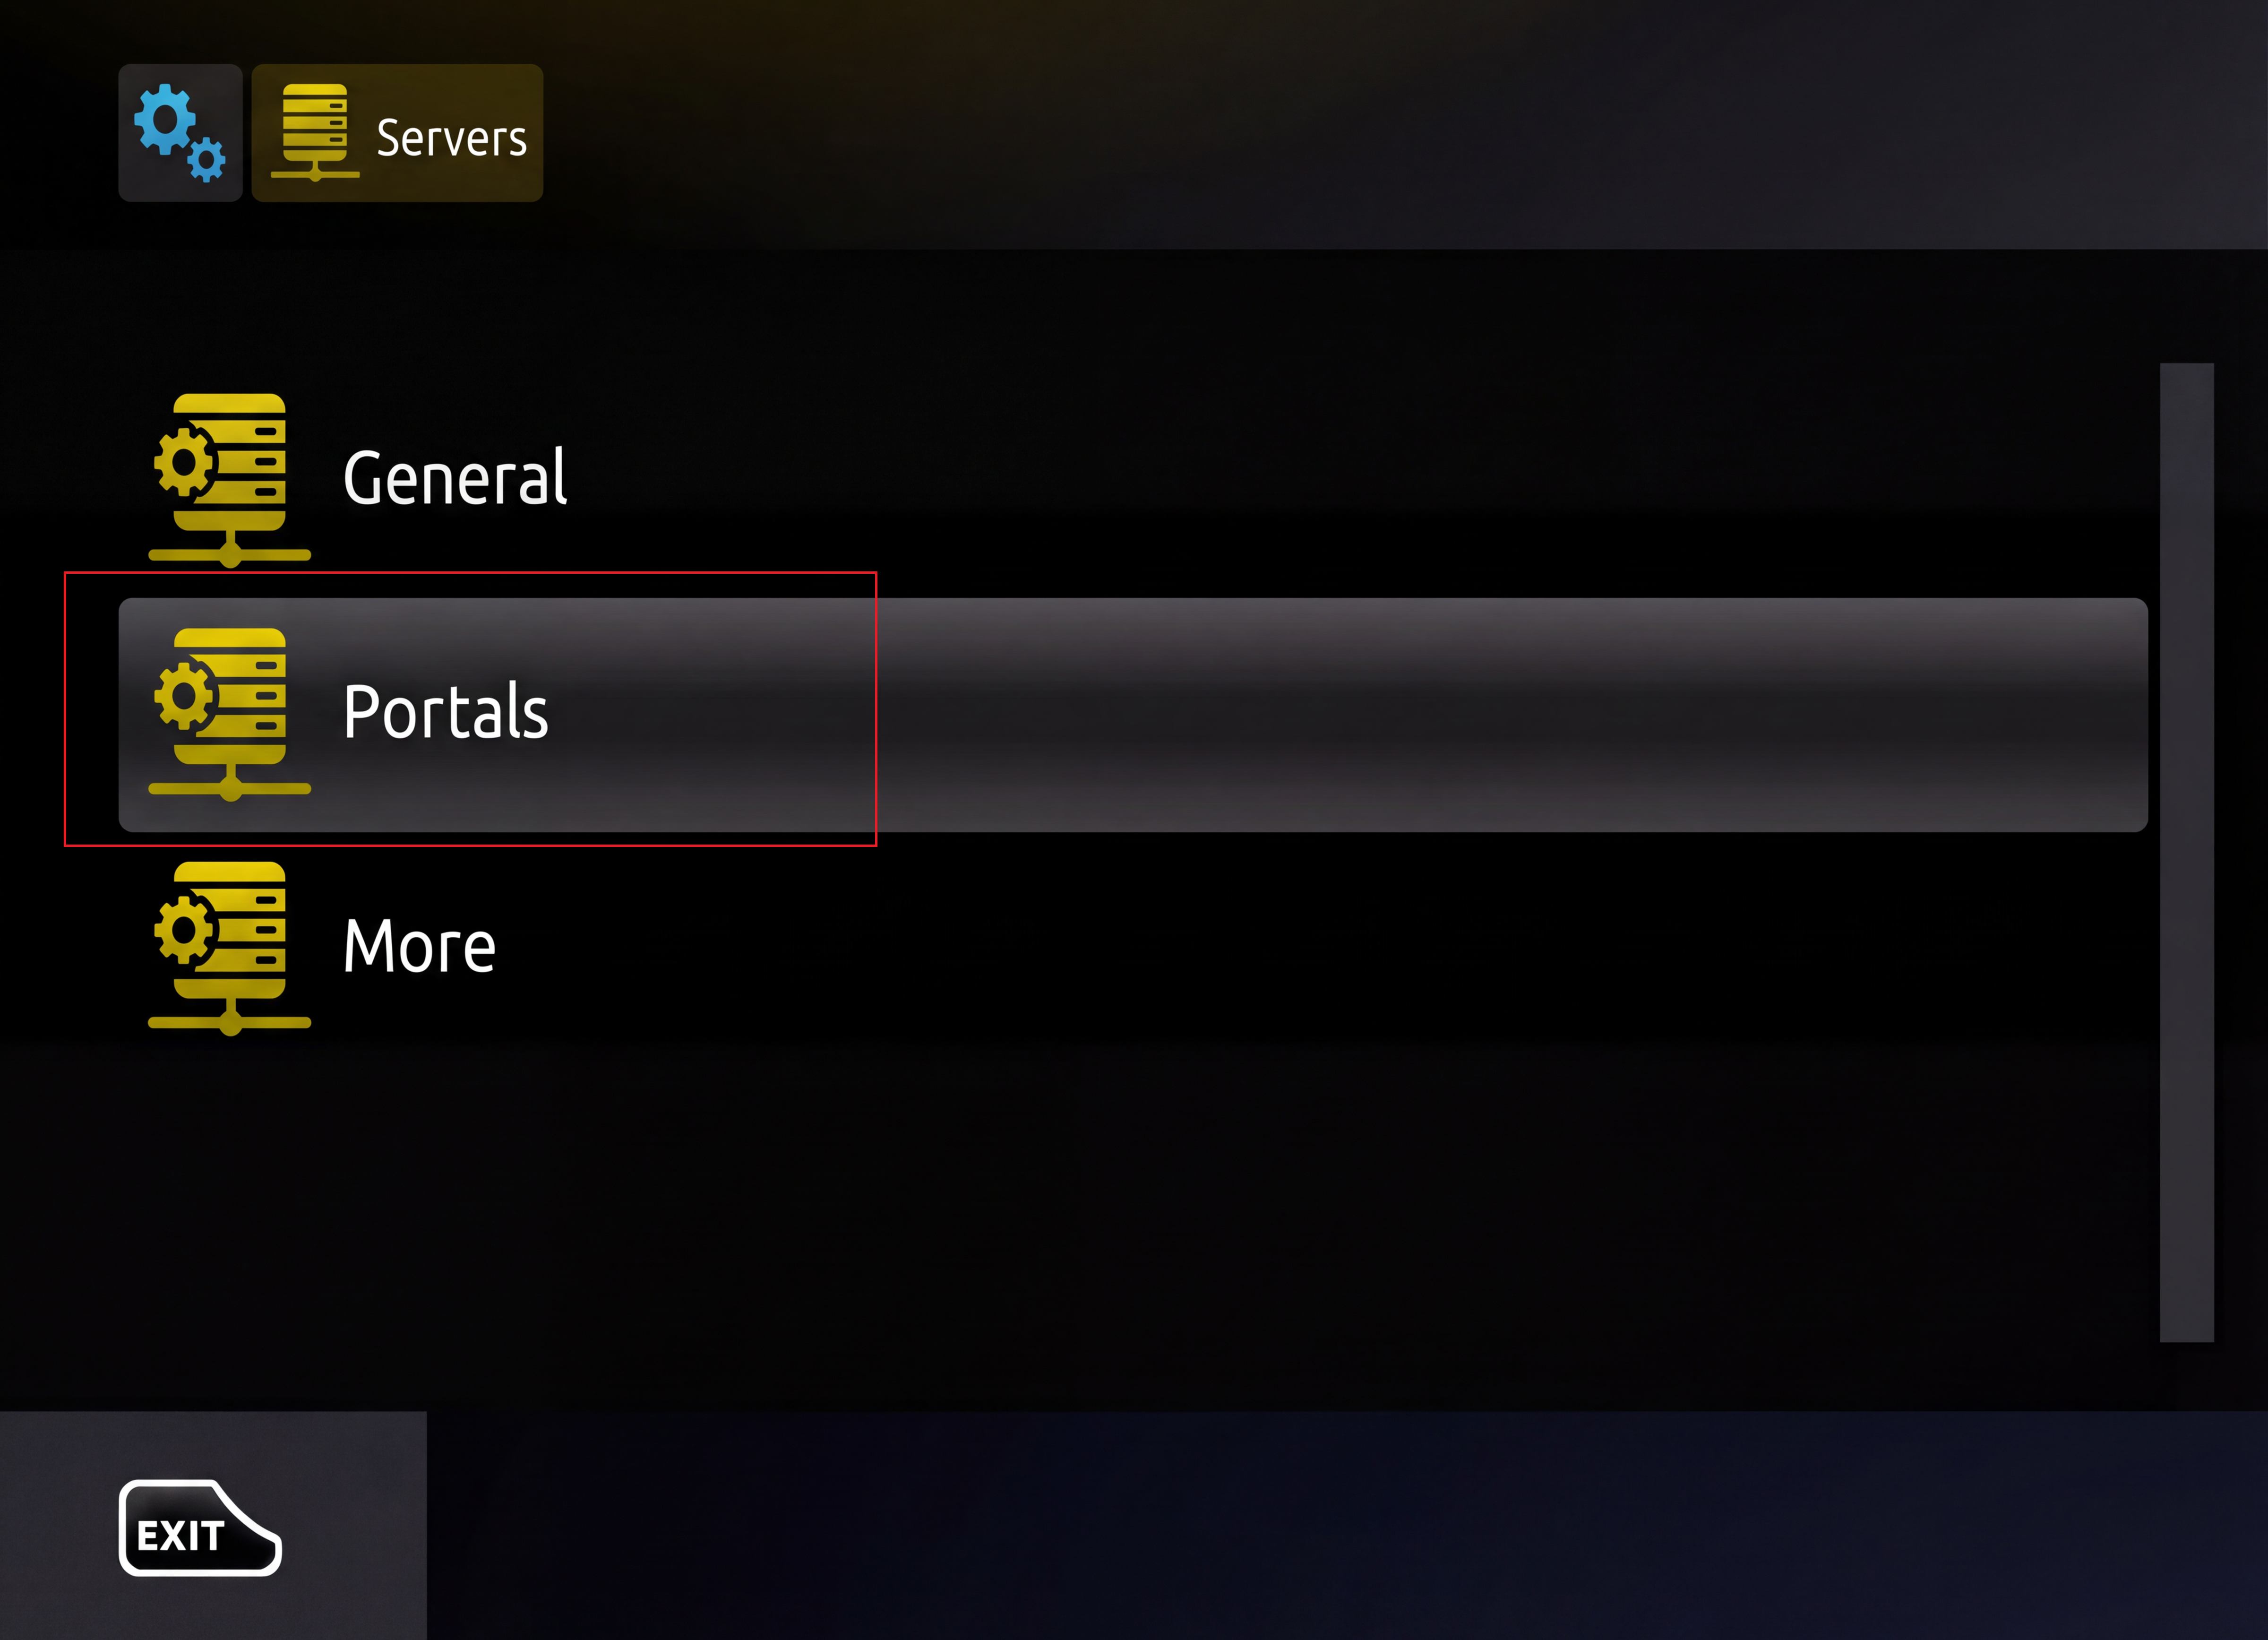
Step 5: Go to “Portals”

In Servers, enter Portals.

MAG - Servers → Portals

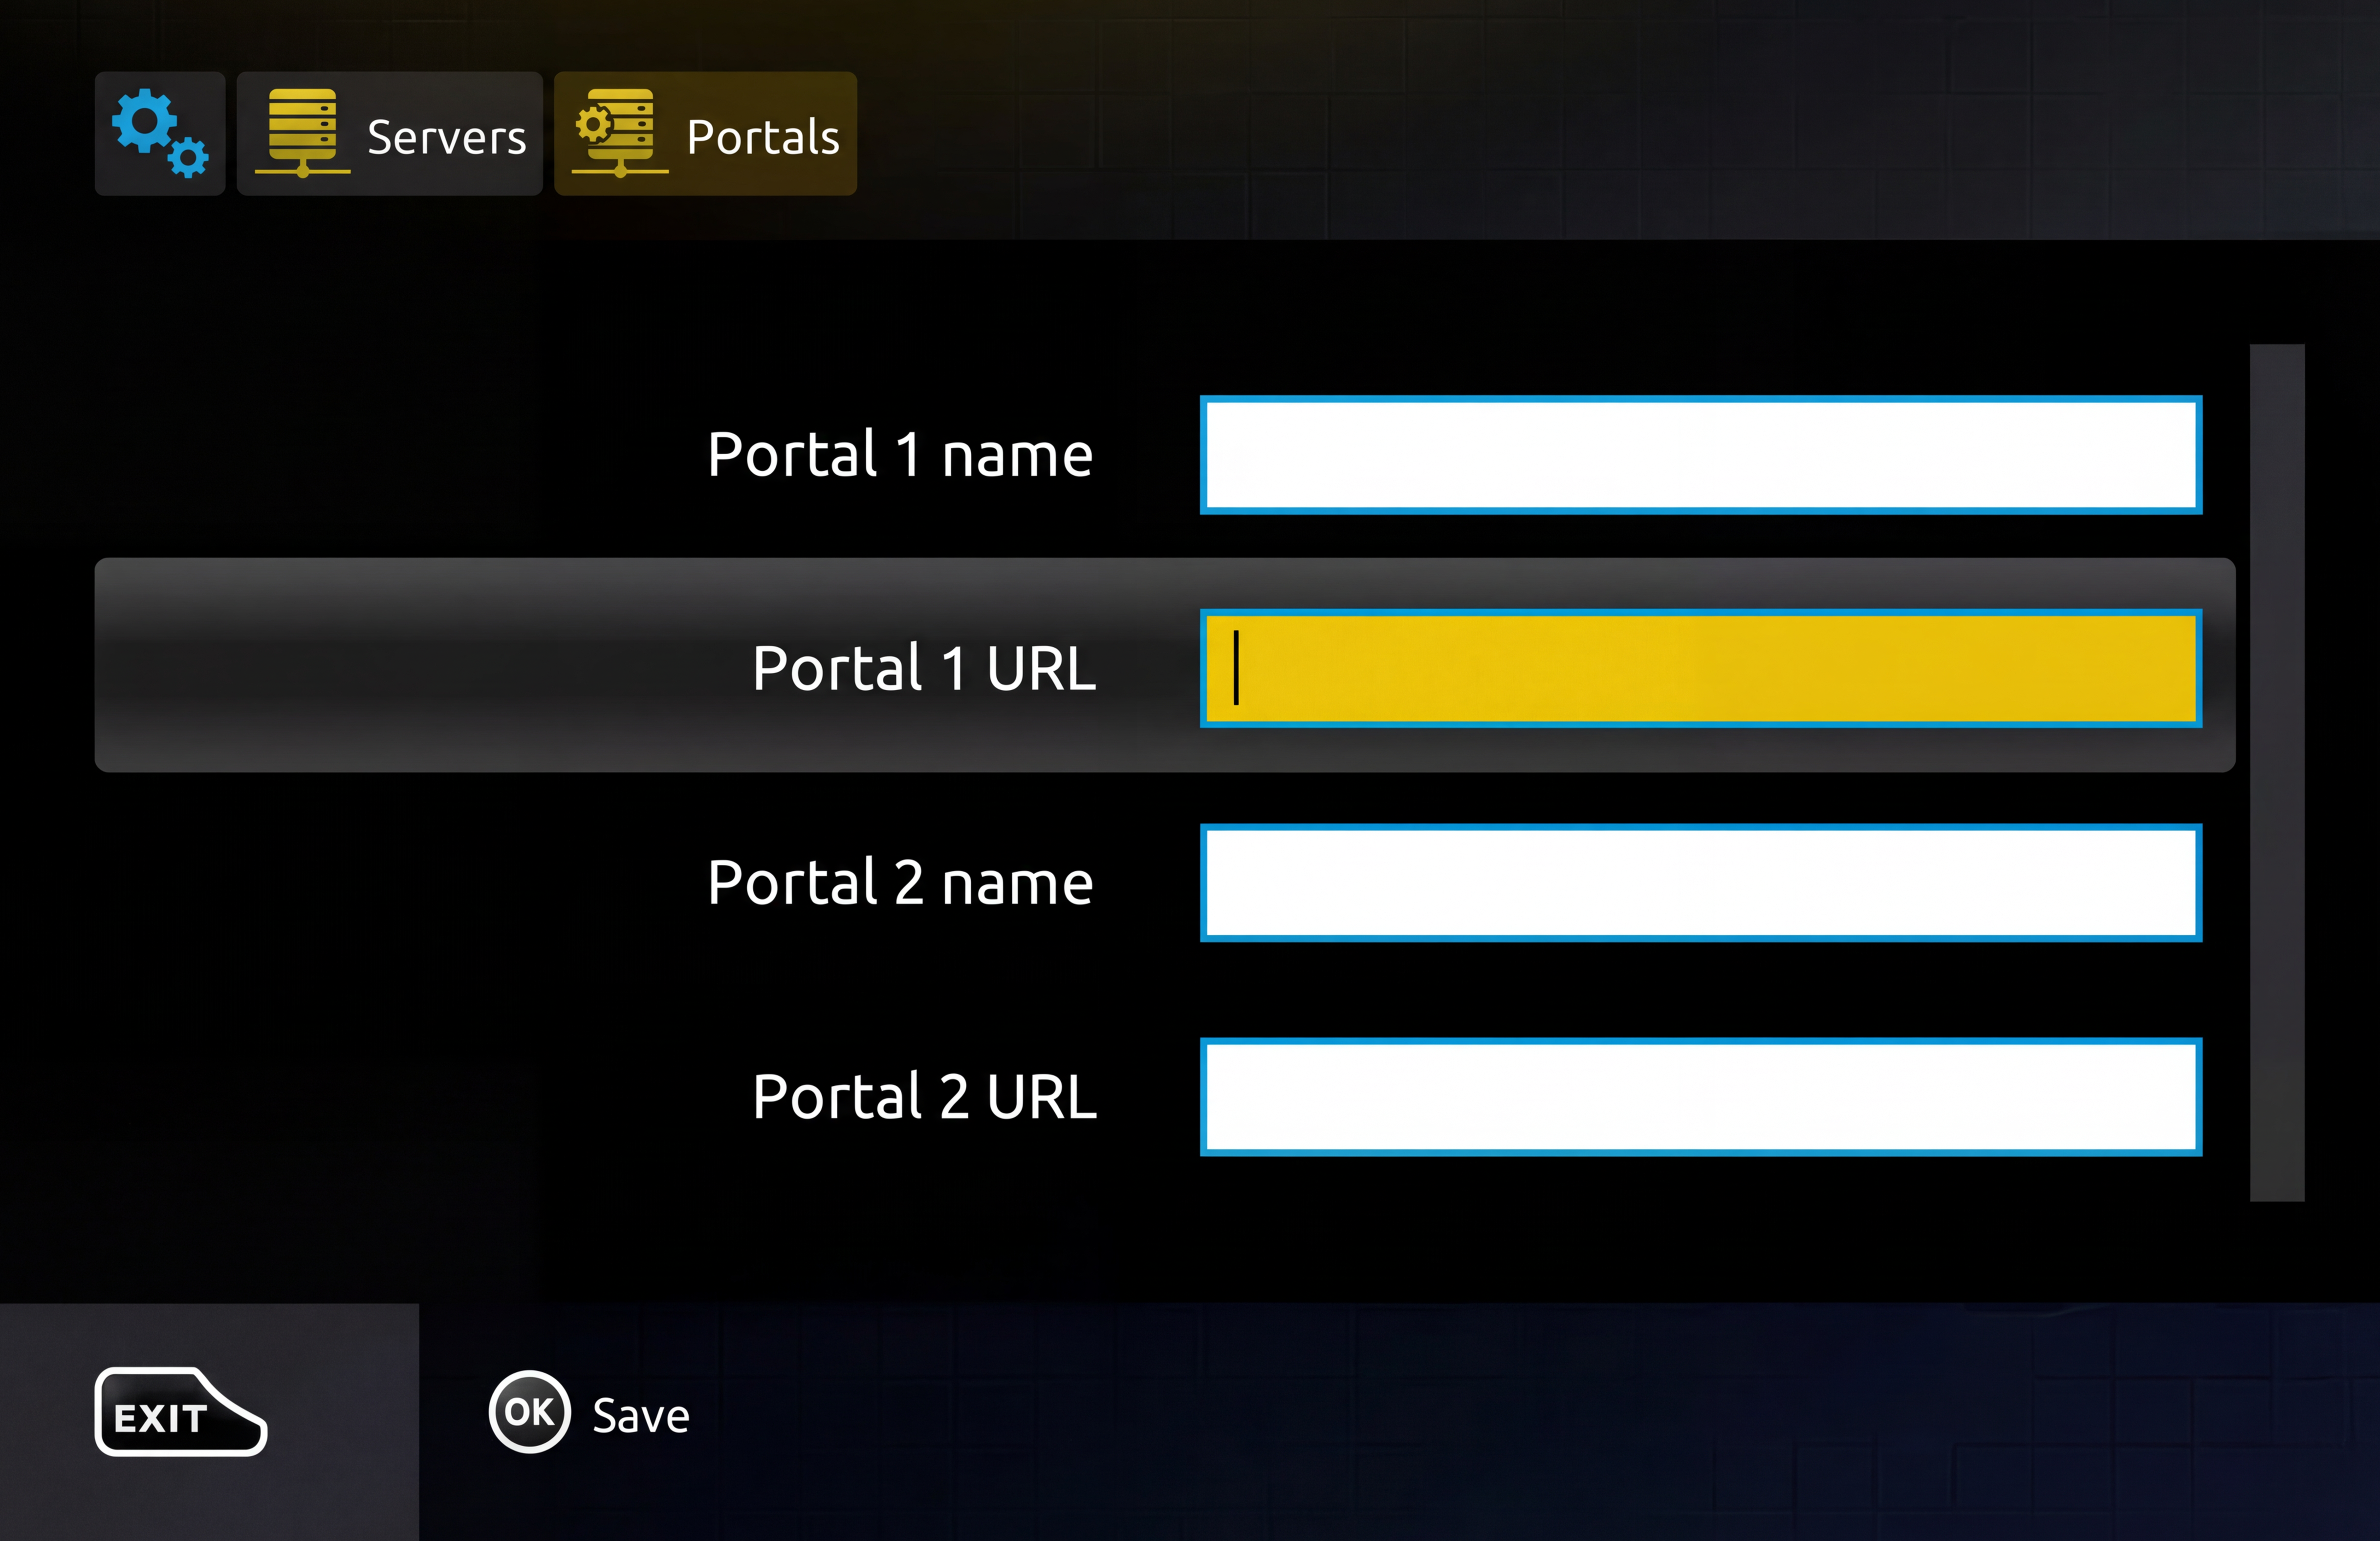
Step 6: Add portal and save

Fill in the following fields:

  • Portal 1 name put Zenith TV (or the name of your choice)
  • Portal 1 URL glue the portal link which you will receive a few hours after your order has been processed.

Then click on OK / Save to save.

MAG - Portals → Portal 1 name / Portal 1 URL

Step 7: Restart the box

To ensure that everything loads properly, perform a reboot: System settings → Reboot device (or electrical reboot if necessary). After rebooting, your channels and content should appear.

❓ No compatible device at home?

See our recommendations

TiviMate offered free of charge to our customers

Premium interface included at no extra charge
Free for our customers
Premium Experience

TiviMate offers a modern, fluid and stable interface for watching your channels, movies and series. This version is included for Zenith TV customers at no extra charge.

Device compatibility Click to see which appliances are compatible with TiviMate

Compatibility : this TiviMate guide is only compatible with Firestick & Fire TV, Google TV / Chromecast / Android TV, Sony TV and Android box. Not compatible with mobile, tablet, Apple TV, Samsung/LG Smart TV, Roku, MAG and other unlisted devices.

Step 1 - Choose your device
Step 2 - Follow the installation instructions

Firestick & Fire TV

Recommended
Information : Some new Fire TV Stick models work with Vega OS, a system that does not allow the installation of external applications such as TiviMate.

✅ Models Firestick 4K and Firestick 4K Max using Fire OS are compatible.

❌ The model Firestick 4K Select (Vega OS) is not compatible with this method.

➡️ Read more

1Access the app menu

On your Amazon Firestick, use the remote control to navigate to the main menu.
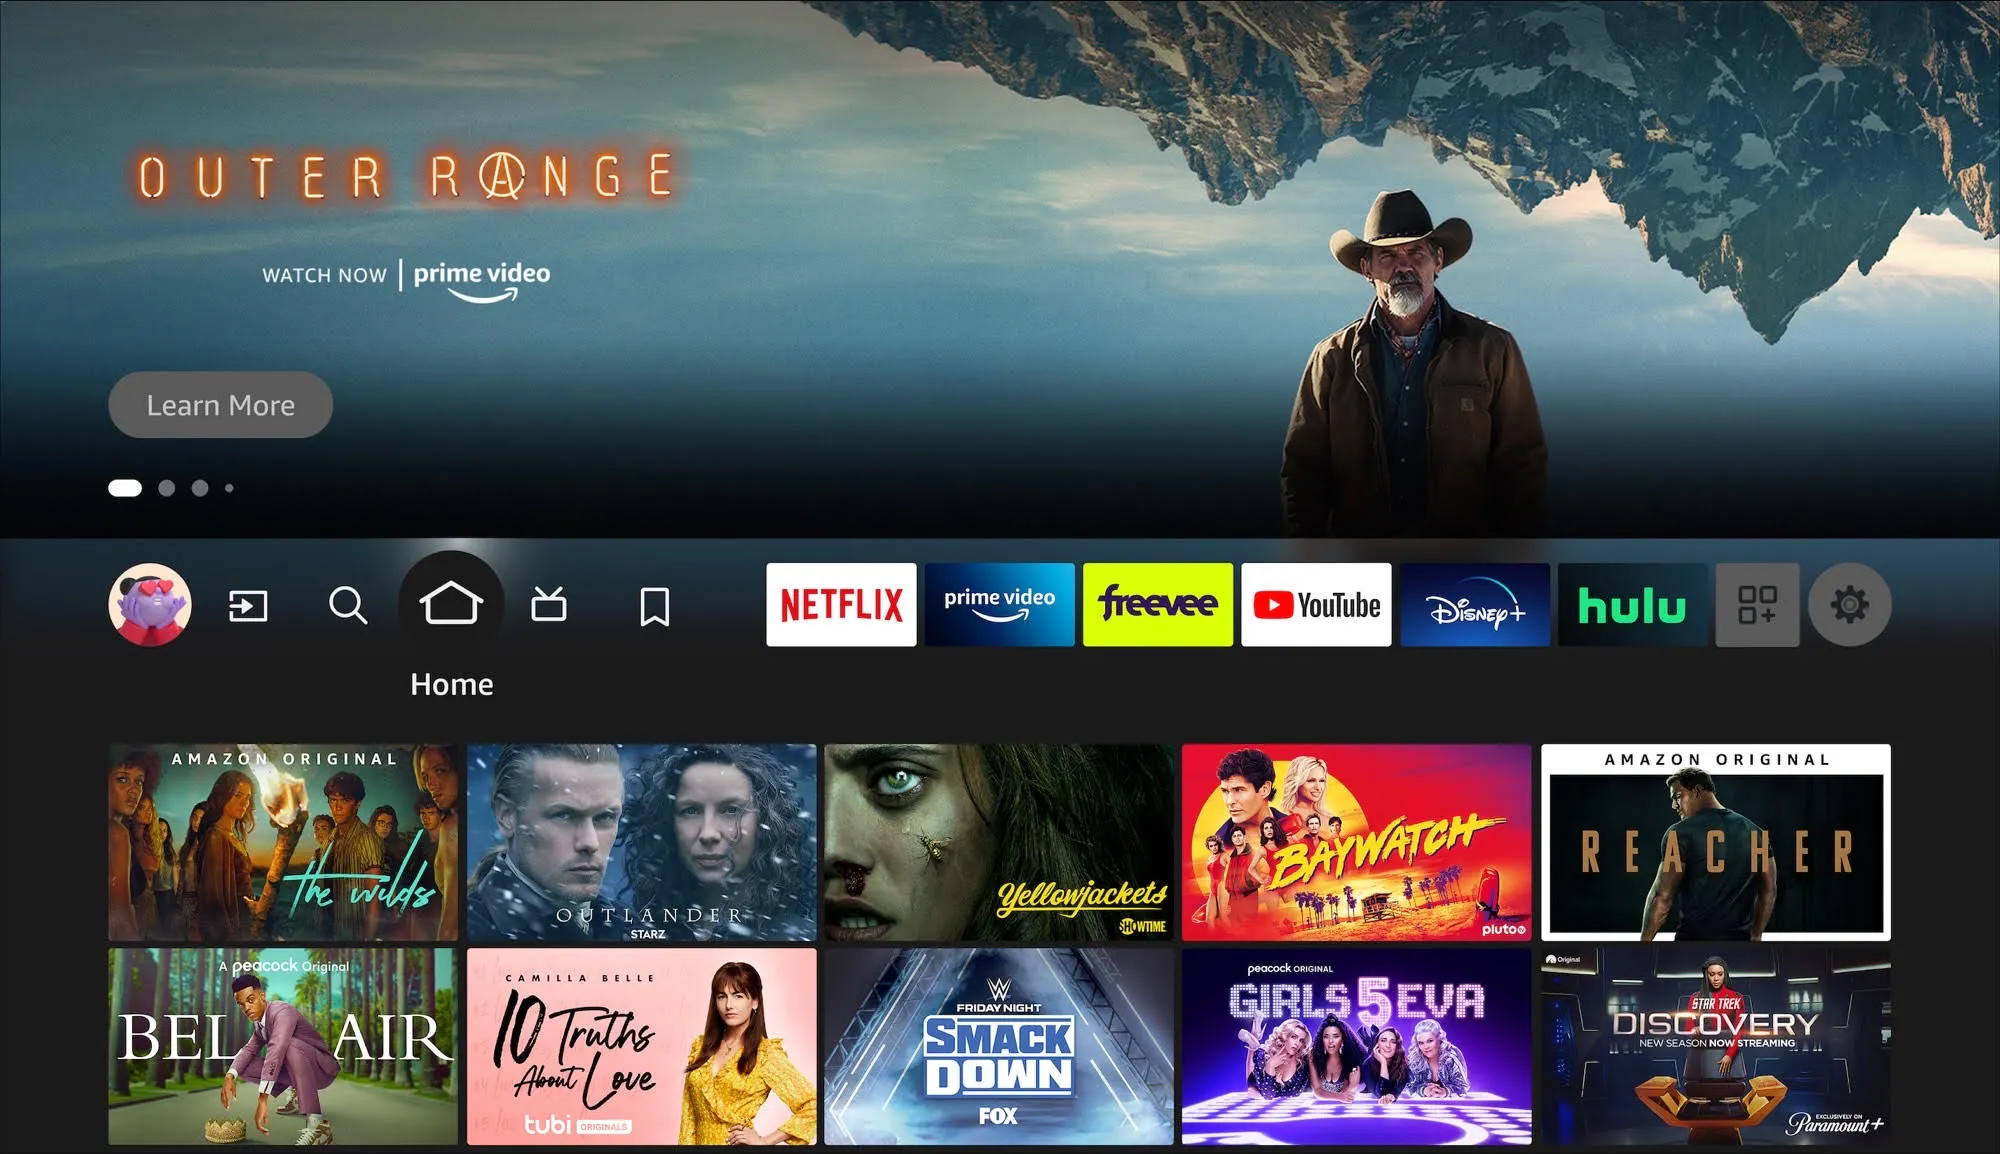
Fire TV main menu

2Search for the Downloader app

In the main menu, use the search function to find the application you are looking for. Downloader. Type Downloader using the on-screen keyboard, then select the application from the results.
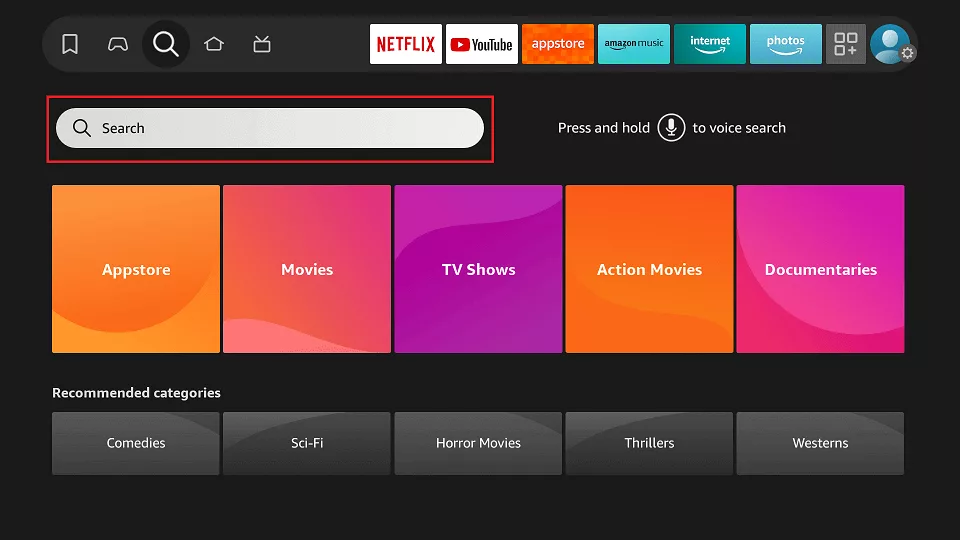
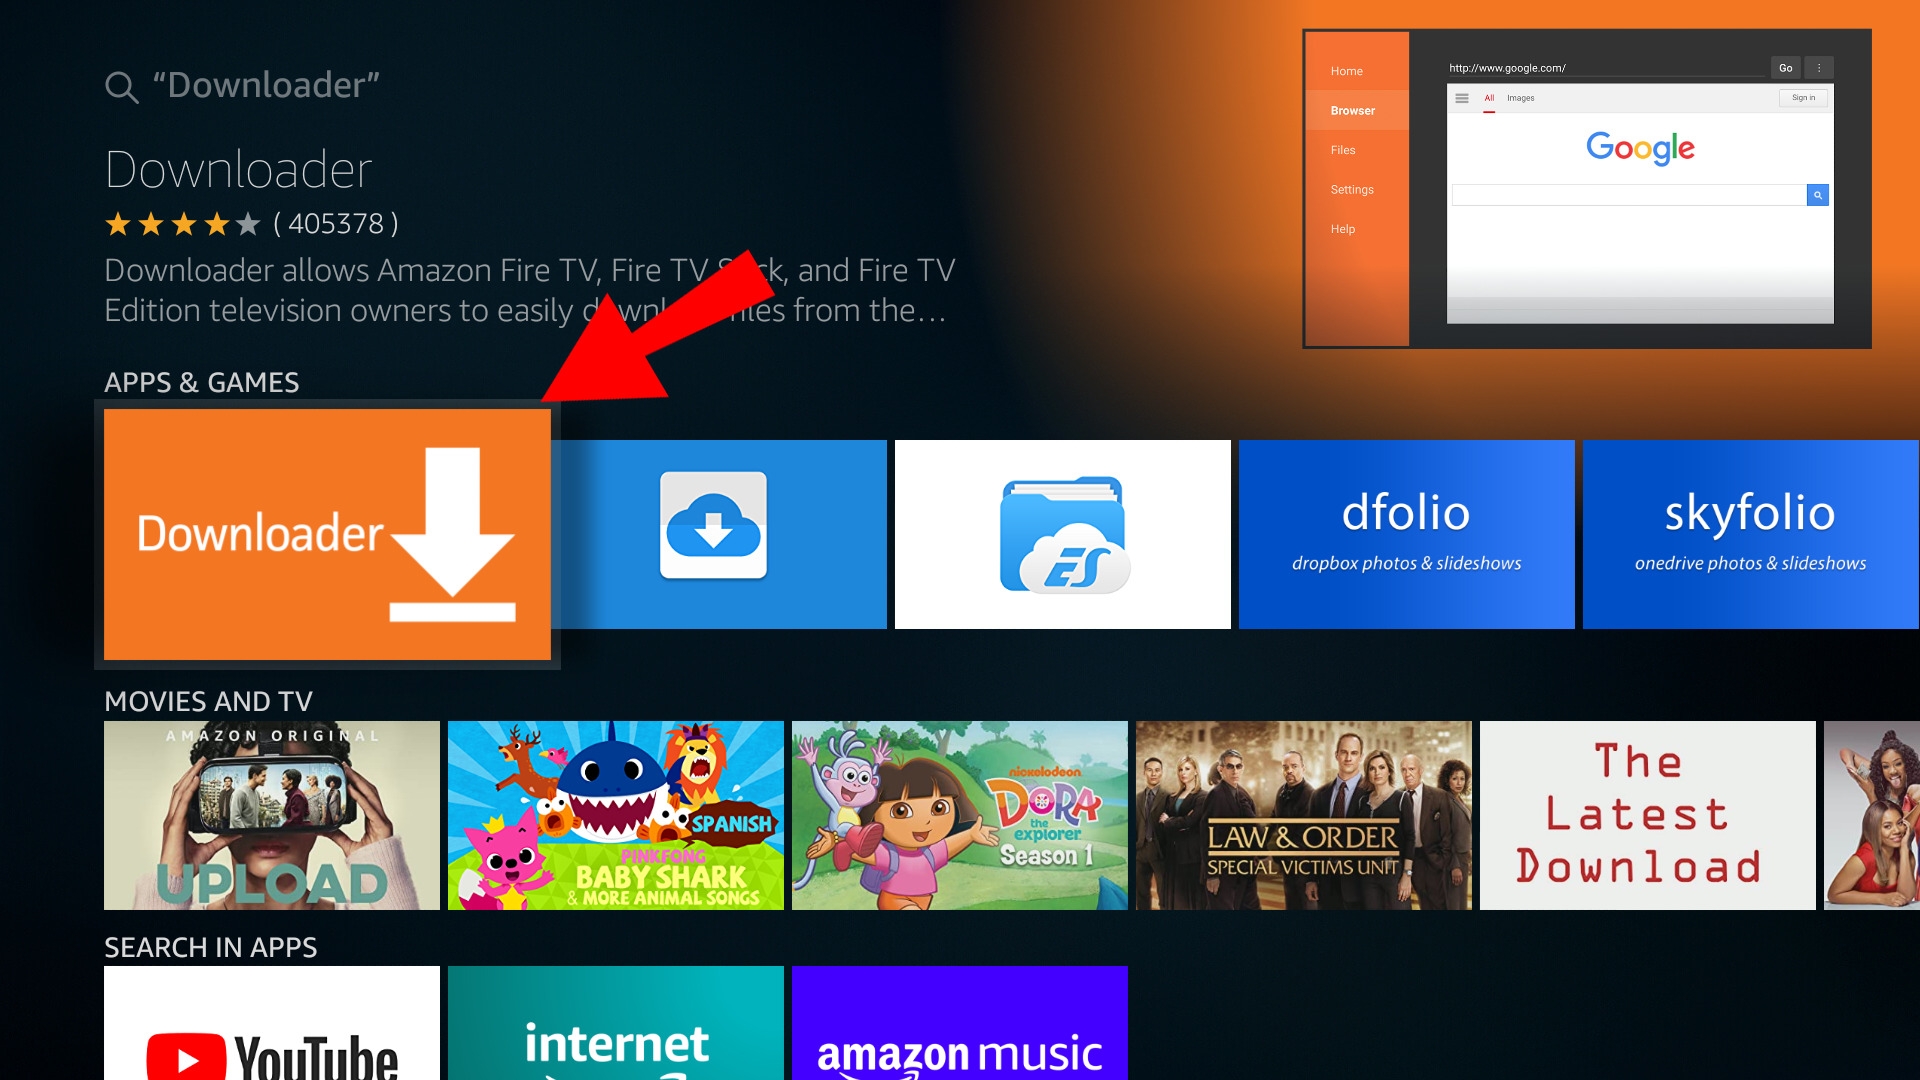
Downloader search on Fire TV

Downloader download

3Installer Downloader

Once on the application page, click on Download or Get to install Downloader on your Firestick.
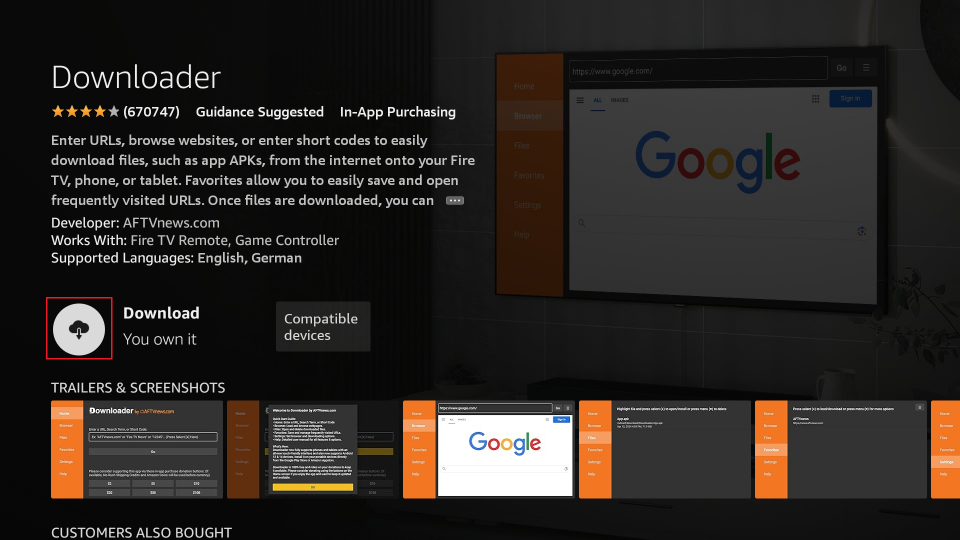
Installing Downloader on Firestick

4Allow installation from unknown sources

This step is fast and do it once only. It simply authorizes installation of TiviMate via the Downloader application.

From your Firestick home screen :

  • Go to ParametersMy Fire TVAbout us
  • Select the name / model of your Firestick
  • Press 7 times until you see the message indicating that developer mode is activated
  • Go back in time My Fire TV
  • Open Options for developers
  • Activate Installation of unknown applications, then set Downloader on ON
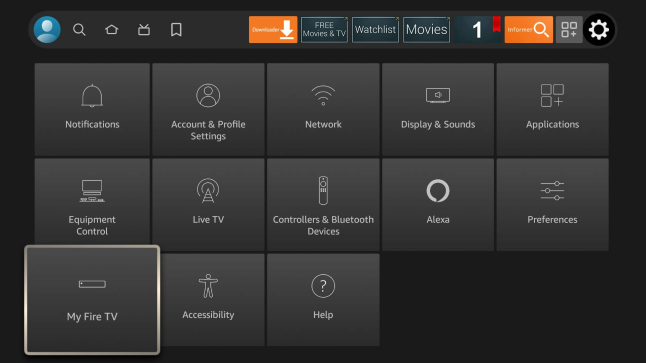
Do you need help with this step?

5Install TiviMate

Open Downloader, enter the code 4189124, then click on Go to download the application. Once the download is complete, click on Install.
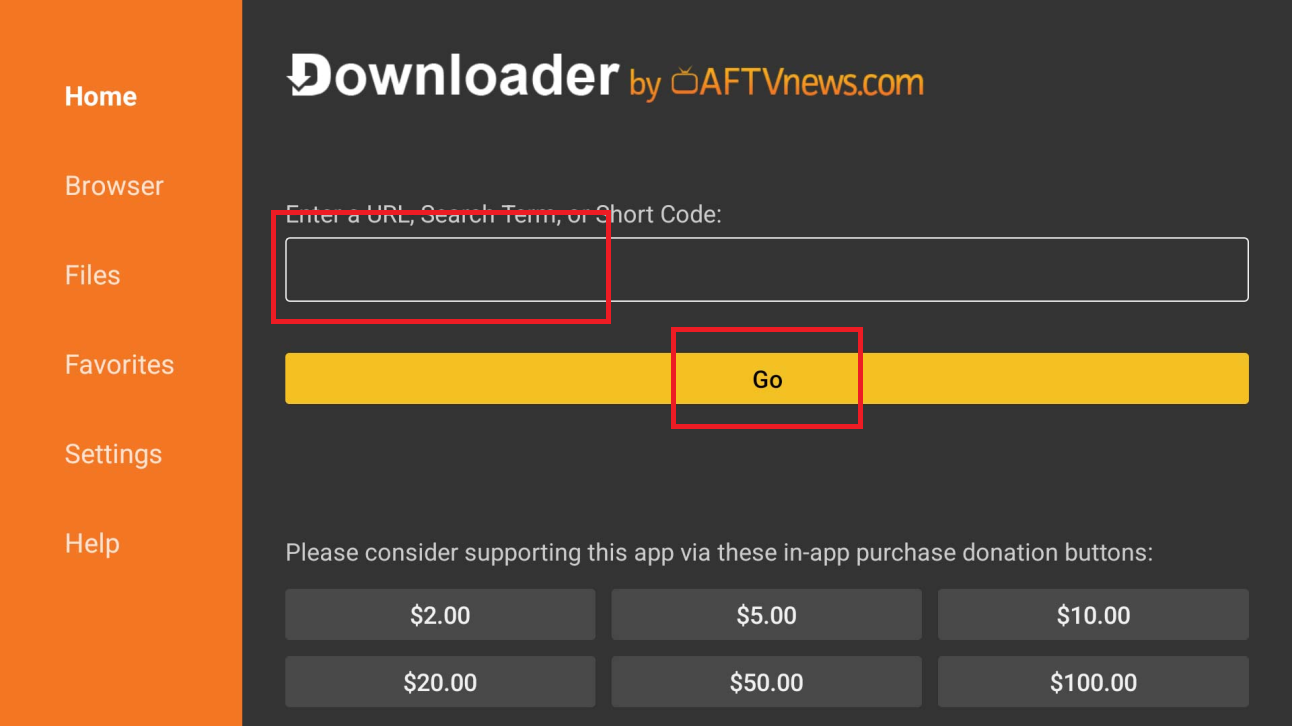
Installing TiviMate via Downloader

6Application Configuration

Open TiviMate. During setup, you must select the server assigned to you—it is displayed below. Then, enter your valid credentials. The field Playlist Name is optional. Wait for the application to load your content.

If your ID consists only of lowercase letters and numbers (e.g., 7rgenm8h), your assigned server is the Secondary Server.
Loading your server...

Congratulations! TiviMate is now ready to use on your Firestick.

Google TV / Chromecast / Android TV

Recommended

1Access the app menu

On your Chromecast with Google TV or Android TV, go to the Home screen, then open the menu Apps or the Play Store.
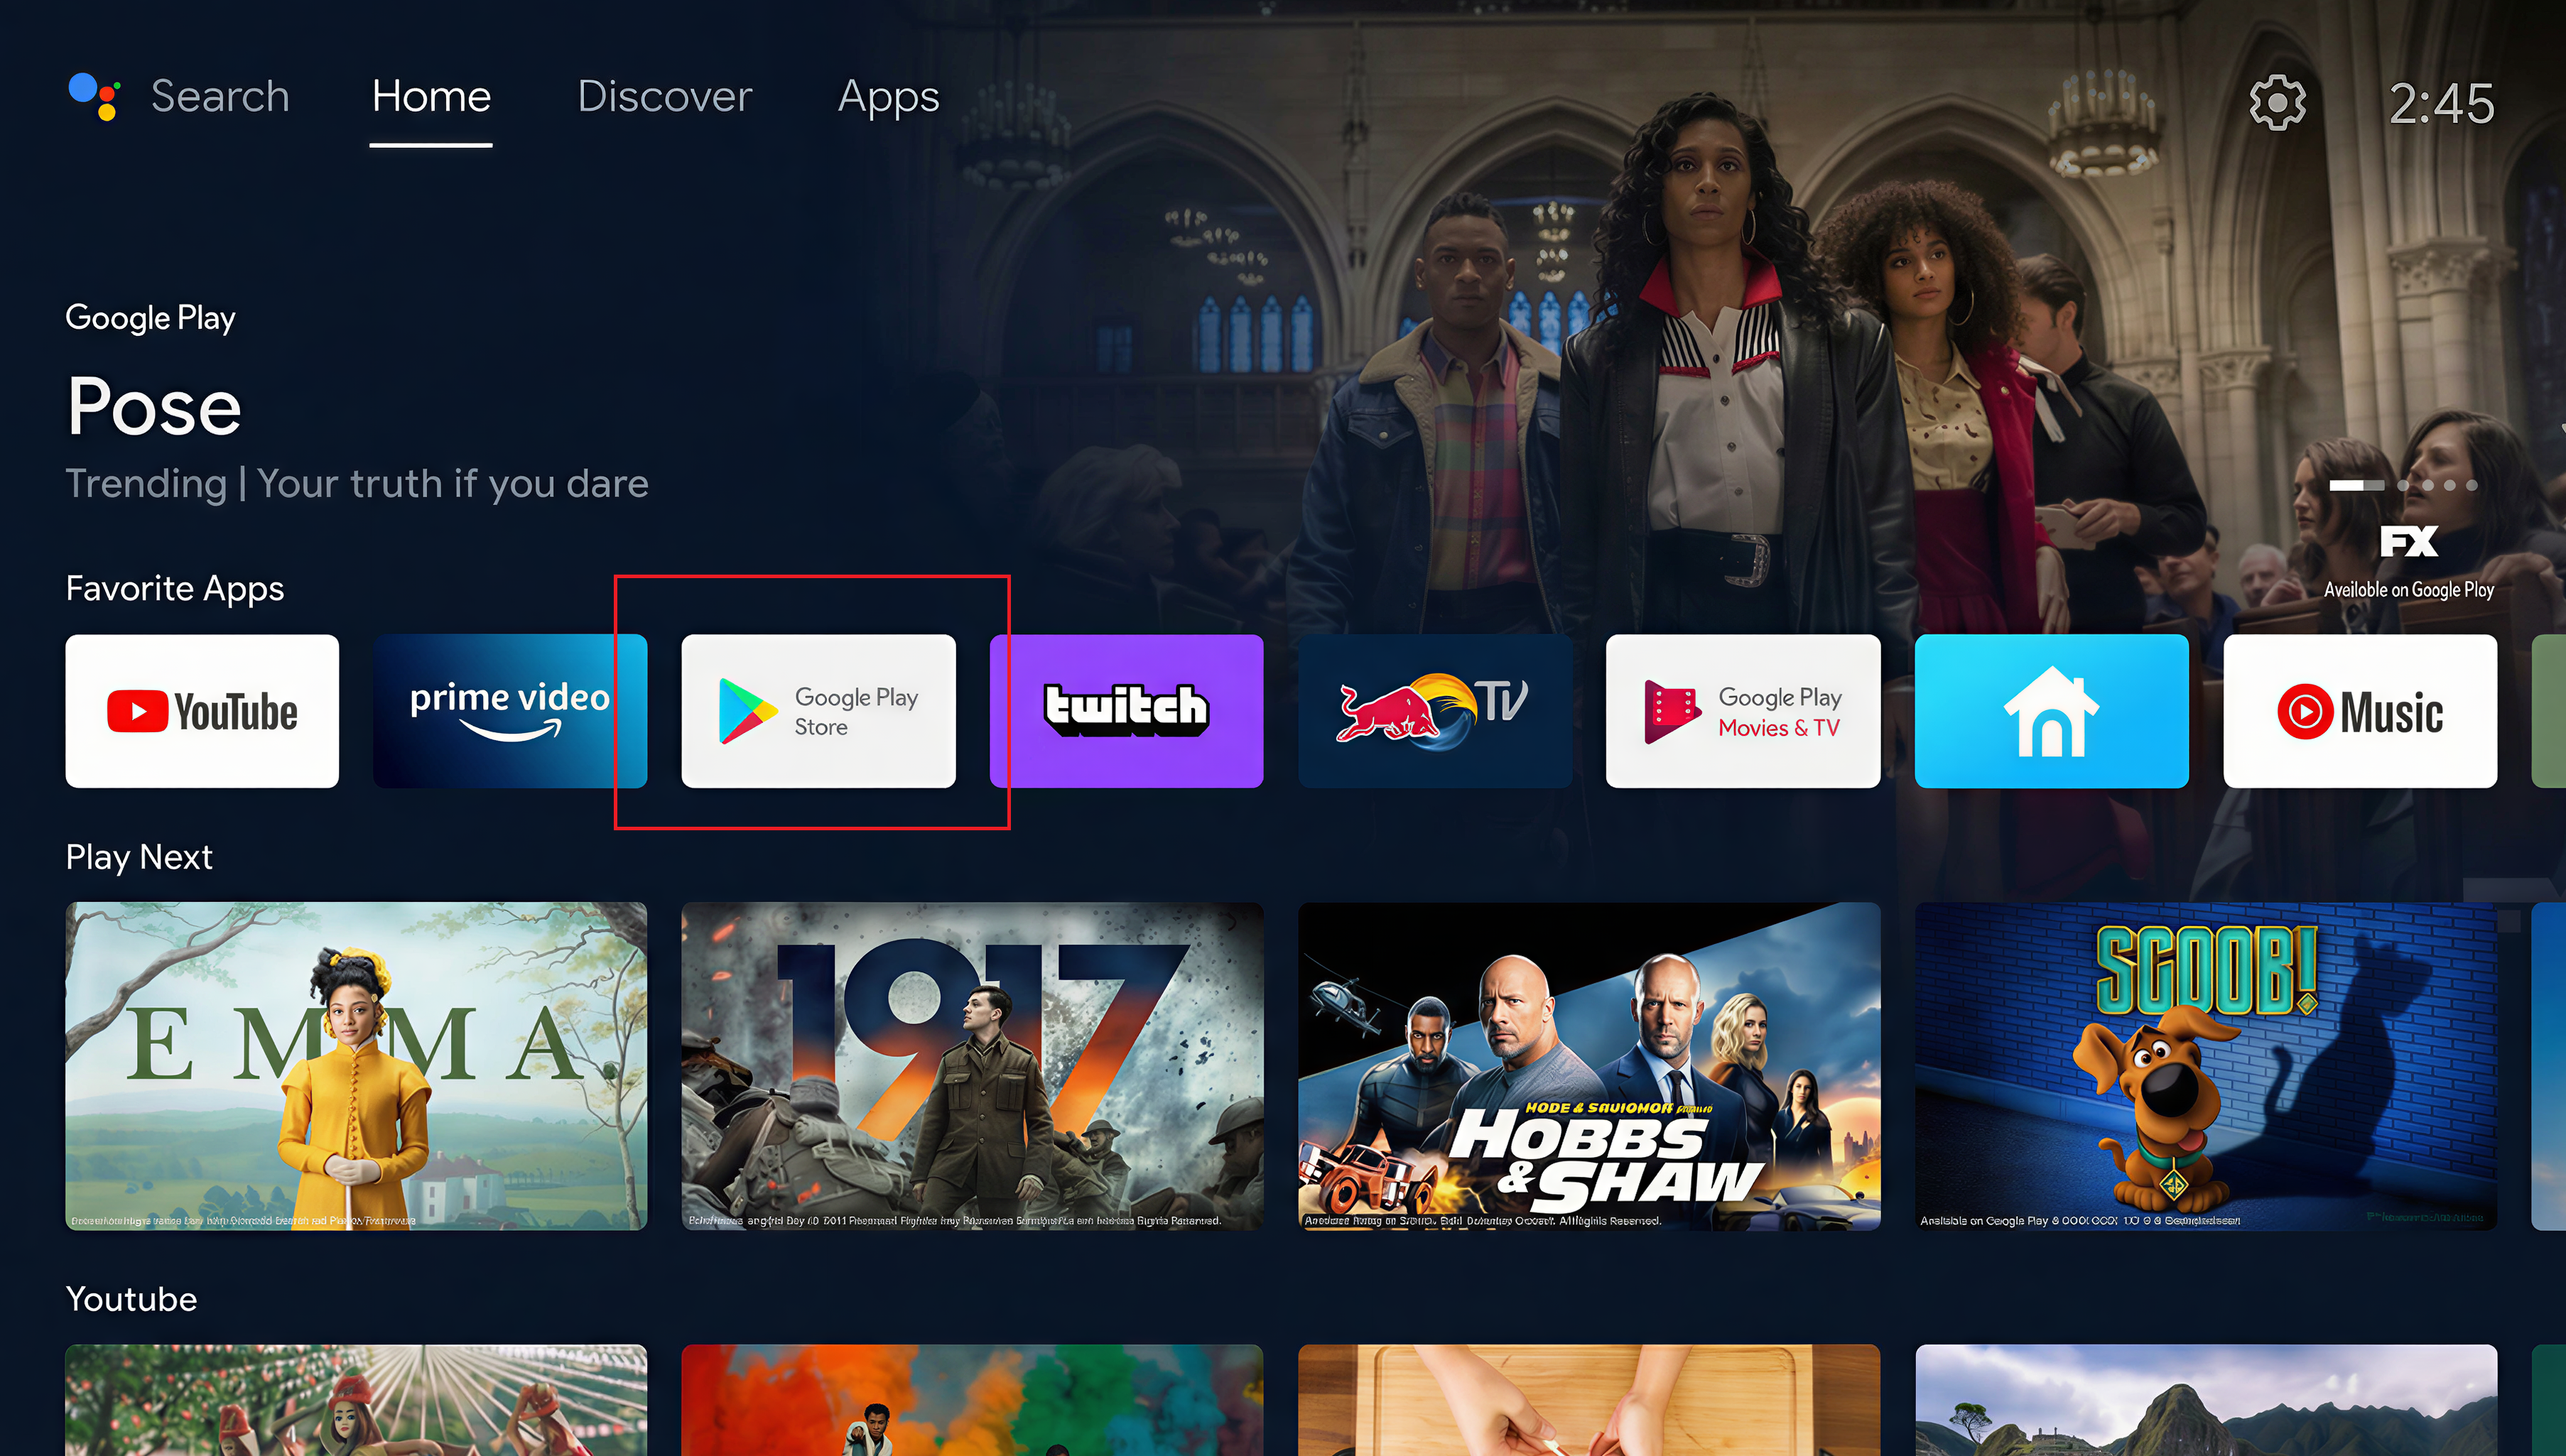
Google TV Android TV Home Apps

2Install the Downloader application

Search Downloader, open the application file, then click on Install.
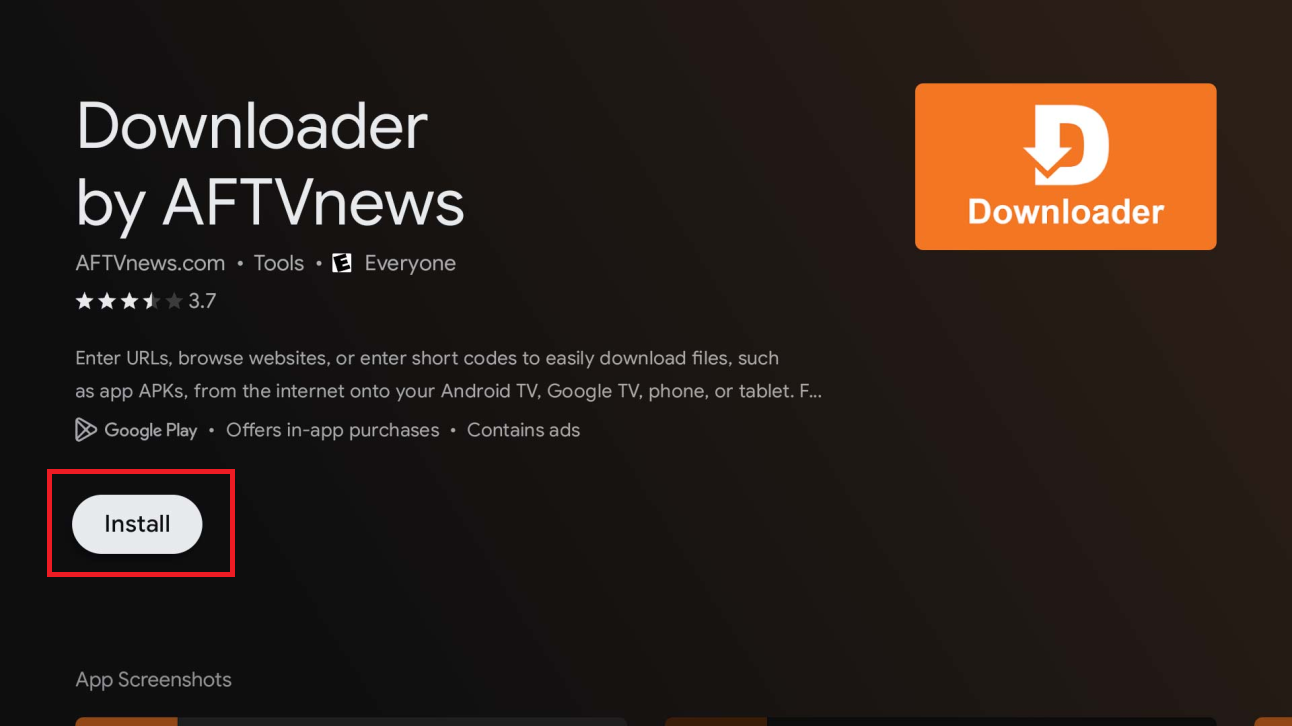
Search Downloader Google TV

3Allow installation from unknown sources (one-time action)

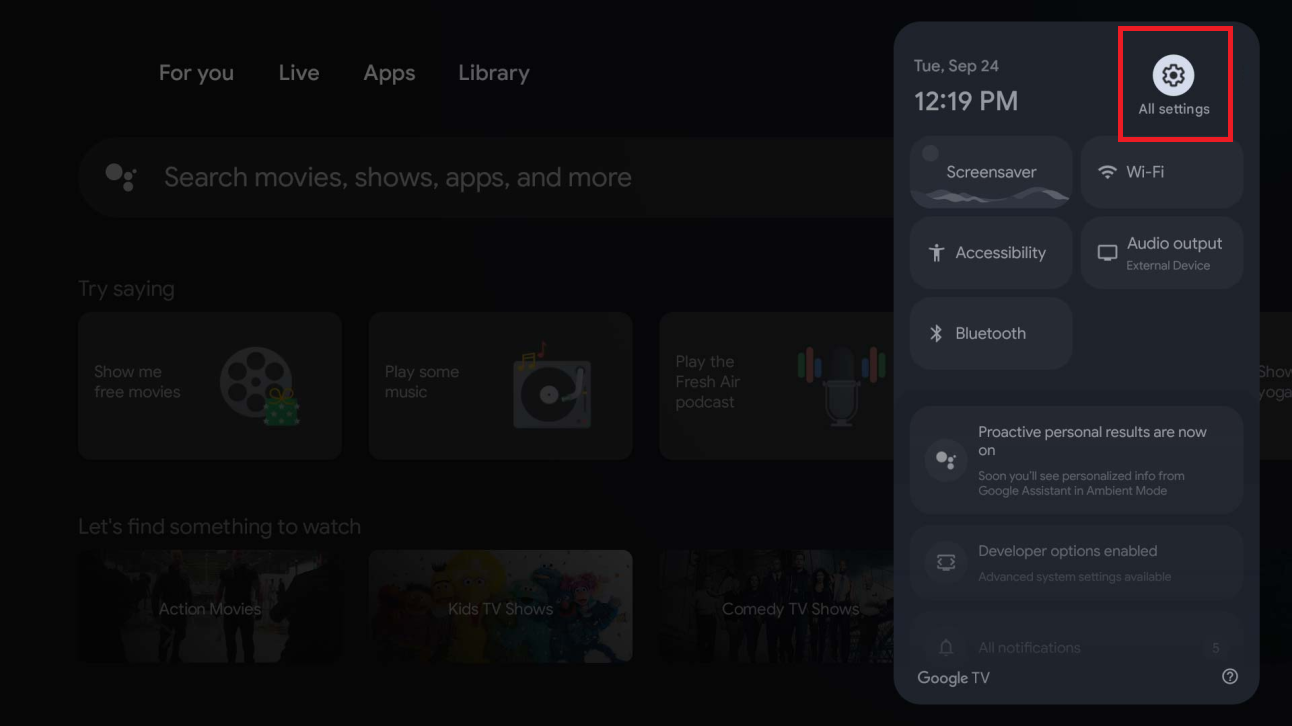
This step simply authorizes Downloader to install TiviMate.

  • Open Parameters (⚙️ icon) → All parameters
  • Go to SystemAbout us
  • Press 7 times on Android TV OS build until the message indicating that you are a developer
Do you need help with this step?

4Download TiviMate via Downloader

Open Downloader, enter the code 4189124, then click on Go.

Downloader enter code 4189124

5Install the Tivimate application

When the installation message appears, click on Settings, then activate Downloader.

Then select Install to install the application. If the Blocked by Play Protect is displayed, select Details, then Install anyway.

Block installation Settings button

Install unknown apps Downloader ON

Install button

6Open TiviMate and finalize the setup

Once installation is complete, click on Done or Open. If you clicked on Done, then open TiviMate from your Home screen or application drawer.

During setup, you must select the server that was assigned to you — it is displayed below. Enter your valid credentials, then provide Playlist Name only if you wish (optional). Wait for the app to load content.

If your ID consists only of lowercase letters and numbers (e.g., 7rgenm8h), your assigned server is the Secondary Server.
Loading your server...

Congratulations! TiviMate is now ready to use on your Google TV / Chromecast / Android TV.

Sony TV

Recommended

1Access the app menu

On your Sony TV (Android TV / Google TV), go to the Home screen, then open the menu Apps or the Play Store.

Sony TV Home Apps

2Install the Downloader application

Search Downloader, open the application file, then click on Install.

Sony TV Search Downloader

3Allow installation from unknown sources (one-time action)

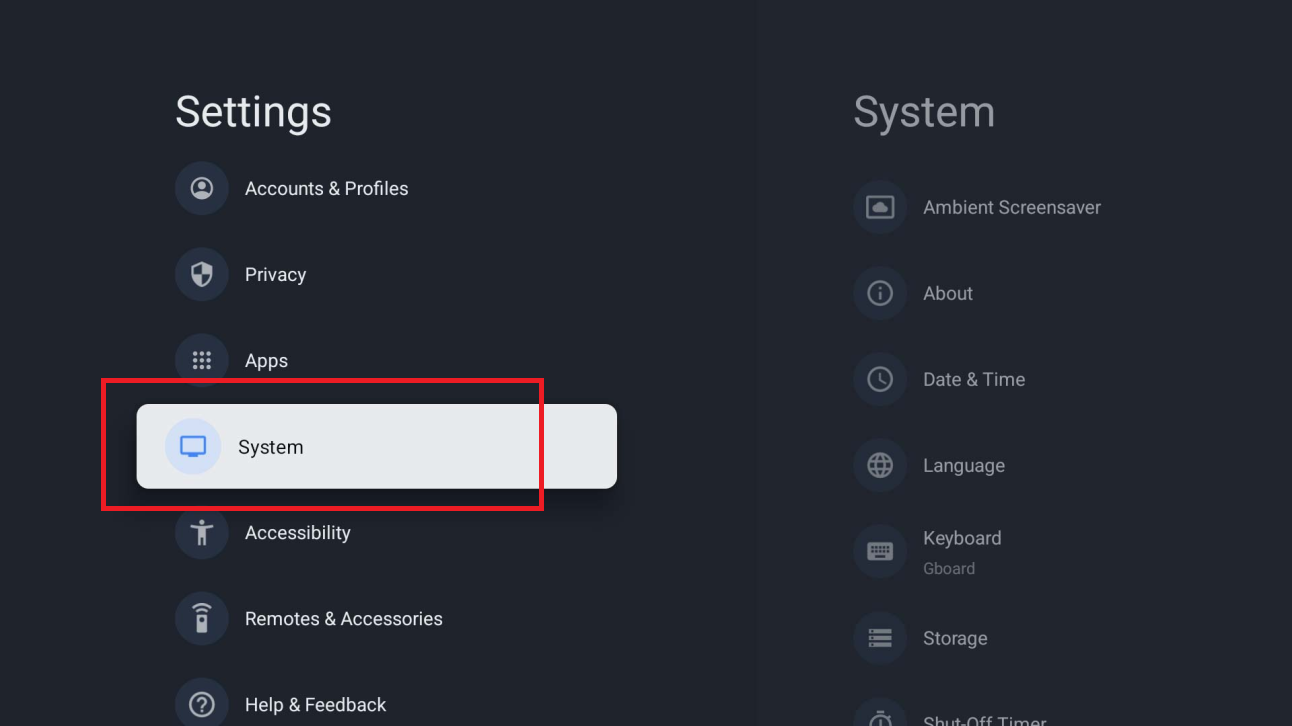
This step simply authorizes Downloader to install TiviMate.

  • Open Parameters (⚙️ icon) → All parameters
  • Go to SystemAbout us
  • Press 7 times on Android TV OS build until the message indicating that you are a developer
Do you need help with this step?

4Download TiviMate via Downloader

Open Downloader, enter the code 4189124, then click on Go.

Sony TV Enter code 4189124

5Install the Tivimate application

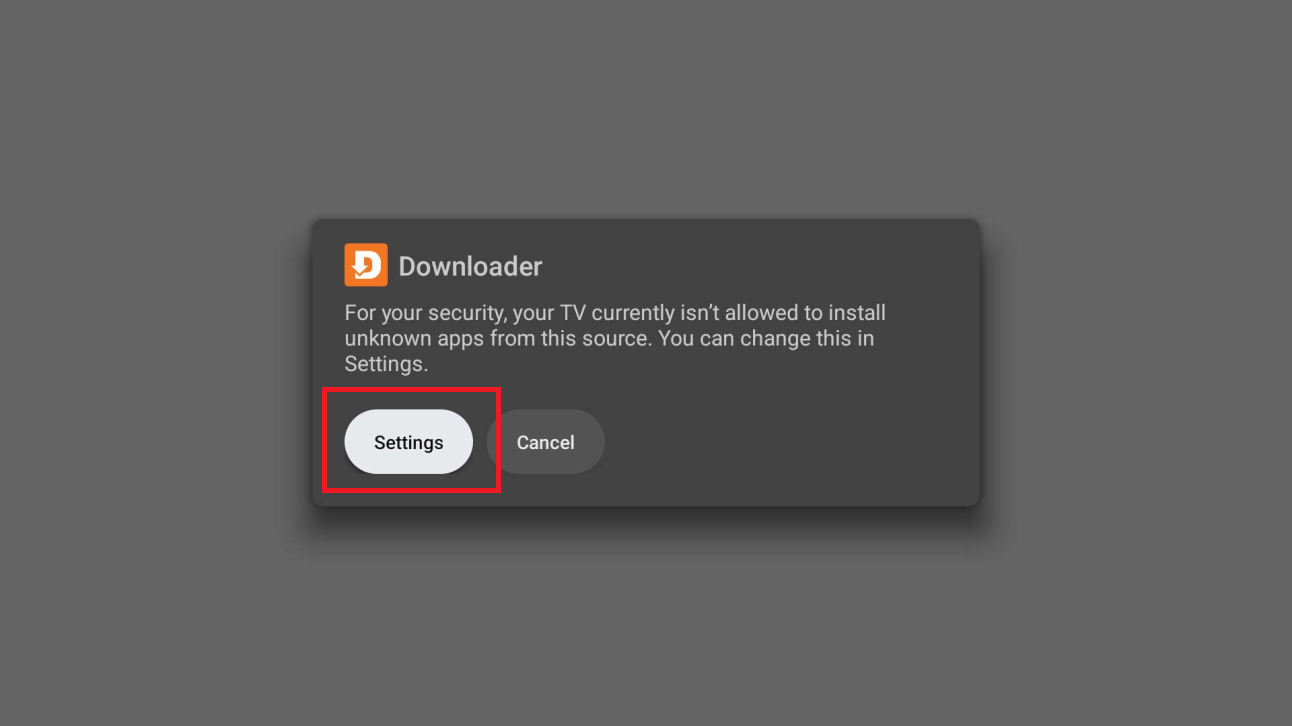
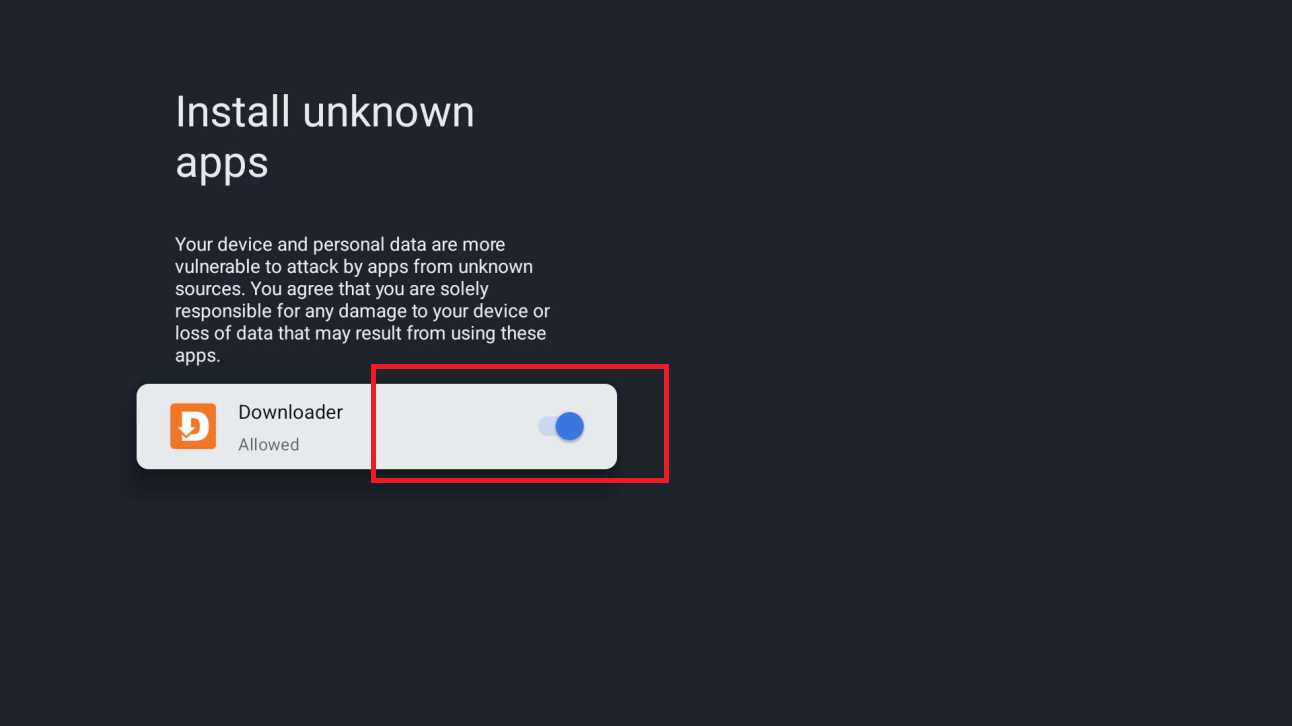
When the installation message appears, click on Settings, then activate Downloader.

Then select Install to install the application. If the Blocked by Play Protect is displayed, select Details, then Install anyway.
Sony TV Installation Blockage

Install unknown apps on Sony TV

Sony TV Install button

6Open TiviMate and finalize the setup

Once installation is complete, click on Done or Open. If you clicked on Done, then open TiviMate from your Home screen or application drawer.

During setup, you must select the server that was assigned to you — it is displayed below. Enter your valid credentials, then provide Playlist Name only if you wish (optional). Wait for the app to load content.

If your ID consists only of lowercase letters and numbers (e.g., 7rgenm8h), your assigned server is the Secondary Server.
Loading your server...

Congratulations! TiviMate is now ready to use on your Sony TV.

Android box

Recommended

1Access the app menu

On your Android box, go to the Home screen, then open the menu Apps or the Play Store.

Android box Home Apps

2Install the Downloader application

Search Downloader, open the application file, then click on Install.

Android box Search Downloader

3Allow installation from unknown sources (one-time action)

This step authorizes Downloader to install TiviMate on your Android box.

  • Open Parameters
  • Go to Applications or Security
  • Activate Allow unknown applications for Downloader
Do you need help with this step?

4Download TiviMate via Downloader

Open Downloader, enter the code 4189124, then click on Go.

Android box Enter code 4189124

5Install the Tivimate application

When the installation message appears, click on Settings, then activate Downloader.

Then select Install to install the application. If the Blocked by Play Protect is displayed, select Details, then Install anyway.
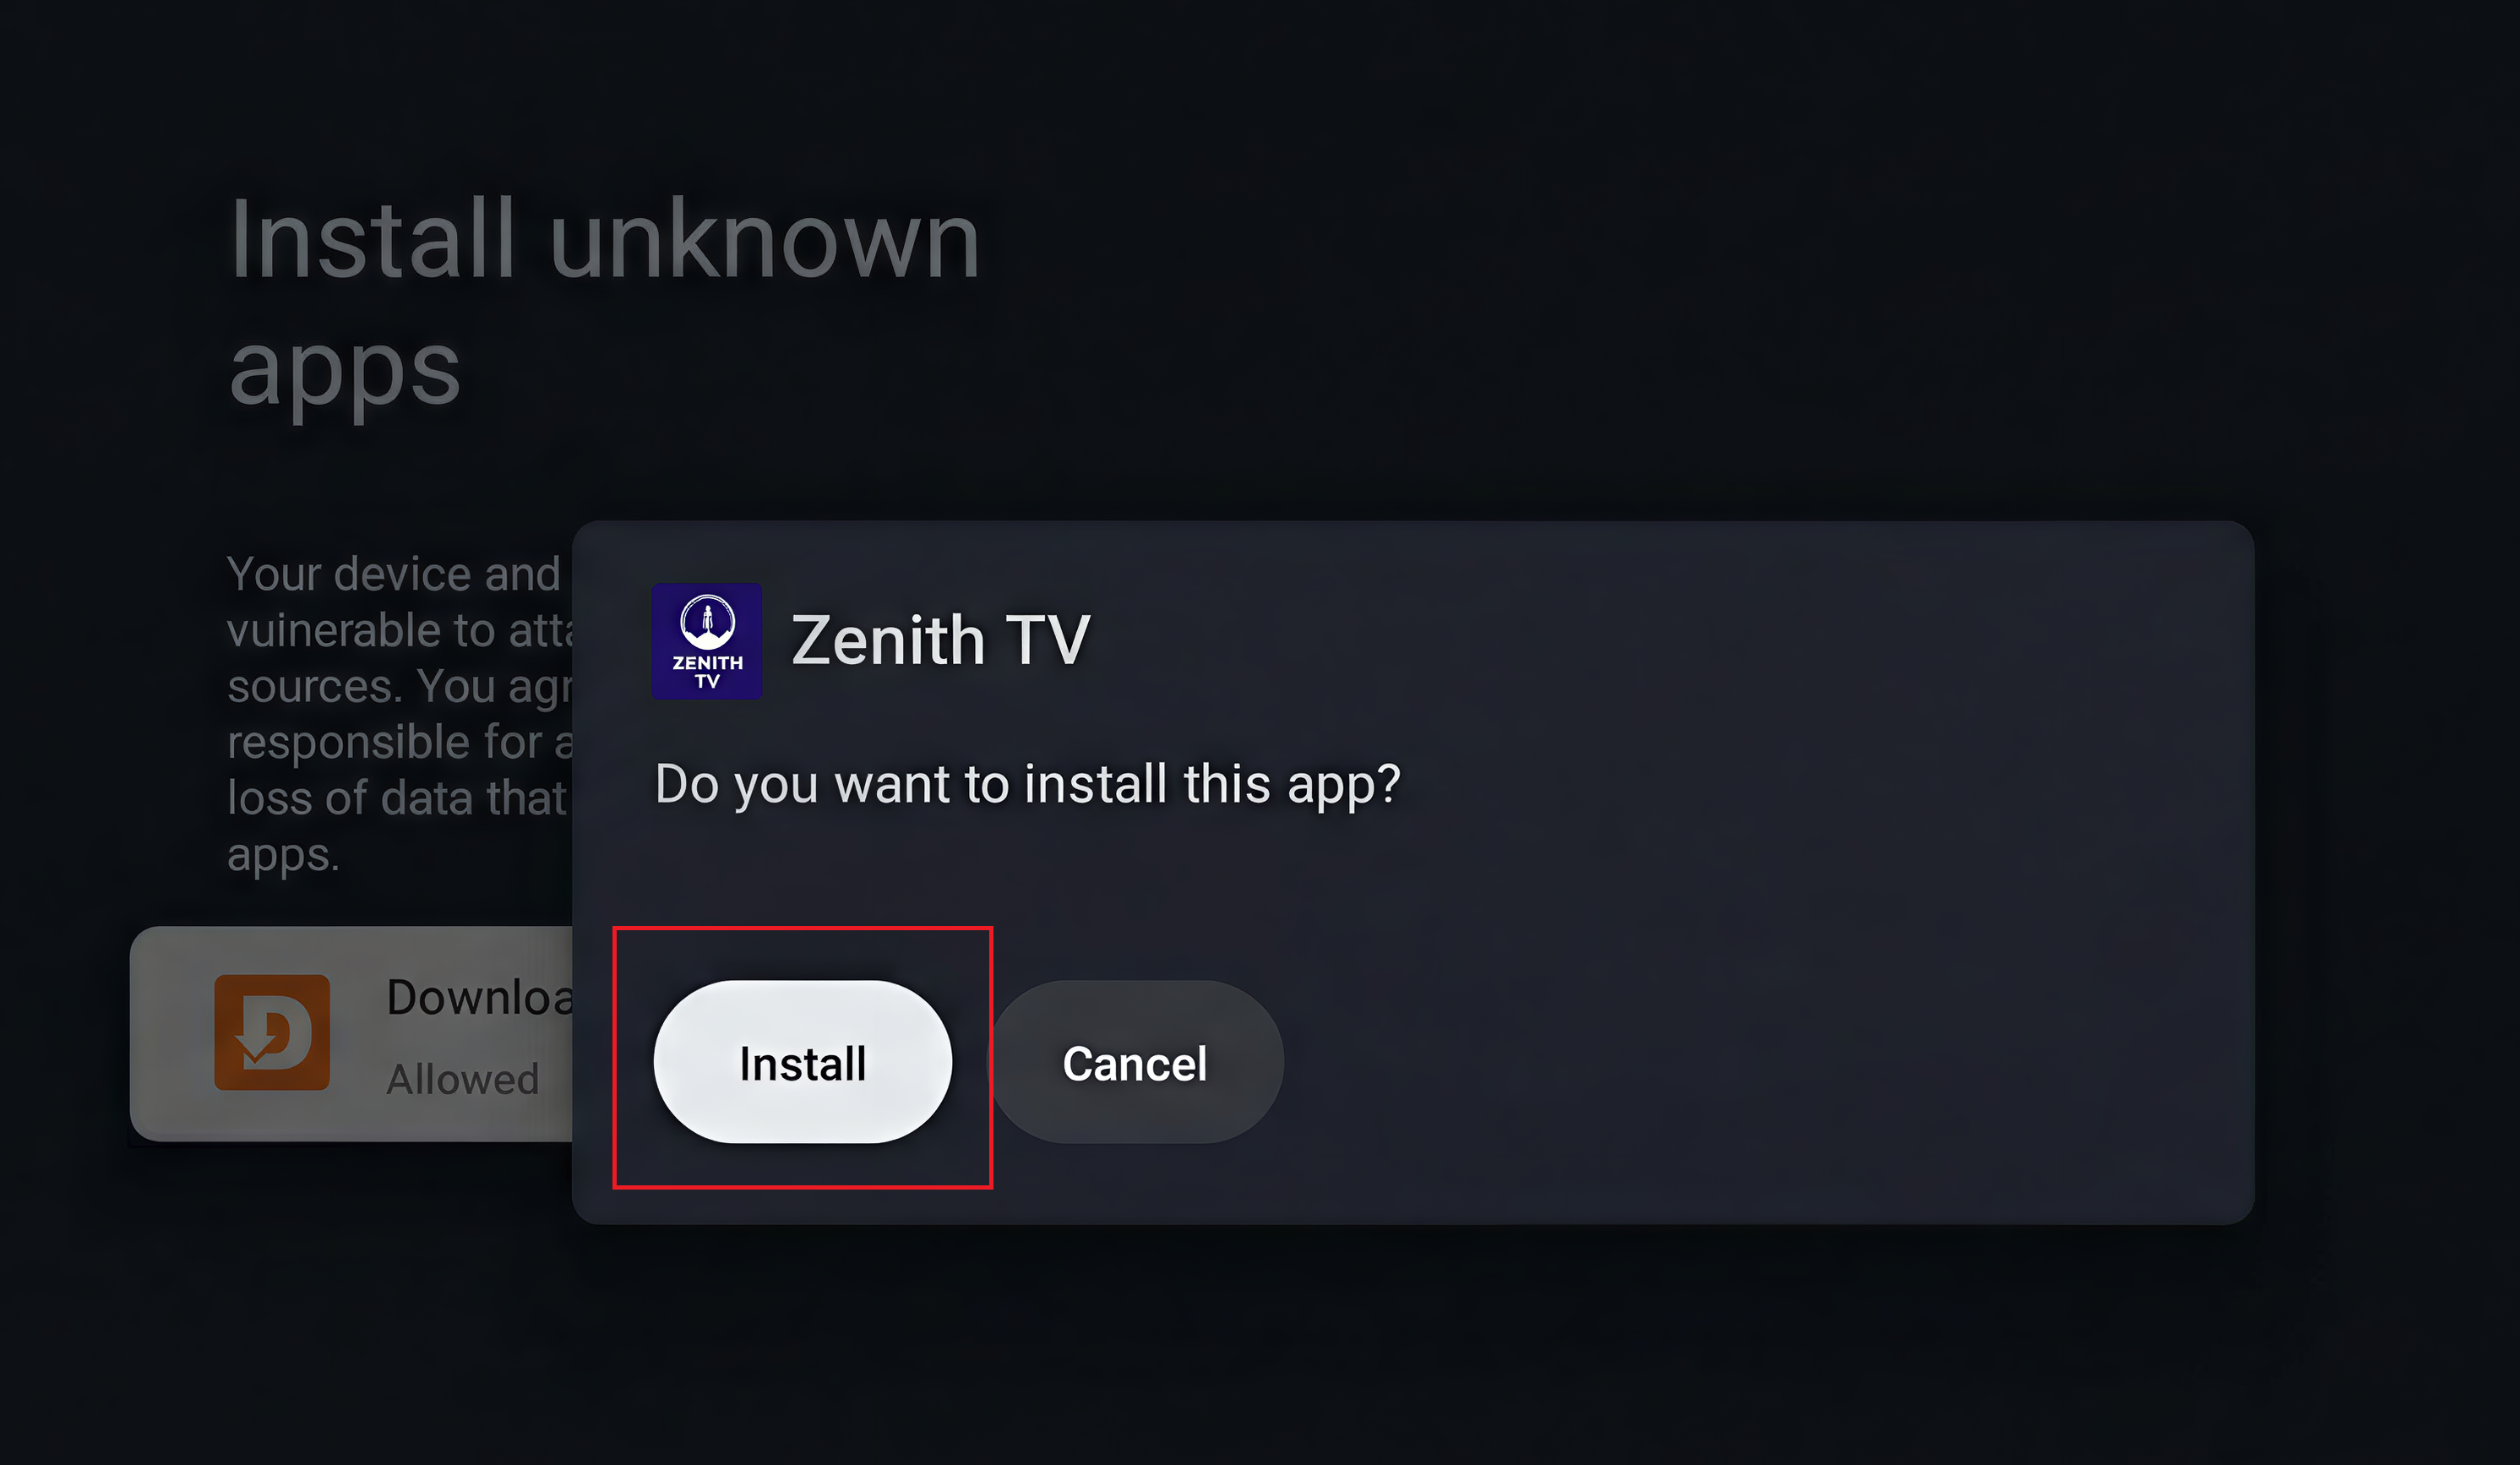
Android Box Installation Block

Android box Authorize Downloader

Android box Install button

6Open TiviMate and finalize the setup

After installation, open TiviMate from your home screen or application drawer.

During setup, you must select the server that was assigned to you — it is displayed below. Enter your valid credentials, then provide Playlist Name only if you wish (optional). Wait for the app to load content.

If your ID consists only of lowercase letters and numbers (e.g., 7rgenm8h), your assigned server is the Secondary Server.
Loading your server...

Congratulations! TiviMate is now ready to use on your Android box.

When to use TiviMate Click to view recommendations

Zenith TV's intelligent installation assistant remains the recommended primary method for configuring your service. This TiviMate is an additional option for testing a different interface.
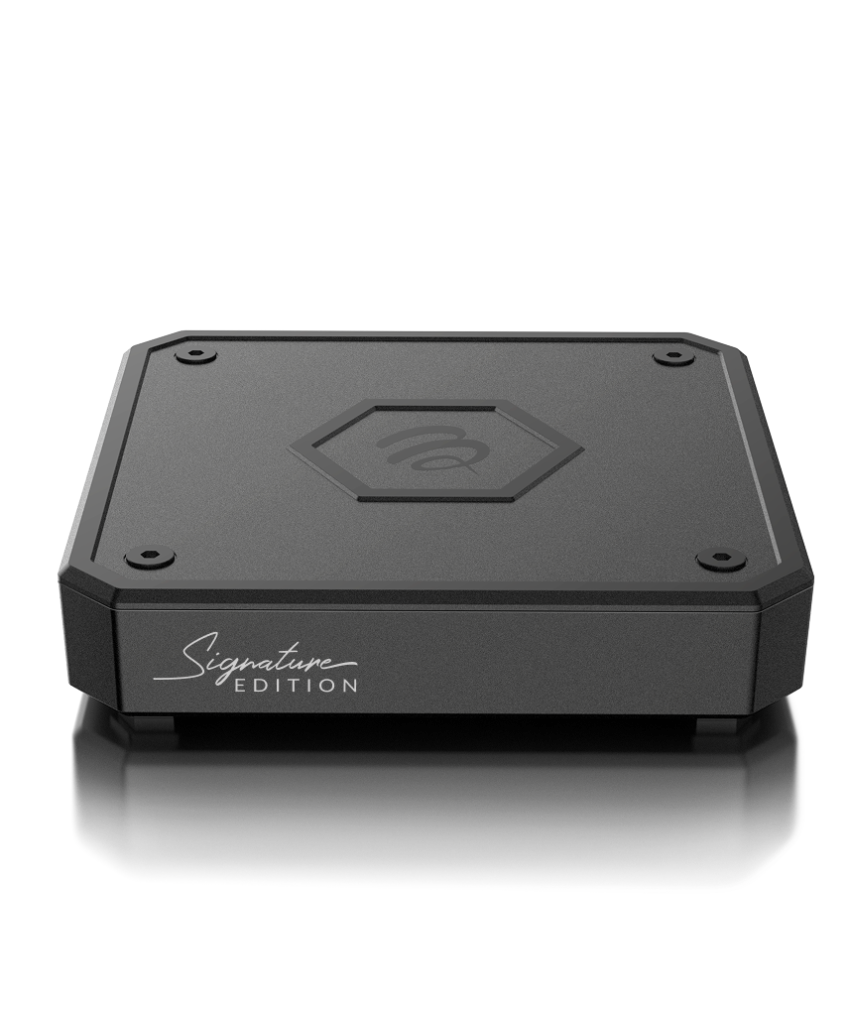
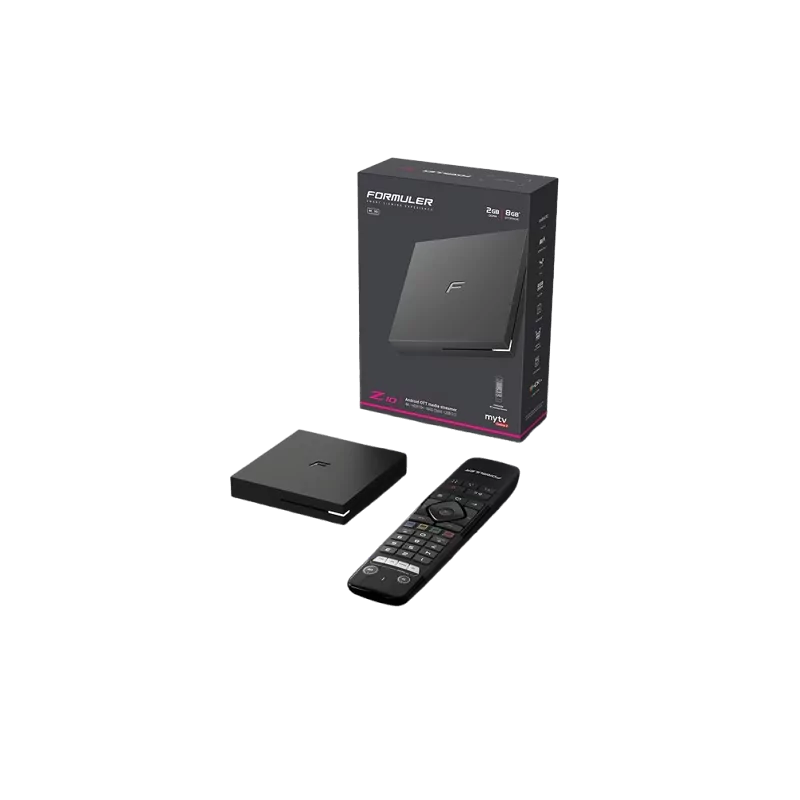
You don't have a compatible device?

Our recommendations

BuzzTV B5 Series

Budget choice
BuzzTV B5 Series Buy
The device does not come with the subscription.

Formuler Z10

Economic Choice
Formuler Z10 Buy
The device does not come with the subscription.

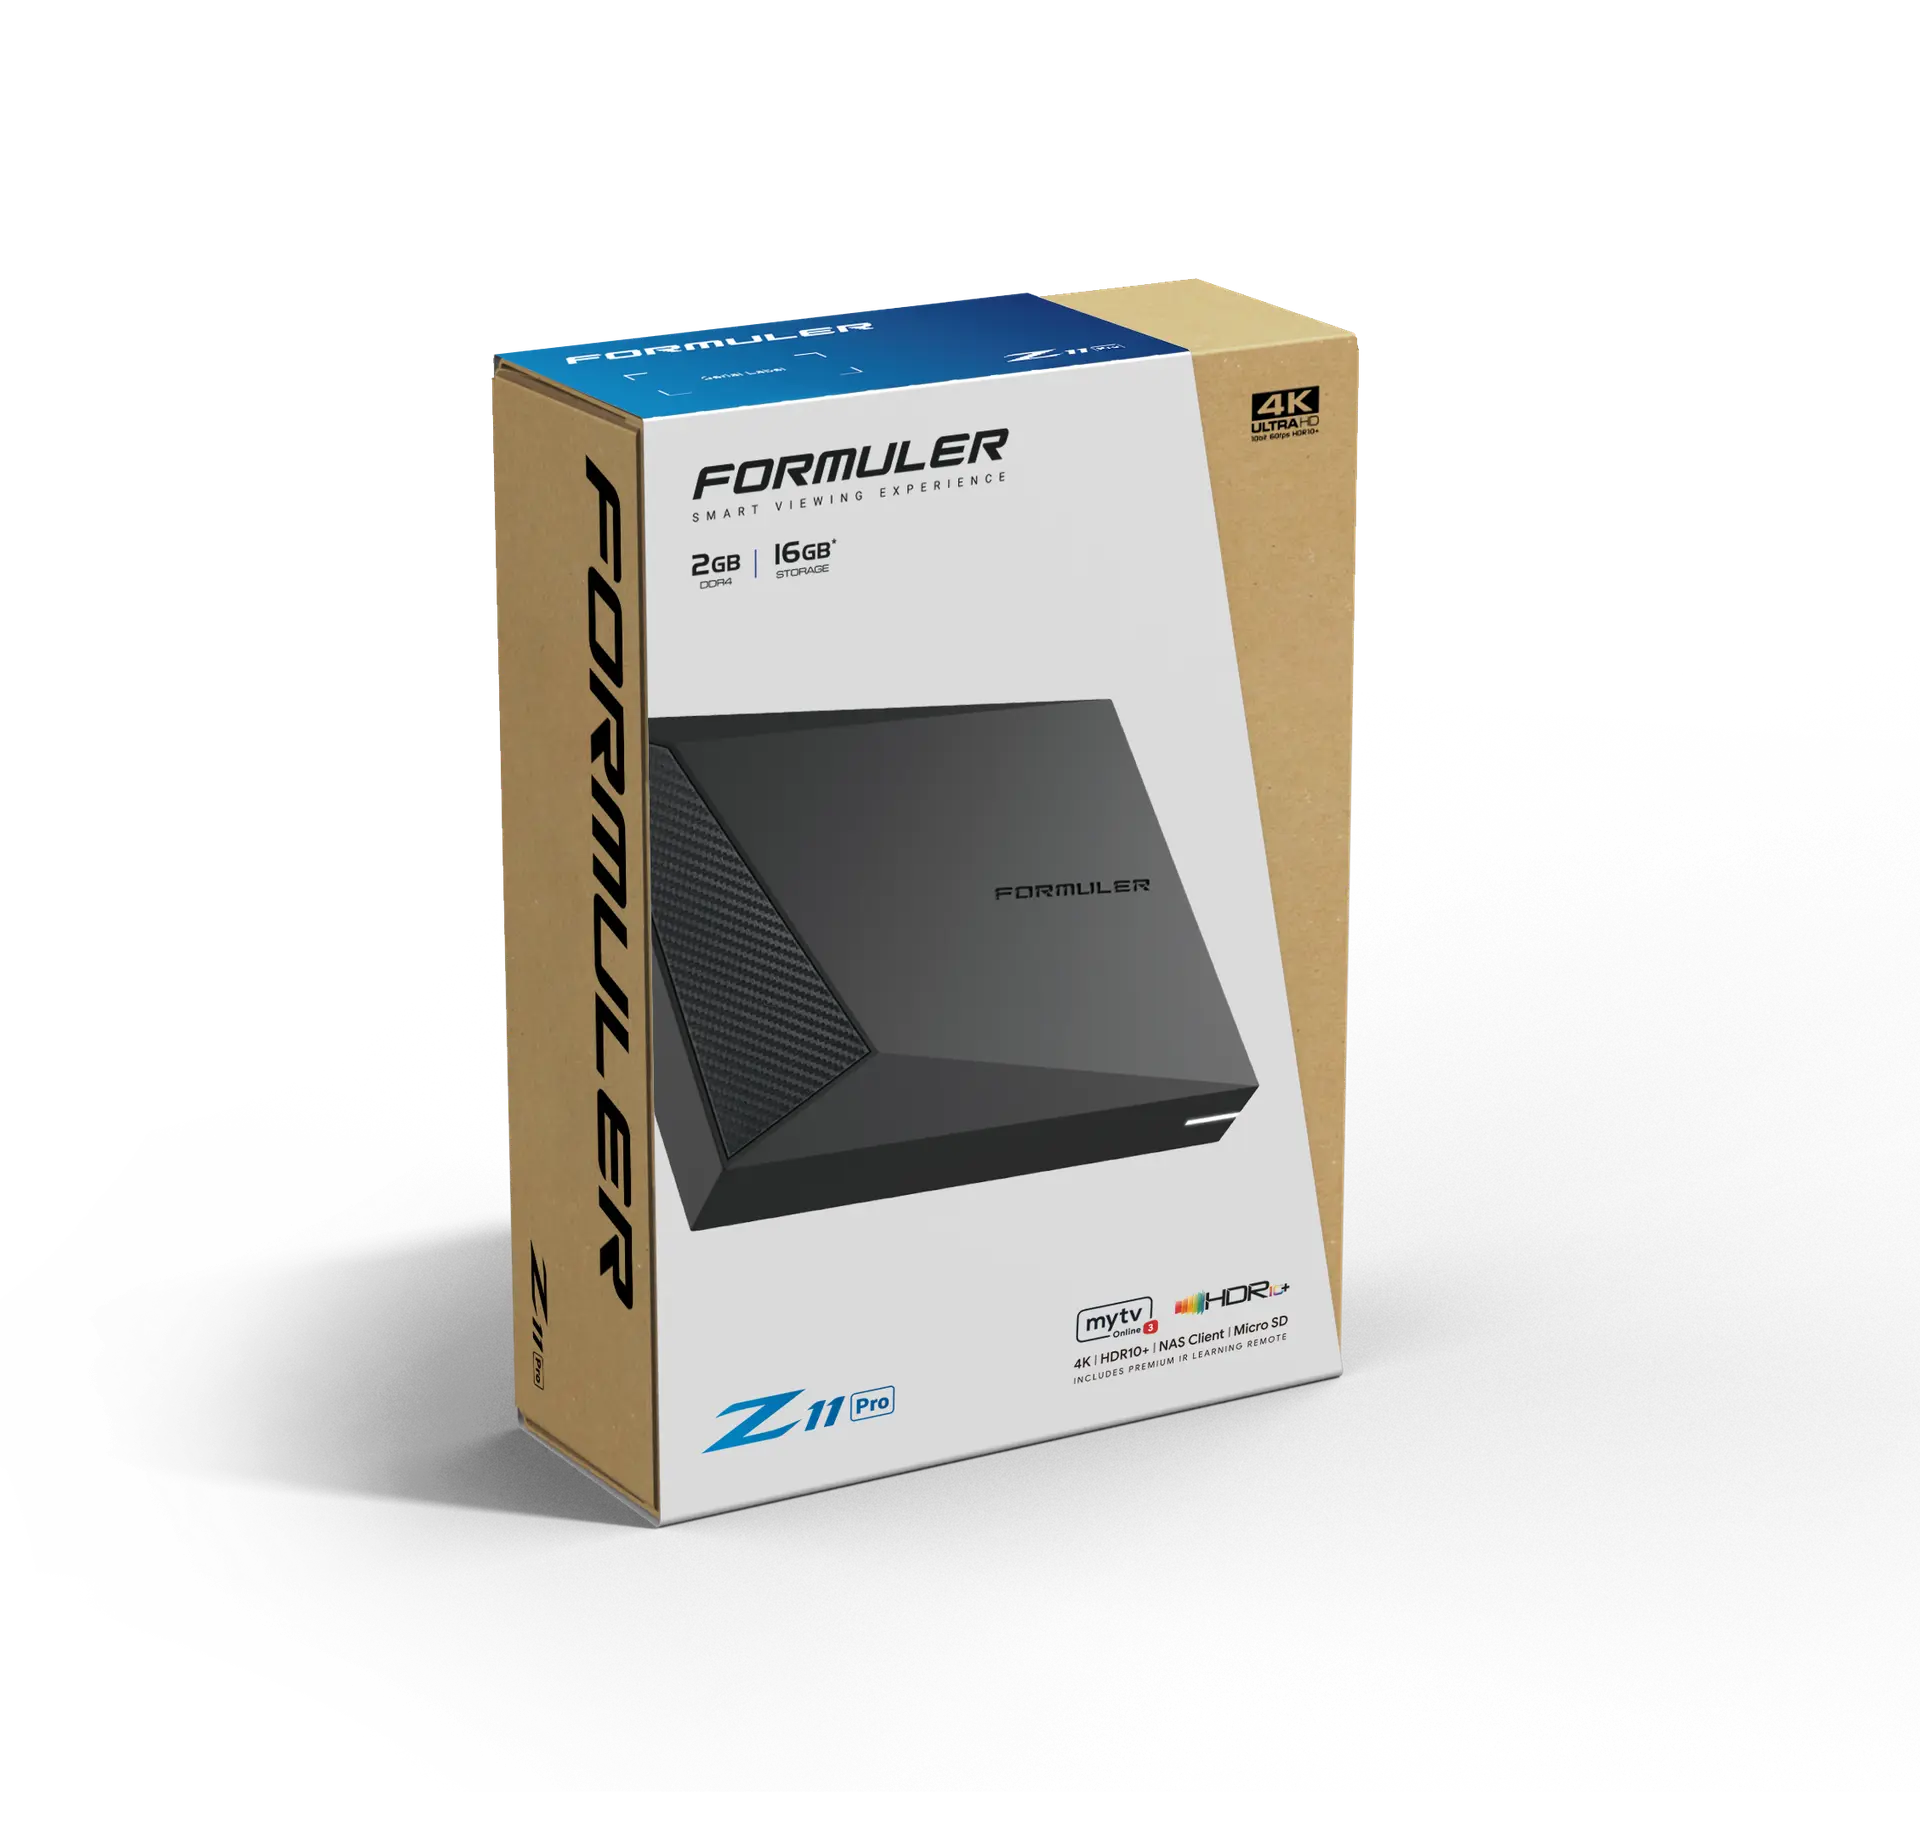
Formuler Z11 Pro

Best choice
Formuler Z11 Pro Buy
The device does not come with the subscription.
For your information: Some devices like the Google Streamer, Chromecast, Nvidia Shield, and other Google-certified Android boxes might make manual app installation more complicated in the future. For now, there is still little official information and the situation continues to evolve. The recommended devices above were carefully selected because they are reliable, performant, and better suited for this type of use. More info →
Tip: avoid Firestick 4K Select (Vega OS) — not compatible with third-party app installation.

FAQ - Frequently asked questions

All you need to know about Zenith TV.
How does our service work?

Our service gives you access to over 20,000 live channels and 100,000+ movies & series (VOD), available for streaming on all your devices (TV, smartphone, tablet, computer, etc.).

👉 Here's how it works in 3 easy steps:

  1. Consult the guide : use our intelligent installation assistant to find the application and follow the steps for your device.
  2. Placing an order : choose a free trial or a subscription adapted to your needs.
  3. Enjoy Zenith TV Receive your login details by email, log in and start watching your channels, films and series straight away.

In short: easy installation, instant access and fast, friendly customer support!

Do you offer a free trial?

Yes, we offer a free trial available every day directly on our site. Take advantage of this opportunity to test our service before subscribing! Click here to go there.

Which countries are available for channels?

Our catalog features all channels from Quebec and Canada, as well as all American channels.

On top of that, you benefit from a comprehensive international selection: France, UK, Italy, Spain, Maghreb, Latin America, Asia and many more.

Whatever your tastes or origins, you'll find your favorite channels in our service!

Which devices are compatible?

At Zenith TV, we support a wide variety of devices so you can enjoy your favorite content wherever you are. Whether you're using a phone, a tablet, a Firestick, a Smart TV, a Apple TV, a Roku, a ChromeCast or any other compatible device, we're here to provide you with a smooth, hassle-free streaming experience.

Recommended internet speed?

We recommend an internet speed of at least 40 Mbps to avoid interruptions. If you still have doubts, try for 24 hours free of charge.

Can I use my subscription abroad?

Yes, as long as you have a stable Internet connection, you can use your subscription anywhere in the world. However, some countries may require the use of a VPN to access the service due to geographical restrictions or local limitations.

Can I use several devices with one subscription?

Yes, depending on the subscription you choose, you can use the service on multiple devices. With a single connection, you can install the subscription on several devices, but only one device can be used at a time.

If you want to use several devices simultaneously, you can choose a subscription with 2, 3, 4 or 5 connections. The price will adjust according to the number of connections selected. Add the subscription to your shopping cart to see the final price.

How long does it take to receive my subscription?

We will give you access to your subscription between 5H and 24H after payment. Delivery times may vary during weekends, vacations and special offers.

Payment methods available ?

Payment methods may vary by country and other factors. To see the exact options available, simply add the product to your cart and proceed to checkout.

In most cases, we accept credit card payments, and sometimes PayPal is also available depending on the situation.

Do you offer refunds?

Yes, we have a 30-day refund policy. We will first do our best to help you resolve any issues. However, if no solution is found even after our assistance, you can get a full refund. More details on our refund policy by clicking here.

Zenith TV Gift Card

🎁 Give the perfect gift. Valid on all our subscriptions, without expiration.Ideal for enjoying your content freely.

For immediate use Send by email No deadline Flexible upright
$ 25 - 200
Offer a gift card
Need help? Contact support

Questions about gift cards

Find out all about the use and conditions of Zenith TV gift cards.
How do I use my Zenith TV gift card?

To redeem your gift card, visit our dedicated article which explains the process in detail. by clicking here.

Can I use several gift cards for a single purchase?

Yes, you can use several gift cards for the same purchase. Simply enter the codes one by one at checkout.

Can the gift card be used for all Zenith TV subscriptions?

Yes, gift cards can be used for all our subscriptions, regardless of the number of connections or duration.

Does the gift card expire?

Our gift cards never expire. So you can take as long as you like to use them.

Can I exchange my gift card for cash?

No, gift cards cannot be exchanged for cash. They are only valid for purchases of Zenith TV services.

What should I do if my gift card doesn't work?

If you have any problems using your gift card, please contact our customer support via email or Facebook. We'll be happy to help.

How do I check my gift card balance?

To check the remaining balance on your gift card, log in to your account and access the "My Gift Cards" section in the "My Account" tab.

OUR TESTIMONIALS

What our customers say about our services

Impeccable service. I haven't had a disconnection since I bought a subscription despite my low internet speed. Also a big plus for the catalog of films and series!

I bought a subscription mainly to watch soccer and was completely satisfied. Fast and courteous customer service and helped me log in the first time.

This is the first time I've used a service like this, and I'm quite impressed. It has the entire Netflix movie catalog as well as all other providers. No need to pay for each one separately anymore!

Lots of choice of films and series as well as channels. I'm really satisfied, considering the price. The only downside is the lack of certain Quebec films, but apart from that everything's great!

Canada CAD Canadian Dollar
United States USD US Dollar
European Union EUR Euro
Switzerland CHF Swiss Franc
CAD CAD
Updating prices for your region...
One moment please.